Plugins · Synths, FX & mixing
The Best Plugins for Drum and Bass: What We Actually Use
Every plugin below is one we actually use in our own drum and bass tutorials, with a screenshot from our footage and a link to the lesson where you can watch it work. No rankings and no prices, and plenty of free and stock options.
Part of our how to make drum and bass guide: this page lists the tools behind the sound design and mixdown steps.
Quick answer
What are the best plugins for drum and bass?
The best plugins for drum and bass are the ones you learn properly. In our tutorials that means one wavetable synth (Vital, which has a free version, or Serum / Serum 2), your DAW’s stock EQ, compressor, saturator and utility, plus a few specialists: OTT for multiband compression, GClip for soft clipping and a precise EQ such as Pro-Q 3.
- VitalWavetable synth with a free version. Our go-to for neuro, roller and foghorn basses.
- Serum 2 and SerumWavetable synth. Reese basses, techy rollers and in-synth multiband processing.
- Your DAW’s stock devicesWavetable, EQ Eight, Glue Compressor, Saturator and Utility in Ableton; the Fruity plugins in FL Studio.
- OTTFree multiband compressor for bright, gritty basses.
- GClipFree soft clipper that buys your drums headroom.
- FabFilter Pro-Q 3Precise EQ for drum buses and bass shaping.
- iZotope TrashTape saturation on the drum bus.
- GullfossDynamic EQ that tames harsh drum tops.
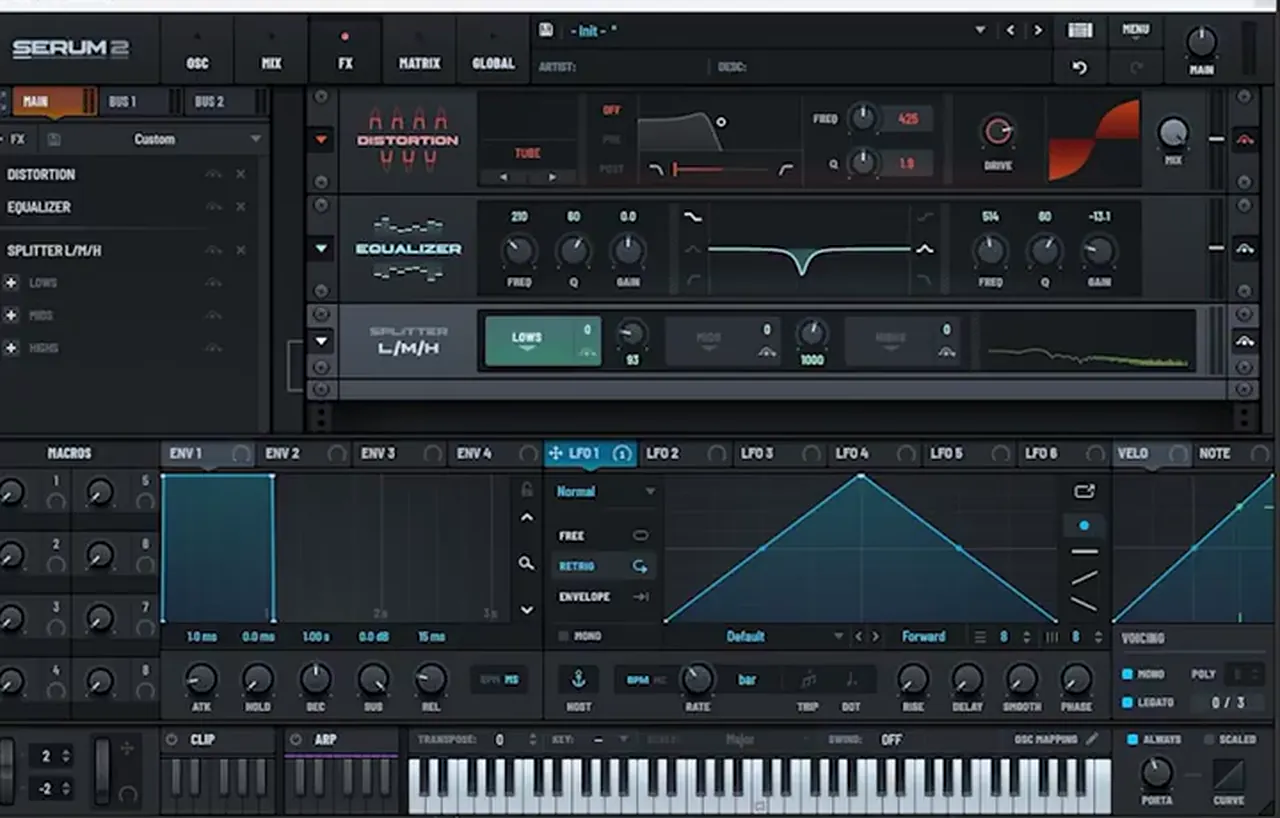
Our Serum 2 reese video: two detuned saws, then multiband processing inside the synth with the Splitter effect. It shows how far one synth and its built-in effects can take you.
What you actually need
You need a DAW, its stock plugins and one good synth. Every technique on this page can be done with stock devices plus Vital, which has a free version. The paid plugins we use save time or add a particular flavour, but none of them is required to finish a drum and bass track.
| What | In our tutorials | Free or stock option |
|---|---|---|
| A DAW | Ableton Live and FL Studio | Any DAW: Logic, Bitwig, Cubase |
| A synth | Vital, Serum, Serum 2, Ableton’s Wavetable | Vital (free version) or your DAW’s stock synth |
| EQ | Pro-Q 3, EQ Eight, Fruity Parametric EQ 2 | Your DAW’s stock EQ |
| Dynamics | Glue Compressor, Compressor, OTT | Stock compressor; OTT is free |
| Saturation & clipping | Trash, Saturator, GClip | Stock saturator; GClip is free |
| Utility & metering | Utility, a spectrum analyser, a stereo imager | Your DAW’s stock tools |
Our drum and bass mixing guide makes the same point: the videos behind it use a few third-party plugins, but Ableton’s EQ Eight, Glue Compressor, Saturator and Utility cover the core of every step. And our neuro drum and bass in Ableton tutorial builds a whole track in Ableton Live Lite with stock devices only.
1.Synths
For drum and bass bass design you need one wavetable synth with FM, filters, LFOs and built-in effects. In our tutorials that is Vital or Serum, with Ableton’s Wavetable and FL Studio’s stock synths covering chords, pads and simple basses.
Vital (free version)
Wavetable synthFree version availableUsed in 5 bass tutorials
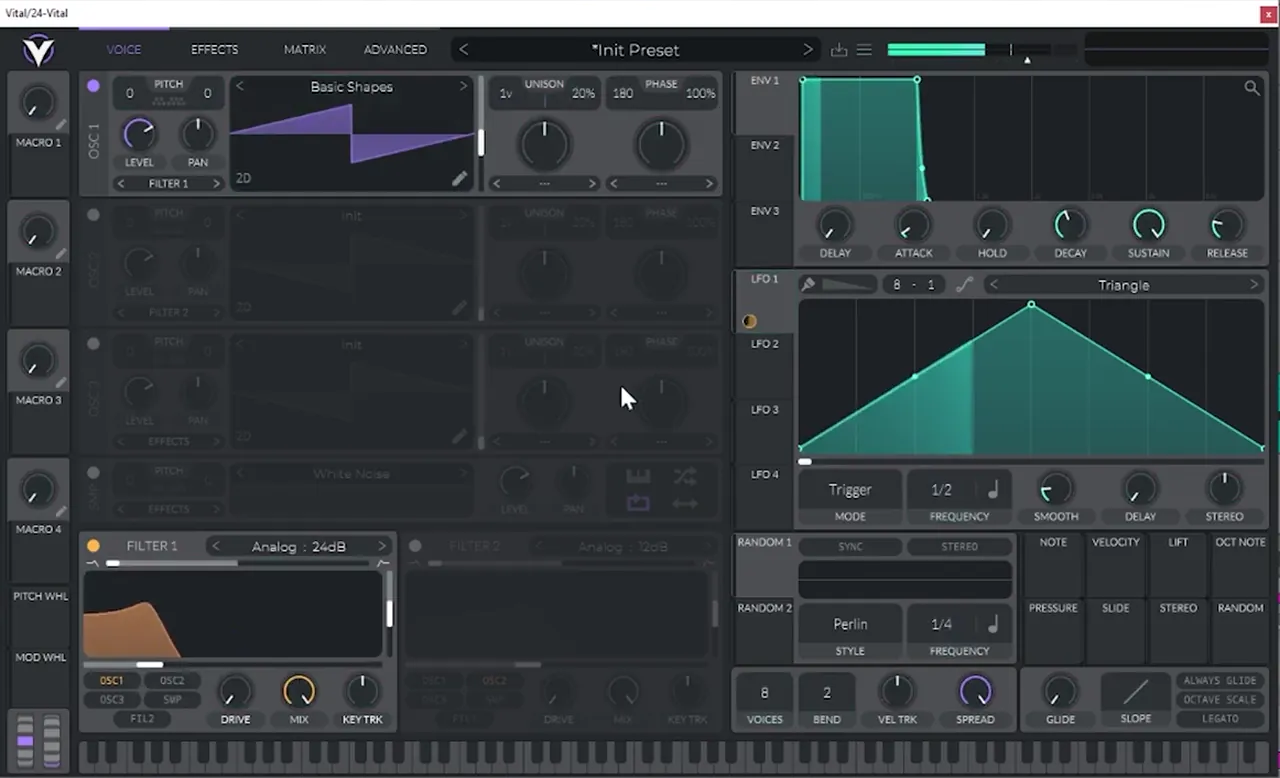
Vital is a wavetable synth with a free version, and it’s the synth we use most for bass tutorials. In our neuro stab video, Icicle builds the whole patch in Vital: a Basic Shapes saw into Filter 1 on Analog 24 dB with LFO 1 on the cutoff (watch at 2:00), FM from oscillator 2 (2:40), a third layer through Filter 2, then chorus and reverb from Vital’s own effects (4:22).
We also use Vital for a roller bass, a foghorn bass, a neuro bass inspired by Noisia and dark, minimal bass sound design. In those patches the Compressor in Multiband mode does the job of OTT inside the synth.
Listen: the finished Vital stab with chorus and reverb6 sec
Serum 2 and Serum
Wavetable synthPaidUsed in reese, techy roller, bass pattern and sub tutorials
Serum 2 is the new version of Xfer’s Serum. Our reese tutorial uses it for one feature in particular: the Splitter effect, which splits the FX chain into low, mid and high bands inside the synth (crossovers at 93 Hz and 1,000 Hz on screen, watch at 4:27). The low band gets a Utility with Mono Bass and an EQ boost (5:36); the mid band takes the overdrive, chorus and multiband compression (6:33). In Serum 1 or Vital you do that multiband split in your DAW instead.
Listen: the finished Serum 2 reese10 sec
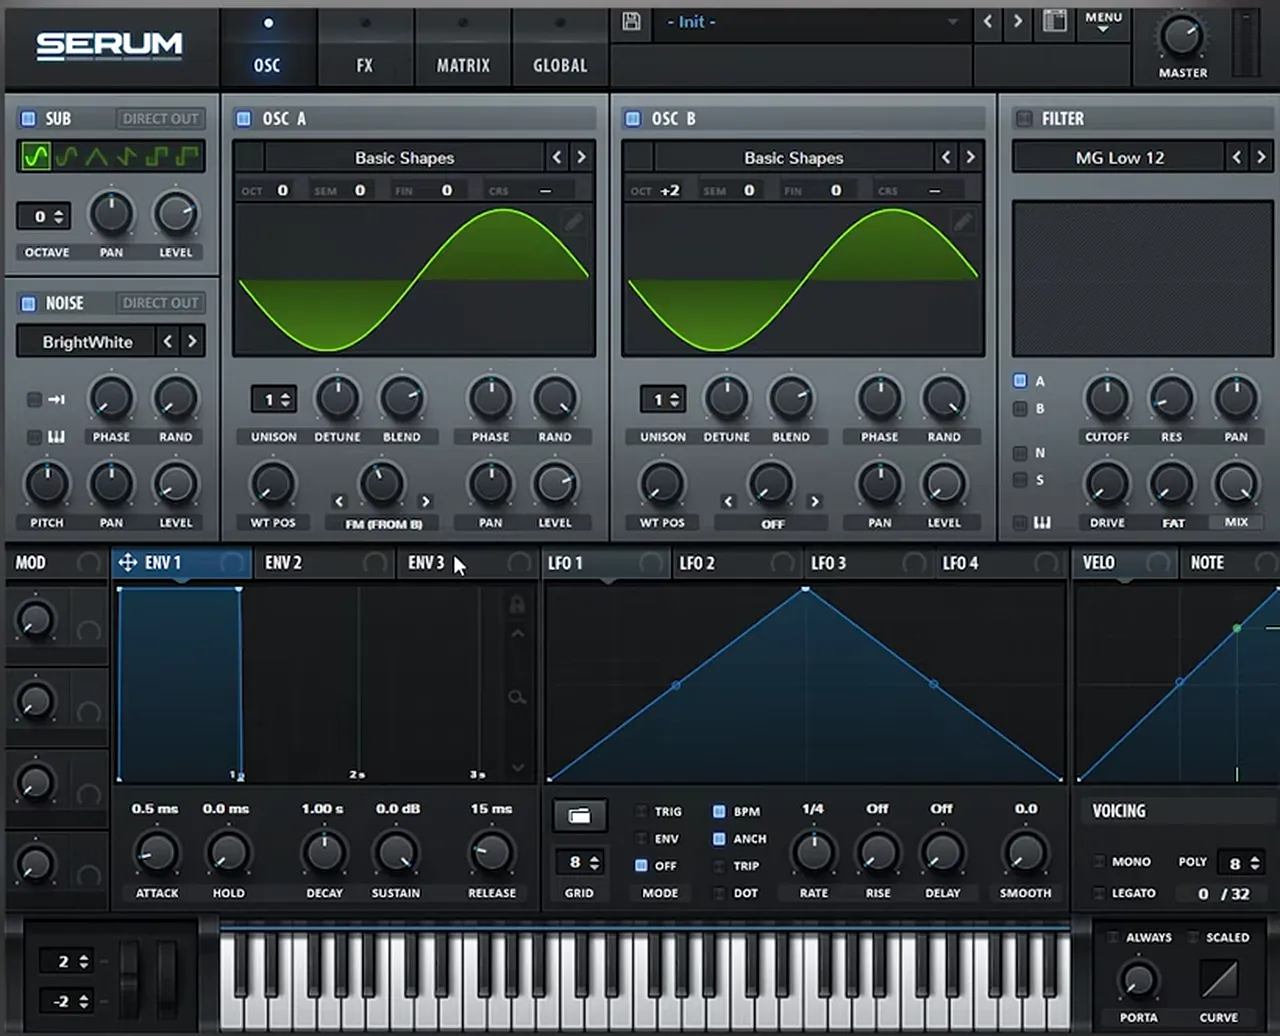
The original Serum appears in several of our tutorials too: a techy roller bass in the style of DLR and Sofa Sound, built from two sines with FM from oscillator B into A (0:18); reese recreations inspired by Mefjus and Kove in the reese guide; tone changes in our neuro bass patterns lesson; and a low-pass reese layer that helps a sub translate on small speakers (6:08).
Ableton’s Wavetable and Operator
Stock synths (Ableton Live)Used in liquid chords and jungle
You don’t need a third-party synth for chords and pads. Our lush liquid chords video uses Ableton’s Wavetable with a saw from Basic Shapes, a 24 dB Clean low pass with the resonance up and a little detune (0:47), and our jungle pad video builds its chord pad in Wavetable too (0:49). In Octavate’s jungle breakdown, the sub layer of the main bass is in Operator (50:30).

FL Studio’s stock synths
Stock synths (FL Studio)Used in liquid tutorials
Our liquid drum and bass in FL Studio tutorial builds a full drop with stock plugins only: BooBass for the mid bass, 3x Osc set to sine waves for the sub, and the Sampler for the drums. Our liquid pianos lesson writes its progression on FL Keys.
2.Drum and bus processing
For DnB drums we use saturation, a glue-style bus compressor, parallel compression and a soft clipper. GClip is free and handles the clipping; iZotope Trash, Ableton’s Glue Compressor and Drum Buss add the colour and glue in our drum bus and jungle videos.
GClip (free soft clipper)
Soft clipperFreeUsed in punchy drums and mixing
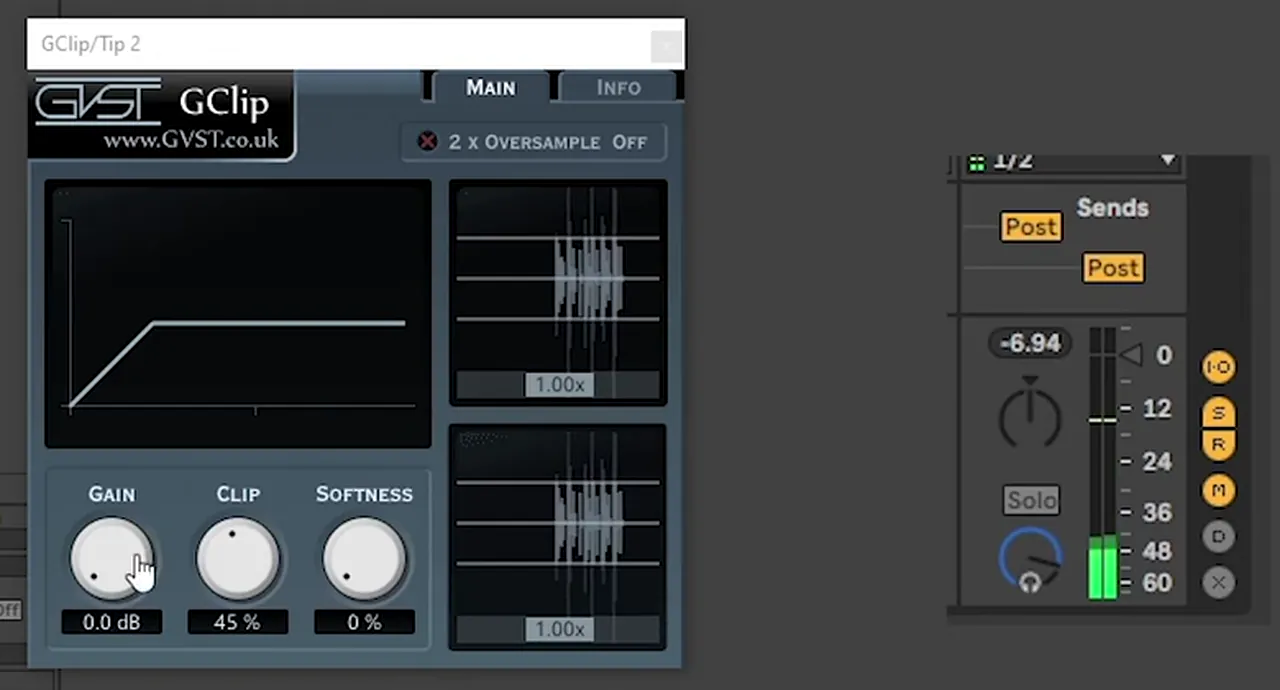
GClip is a free soft clipper. In our punchy drums tutorial the drums peak at about +4.3 dB with GClip at its defaults. Set Clip to 45% and the peak drops to −6.94 dB with almost no change in perceived loudness: more than 6 dB of headroom (watch at 4:35). Push Gain to 4.6 dB with Clip still at 45% for fatter, more aggressive drums. Any soft clipper does the same job.
Listen: drums without, then with GClip9 sec
iZotope Trash
Saturation and distortionUsed in drum bus and jungle
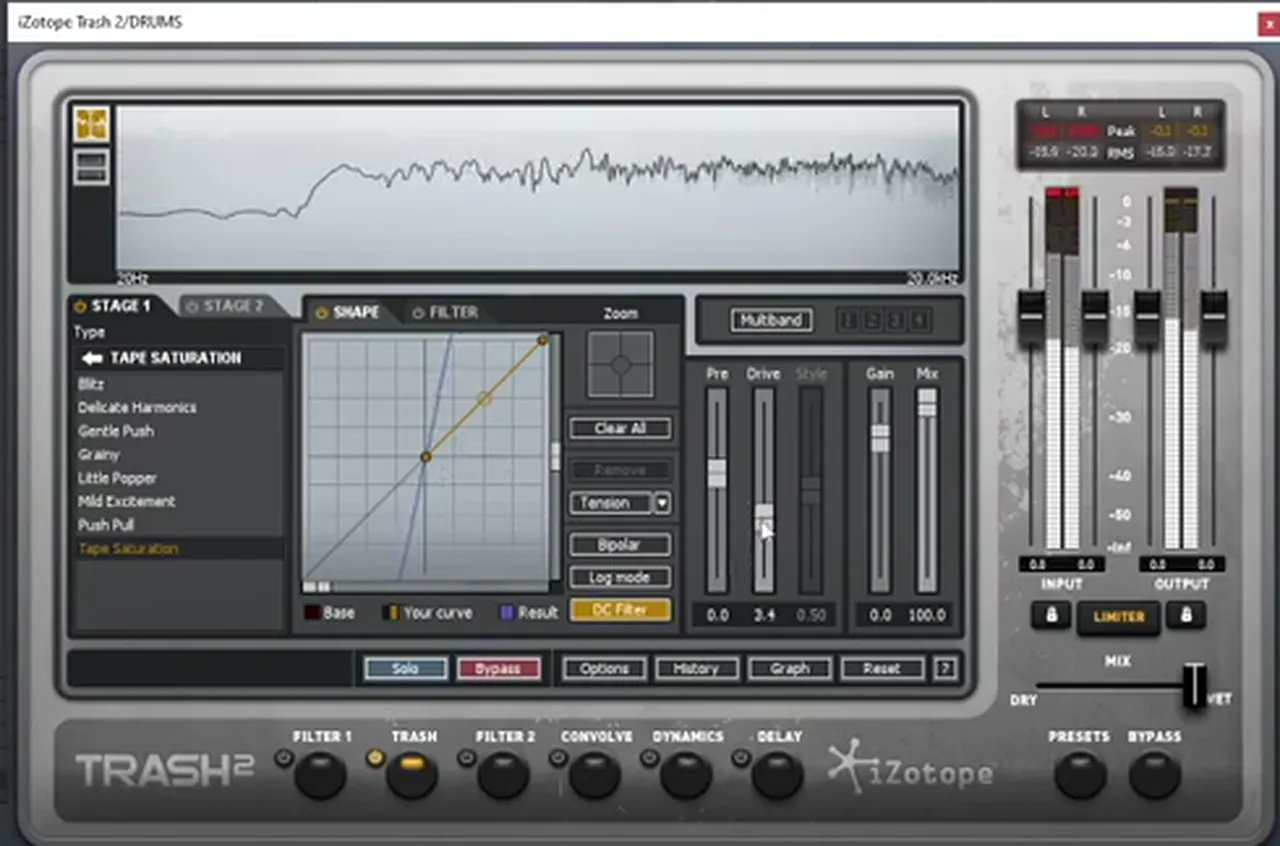
Trash is the first device on the drum bus in our drum bus video: Tape Saturation, the drive pushed up only a little (around 3.4 on screen) and no wave-shaping (2:35). Some transient is lost; the compression after it brings it back. In Octavate’s jungle breakdown it works as a multiband gate on the layered breaks, cutting the mud around 200–400 Hz while the highs stay lush (21:03).
Glue Compressor, Compressor and Drum Buss (Ableton)
Stock dynamics (Ableton Live)Used in mixing, punchy drums and jungle
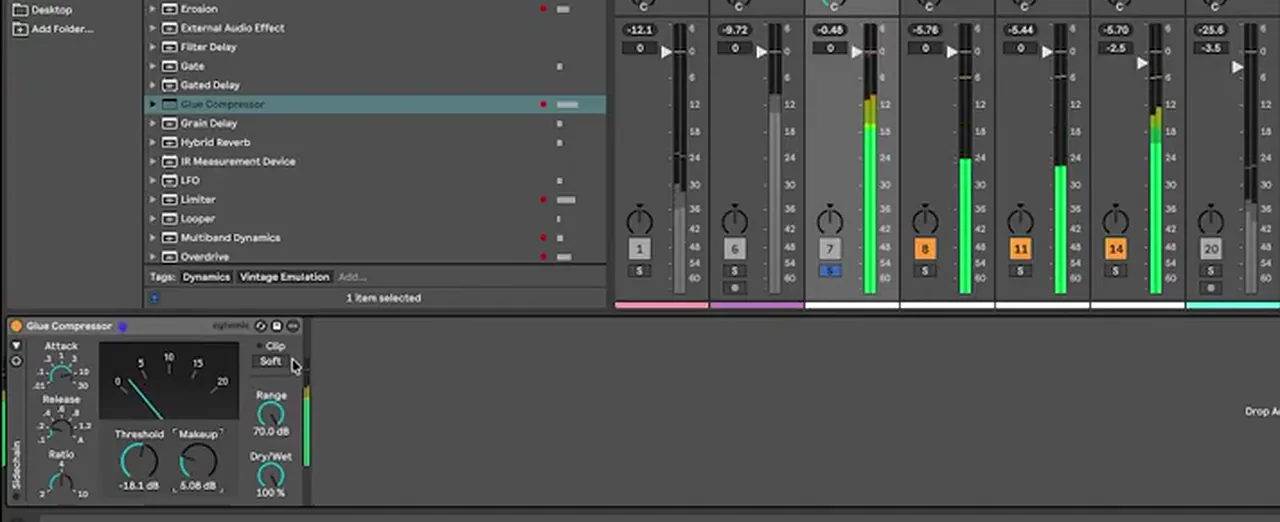
Ableton’s Glue Compressor is the bus compressor in most of our drum videos. On the drum bus: a slower attack, a faster release and a 4:1 ratio, with the threshold lowered until the meter shows about 5 dB of gain reduction on the kick peaks, then soft clip on (6:25). Our mixing drums video puts one on a Drums group at a −18.1 dB threshold with 6.08 dB of makeup (6:02).
For parallel compression, our punchy drums video uses an Audio Effect Rack with a Dry and a Compressed chain, the stock Compressor pushed to inf:1 with Makeup off (0:21). And for jungle, Octavate keep the drum bus gentle: Drum Buss on a low mix (26% on screen), then a Glue Compressor with soft clip and a touch of Saturator (27:37).
OTT (multiband compression)
Multiband compressorFree (Xfer OTT)Used in bass tutorials
OTT is a free multiband compressor from Xfer, and it turns up in almost every bass we make. Our techy roller tutorial stacks three OTTs after Serum, each at Amount 66% (3:23), and that adds a lot of level and grit, so level-match before you judge it. Ableton’s Multiband Dynamics has an OTT preset, and in Vital or Serum the multiband compressor does a similar job inside the synth.

One more from the drums world: in our drum patterns tutorial, Jon Tho programs drums in Addictive Drums and turns on No Alts so the kick hits exactly the same every time.
3.EQ, space and mixing
The core mixing tools in our videos are a precise EQ, a mid-side EQ, a utility and a way to check stereo width. We use FabFilter Pro-Q 3 and Gullfoss for specific jobs, but Ableton’s EQ Eight, Saturator and Utility do most of the work.
FabFilter Pro-Q 3
EQPaidUsed in drum bus and Icicle’s stab
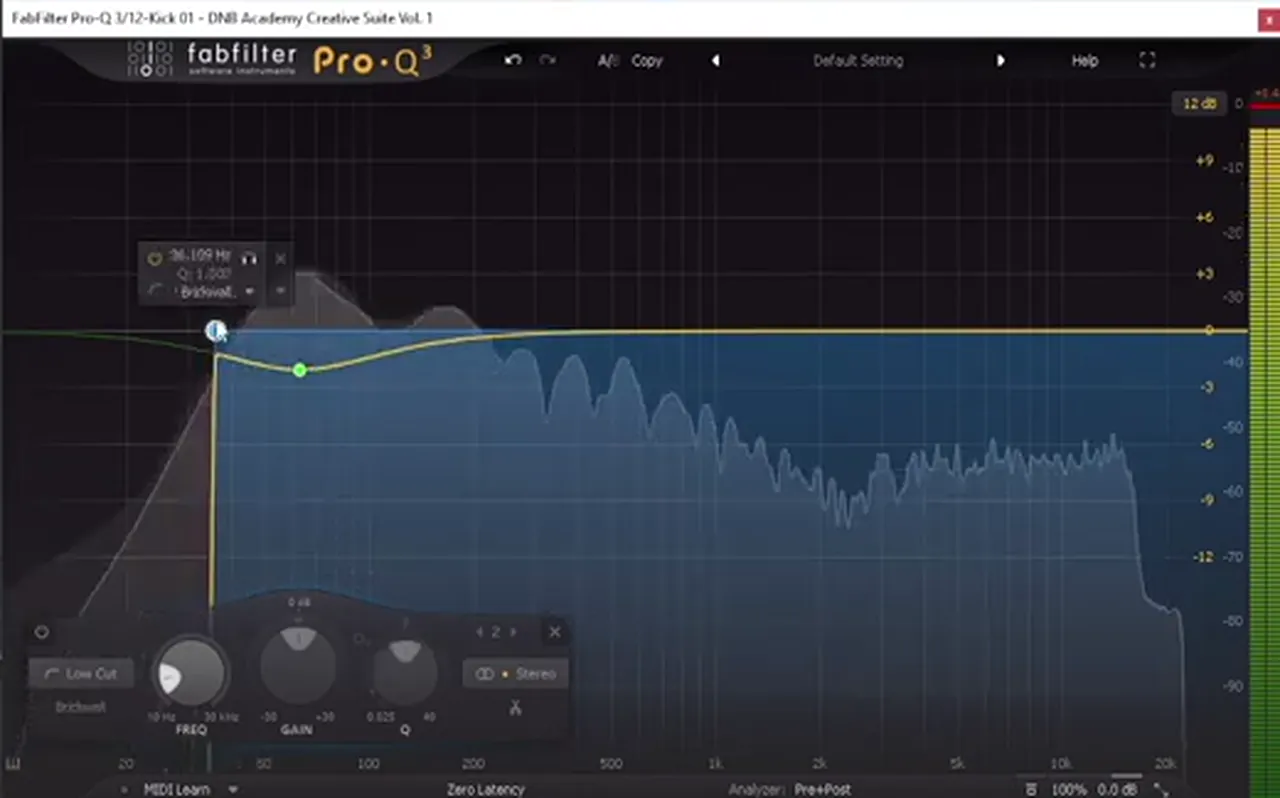
On our drum bus, Pro-Q 3 cuts the extreme lows (around 20–30 Hz) and highs (around 20 kHz) (3:57), then puts a brickwall low cut around 36 Hz on the kick to clean up what the saturation dirtied (5:22). In our neuro stab video, Icicle puts it after Vital: a steep low cut, a low-mid bell for body and a broad mid boost (4:47). Any EQ works; Pro-Q 3 is simply fast and precise.
Gullfoss
Dynamic EQPaidUsed on the drum bus
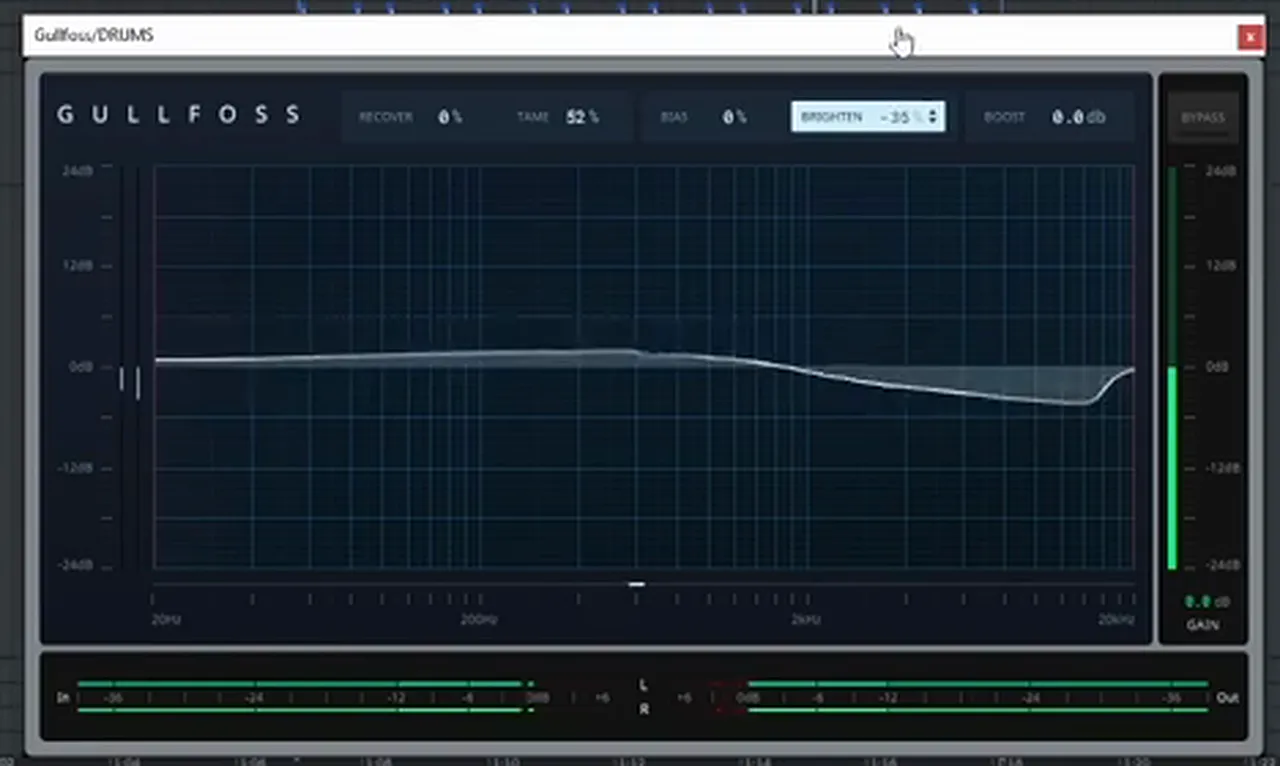
Gullfoss is the dynamic EQ on our drum bus. It removes ear-piercing crispness without dulling the drums: on screen Tame sits at 52% and Brighten is pulled below zero (8:06). Use it after the glue compression, then clip at the end of the chain.
EQ Eight and Utility (Ableton)
Stock EQ and gain (Ableton Live)Used in mixing and punchy drums
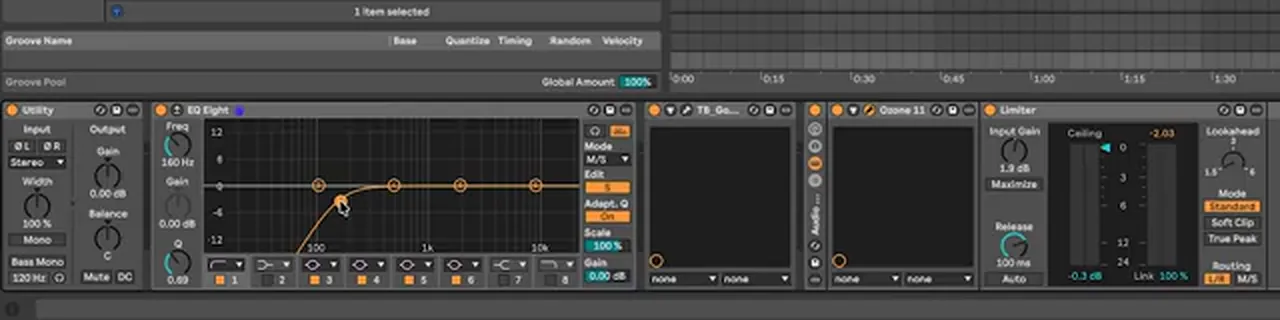
EQ Eight high-passes our tops group around 230 Hz to clear low-end rumble out of the loops (4:18). For the low end of the whole mix, our stereo video prefers EQ Eight in M/S mode, high-passing only the sides (around 160 Hz on screen) rather than a Utility’s Bass Mono (12:00). Utility itself is the quiet hero: automate its gain to duck the bass under every kick and snare (8:01), or use it as a trim for gain staging.
Saturator (Ableton)
Stock saturation (Ableton Live)Used for sub bass
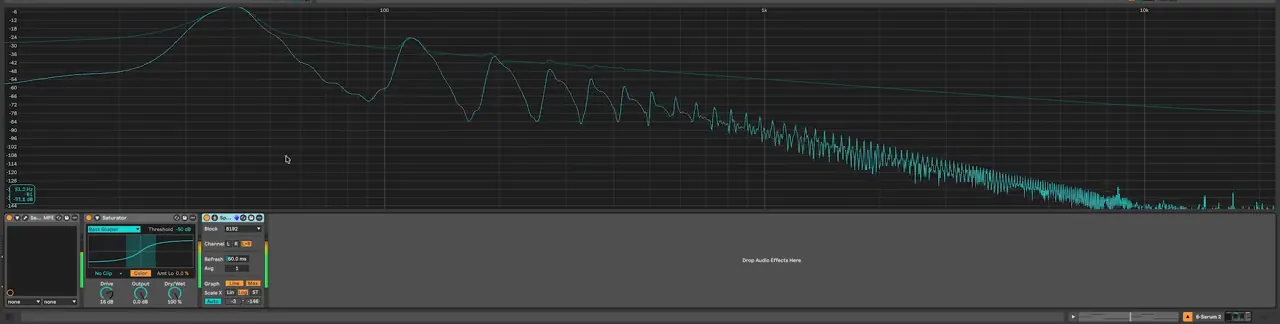
A pure sine sub can vanish on phone speakers. Our sub video puts Ableton’s Saturator in Bass Shaper mode on it, with the level compensated, and the harmonics show up straight away on the analyser; Soft Sine sounds rounder (4:51). Our DnB sub bass tutorial goes deeper.
Ozone Imager and a transient shaper
Metering and transientsUsed in mixing
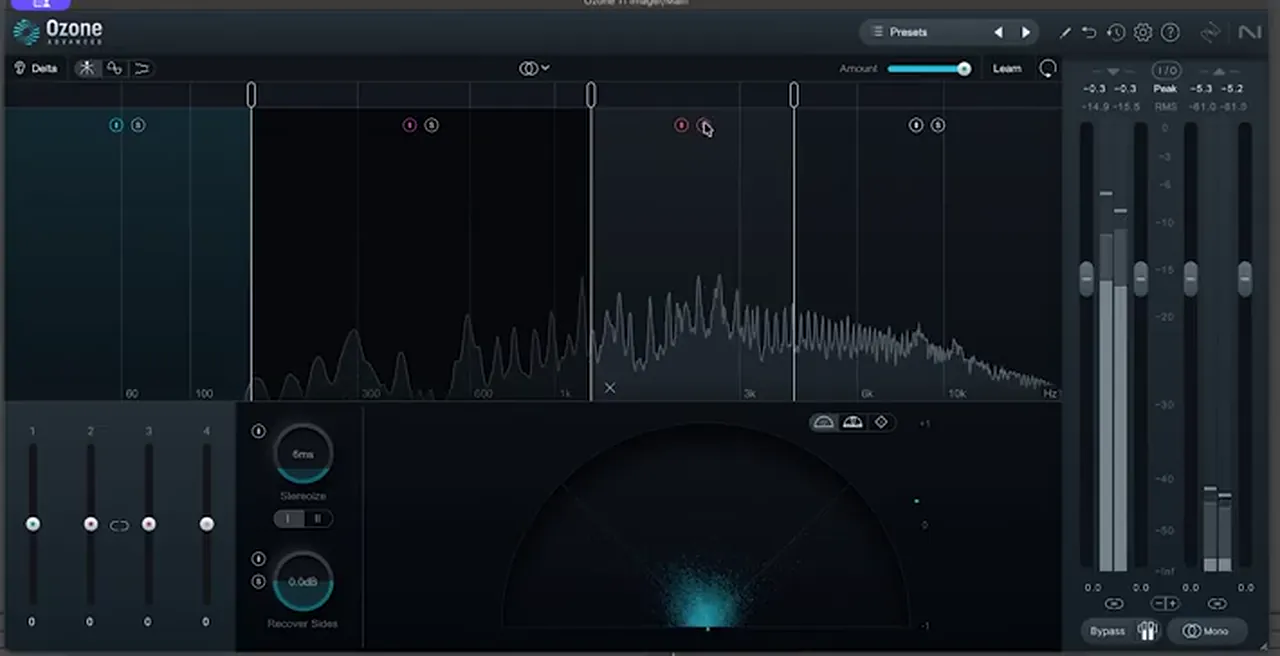
In our wide-mix video an iZotope Ozone Imager splits the mix into bands so you can check width per band. It’s used only to look, not to widen (5:30). Our mixing drums video adds a Kilohearts Transient Shaper to the tops group at only a “tiny little percentage difference” to tighten splashy loops (4:38).
Reverb, delay and texture
Space and FXStock and third-party
On the lead bus in our neuro stab video, Icicle layers a little extra reverb with FabFilter Pro-R (7:37). The stock options go a long way, though. Our lush chords video uses Ableton’s Roar (new in Live 12) for noise texture, Hybrid Reverb at 34% dry/wet (6:00), a ping-pong Delay and Redux. Our pianos video uses Fruity Delay 3 in ping-pong mode with a high-pass of about 800 Hz on the feedback, then Fruity Chorus (14:27).
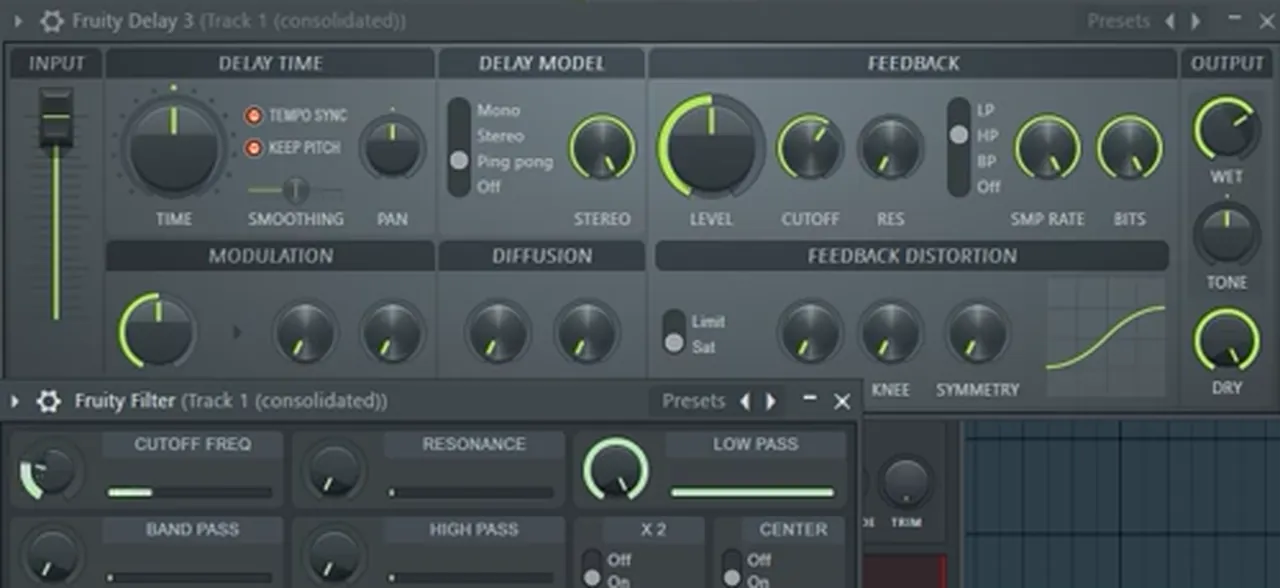
4.Stock DAW tools that are enough
Yes, stock tools are enough to make and finish drum and bass. Two of our tutorials build complete tracks or drops with stock plugins only, one in Ableton Live Lite and one in FL Studio, and our lush chords video uses nothing but stock Ableton Live 12 devices.
| Job | Ableton Live | FL Studio |
|---|---|---|
| Synths & keys | Wavetable, Operator | FL Keys, 3x Osc, BooBass |
| Drums & samples | Drum Rack, Simpler | Sampler |
| Filter | Auto Filter | Fruity Filter |
| EQ | EQ Eight, Channel EQ | Fruity Parametric EQ 2 |
| Dynamics | Glue Compressor, Compressor, Drum Buss, Multiband Dynamics | Fruity Limiter |
| Saturation | Saturator, Roar | Fruity WaveShaper |
| Space & texture | Reverb, Hybrid Reverb, Delay, Redux | Fruity Delay 3, Fruity Chorus |
| Gain & ducking | Utility | Mixer volume automation |
Which stock devices you get depends on your DAW edition, so check yours. The neuro Ableton tutorial uses only Drum Rack, Utility, Auto Filter, Reverb and Channel EQ, and the liquid FL Studio tutorial only the Sampler, BooBass, 3x Osc, Fruity Filter, Fruity WaveShaper, Fruity Parametric EQ 2 and Fruity Limiter.

5.Free plugins we use
Three free plugins appear in our tutorials: Vital (free version), GClip and Xfer’s OTT. Add your DAW’s stock devices and you have a complete free toolkit for writing and mixing drum and bass.
- Vital (free version): wavetable synth for basses, plucks, leads and pads. Start with our neuro stab bass with Icicle or roller bass tutorial.
- GClip: soft clipper for drum headroom, from our punchy drums tutorial.
- OTT: multiband compressor for brightness and grit, from our techy roller bass tutorial.
- Free presets: the Vital Starter Preset Pack gives the free synth some neuro bass, pluck and lead sounds to start from.
Every plugin at a glance
Here is every plugin named on this page, what we use it for in drum and bass and the tutorial where you can see it. “Free” and “Paid” are only shown where we are sure; check the maker’s site for current versions and licences.
| Plugin | Type | Free / paid | What we use it for | Tutorial |
|---|---|---|---|---|
| Vital | Wavetable synth | Free version | Neuro stabs, rollers, foghorns, neuro basses | Neuro stab bass with Icicle |
| Serum 2 | Wavetable synth | Paid | Reese with an in-synth multiband split | Reese bass |
| Serum | Wavetable synth | Paid | Techy rollers, reese recreations, bass variations | Techy roller bass |
| Wavetable | Synth | Stock (Ableton Live) | Liquid chords, jungle pads | Liquid DnB chords |
| Operator | Synth | Stock (Ableton Live) | Jungle sub layer | How to make jungle |
| FL Keys, 3x Osc, BooBass | Synths | Stock (FL Studio) | Pianos, sub and mid bass | Liquid DnB in FL Studio |
| GClip | Soft clipper | Free | Drum headroom without losing loudness | Punchy DnB drums |
| OTT | Multiband compressor | Free | Brightness and grit on basses | Techy roller bass |
| iZotope Trash | Saturation, multiband | – | Drum bus tape saturation, cleaning up breaks | How to mix DnB |
| Glue Compressor | Bus compressor | Stock (Ableton Live) | Drum bus glue and soft clip | How to mix DnB |
| Drum Buss | Drum processor | Stock (Ableton Live) | A gentle jungle drum bus | How to make jungle |
| Saturator | Saturation | Stock (Ableton Live) | Harmonics on a sine sub | How to mix DnB |
| FabFilter Pro-Q 3 | EQ | Paid | Bus clean-up, kick low cut, shaping basses | How to mix DnB |
| Gullfoss | Dynamic EQ | Paid | Taming harsh drum tops | How to mix DnB |
| EQ Eight | EQ | Stock (Ableton Live) | High-passing tops, mid-side low end | How to mix DnB |
| Utility | Gain and stereo | Stock (Ableton Live) | Ducking and gain staging | Punchy DnB drums |
| Ozone Imager | Stereo imager | – | Checking width per band | How to mix DnB |
| Kilohearts Transient Shaper | Transient shaper | – | Tightening top loops | How to mix DnB |
| FabFilter Pro-R | Reverb | Paid | Extra reverb on a lead bus | Neuro stab bass with Icicle |
| Roar, Hybrid Reverb, Redux | Effects | Stock (Ableton Live) | Texture and space on chords | Liquid DnB chords |
| Fruity Delay 3, Filter, Chorus | Effects | Stock (FL Studio) | Processing liquid pianos | Liquid DnB chords |
| Addictive Drums | Drum instrument | – | Programming consistent drum hits | DnB drum patterns |
Common plugin mistakes
- Buying plugins before learning stock tools. Stock EQ, compression, saturation and a utility cover the core of every mixing step we teach. Learn them first, then buy for a specific job.
- Collecting synths instead of learning one. Pick Vital or Serum and learn it deeply; the ideas carry over to every wavetable synth.
- Judging by loudness. OTT, saturation and clipping all add level. Level-match before and after, or louder will always seem better.
- Stacking OTT on everything. Three OTTs work on a techy roller bass; on a sub or a whole mix they flatten everything.
- Widening the sub. Keep the low end mono and let a mid bass or reese layer carry any width.
- Using presets without opening them. Load a preset, then switch off one module at a time to hear what each part does.
Free download
Free Vital presets to start from
Vital has a free version, so this is a no-cost way to start sound design. The Vital Starter Preset Pack is a neuro DnB starter pack with:
- Neuro bass presets
- Pluck presets
- Lead presets
- Works with the free version of Vital
It’s one of seven free sample and preset packs in DNB Academy Free Access, along with the mixing and mastering e-books and the 3‑day DnB challenge. Join 40,000+ producers in Free Access. Free account, no card needed.
Go deeper
Presets for Serum and Vital
Learning a synth is faster when you can open finished sounds and see how they’re built.
 Preset bundle · SerumMolecular Serum preset bundle100 Serum presets for funky, techy, jump up and roller styles: 35 basses, 11 pads, 11 FX, 13 synths and 30 drum sounds, plus every preset as a WAV file.
 Preset bundle · VitalALIX Vital preset bundle100 Vital presets for deep, minimal drum and bass: 50 basses, 25 drums, 10 FX, 10 leads and 5 pads, plus WAV files of every preset.
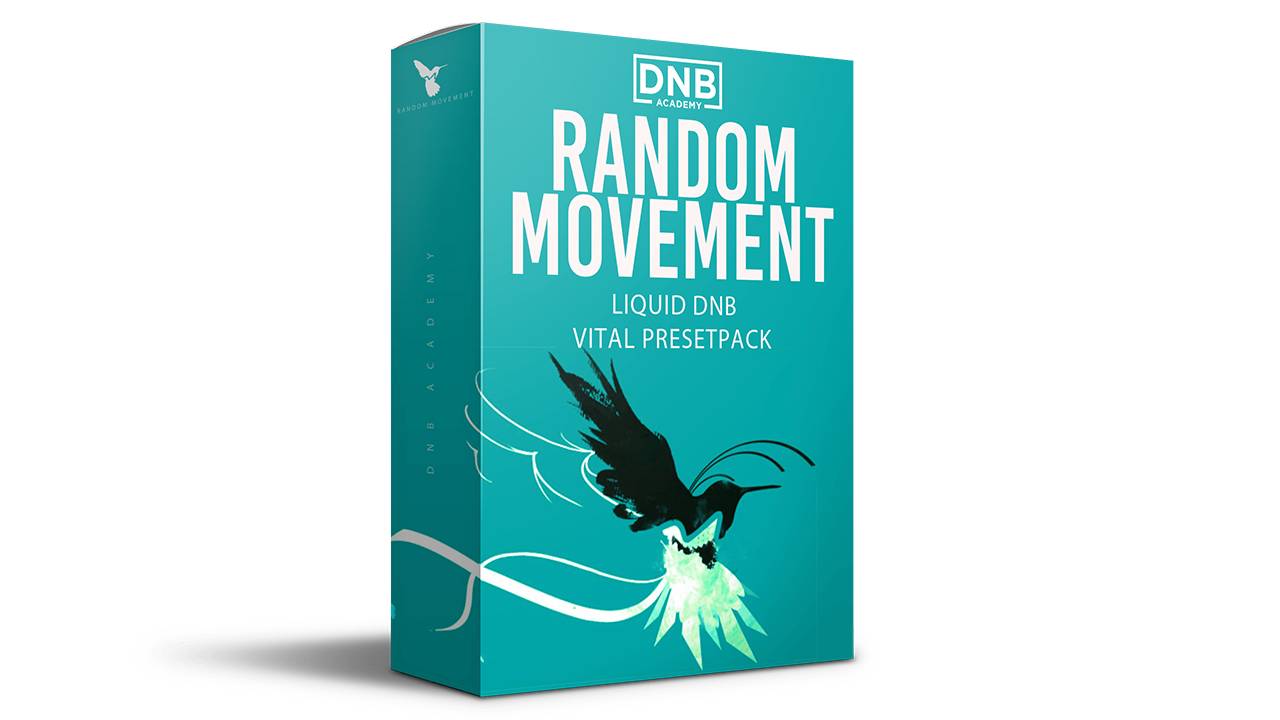 Preset bundle · VitalRandom Movement Vital presets100+ liquid funk presets for Vital, including 24 keys and 25 pads, with every preset also included as a WAV file.
Every artist course, preset bundle and sample pack is also in The Vault. Browse courses
Related tutorials
All tutorials →- Guide · MixingHow to Mix Drum and Bass: A Mixdown Guide for DnB19 min read · Guide
- Serum 2 · BassHow to Make a Reese Bass for Drum and Bass15 min read · Video + guide
- Vital · NeuroHow to Make a Neuro Stab Bass in Vital with Icicle8 min read · Video + guide
- Mixing · DrumsHow to Make DNB Drums Punchy: 3 Techniques That Work8 min read · Video + guide
More bass tutorials: every DnB bass type explained · sub bass · jump up · liquid bass inspired by Random Movement.
FAQ: plugins for drum and bass
What are the best plugins for drum and bass?
The best plugins for drum and bass are the ones you learn properly. In our own tutorials that means one wavetable synth (Vital, which has a free version, or Serum and Serum 2), your DAW’s stock EQ, compressor, saturator and utility, plus a few specialists: OTT for multiband compression, GClip for soft clipping and FabFilter Pro-Q 3 for precise EQ.
What is the best synth for drum and bass?
There is no single best synth. We use Vital and Serum most. Vital has a free version and handles the neuro, roller and foghorn basses in our tutorials; Serum 2 adds in-synth multiband processing with its Splitter effect. Pick one wavetable synth and learn it well before you buy another.
Is Vital good enough for drum and bass?
Yes. Five of our bass tutorials are built in Vital, including a neuro stab bass with Icicle, and the synth work uses only Vital’s own oscillators, filters, LFOs and effects. Vital has a free version, so it is the easiest place to start.
Do I need Serum to make drum and bass?
No. Serum and Serum 2 are in several of our tutorials, but the same ideas work in Vital, which has a free version, or in your DAW’s stock synths. Our liquid drum and bass in FL Studio tutorial makes its sub and mid bass with the stock 3x Osc and BooBass.
What free plugins are good for drum and bass?
The free plugins we use in our tutorials are Vital (free version), GClip, a soft clipper, and Xfer’s OTT, a multiband compressor. Together with your DAW’s stock devices, that is a complete free toolkit for writing and mixing drum and bass.
Can you make drum and bass with stock plugins only?
Yes. Our neuro tutorial builds a full track in Ableton Live Lite with stock devices, our liquid tutorial builds a full drop in FL Studio with stock plugins only, and our lush chords video uses nothing but stock Ableton Live 12 devices.
What plugins do you need to mix drum and bass?
An EQ (ideally one with mid-side mode), a bus compressor, a saturator, a soft clipper, a utility for gain and ducking, and a spectrum analyser. Our mixing videos use some third-party tools such as Pro-Q 3, Trash and Gullfoss, but Ableton’s EQ Eight, Glue Compressor, Saturator and Utility cover the core moves.
Where can I get free Vital presets for drum and bass?
The Vital Starter Preset Pack in DNB Academy Free Access is a neuro DnB starter pack with neuro bass, pluck and lead presets, and it works with the free version of Vital. Free Access is a free account with no card needed.
Next steps
Pick one synth, open one of the tutorials above and copy the settings exactly. Then make the sound your own and put it in a track:
Free Access
Seven free DnB sample and preset packs, including the Vital Starter Preset Pack, plus e-books and a 3-day challenge.
Get free packsThe full guide
Tempo, drums, bass, chords, arrangement and mixdown: every step of a DnB track.
Read the guide1:1 Mentorship
Personal guidance on your music from a mentor, built around your goals.
See the mentorship50,000+ producers have joined DNB Academy, and our producer Discord has 5,300+ members.