
Bass sound design · Serum
How to Make a Reese Bass for Drum and Bass
A reese bass is two or more detuned saw waves phasing against each other, which gives that rolling, growling movement. To make one: stack two saws, detune them in opposite directions, add a notch filter and some noise, then distort the mids and keep the sub mono. Here is the full build from our Serum 2 reese video, plus reeses in the style of Mefjus and Kove.
Part of our how to make drum and bass guide: this page goes deep on one of the genre’s classic bass sounds.
Quick answer
What is a reese bass?
A reese bass is a bass made from two or more detuned saw waves. Because they are slightly out of tune, the waves keep drifting in and out of phase, so the sound swells, thins out and rolls even on one held note. The name comes from Kevin Saunderson’s 1988 track “Just Want Another Chance”, released under his Reese alias; jungle and drum and bass producers picked up that detuned bassline and made it a staple of the genre.
- Two saws, pitched low.Same shape, same octave.
- Detune them apart.One up, one down, a few cents each way.
- Shape it.Notch filter, a little noise, mono with glide.
- Split the bands.Mono, clean sub; distortion on the mids.
- Add air.Soft saturation and a short reverb on the highs.
Watch our Serum 2 reese video: two detuned saws, a notch filter and noise, then Serum 2’s new Splitter effect to process the lows, mids and highs separately.
What you’ll need
- Serum 2 for the main build. The Splitter L/M/H effect we use for multiband processing is new in Serum 2.
- Serum (version 1) works for the Mefjus- and Kove-style patches, which were built in the original Serum and finished in Ableton Live.
- Or Vital, which has a free version. See making a reese in Vital below.
- A spectrum analyser (any will do) to check the phasing in the low end.
TipPlay a long, low sustained note while you design. A reese is all about movement over time, and short notes hide it.
1.Two saws, detuned in opposite directions
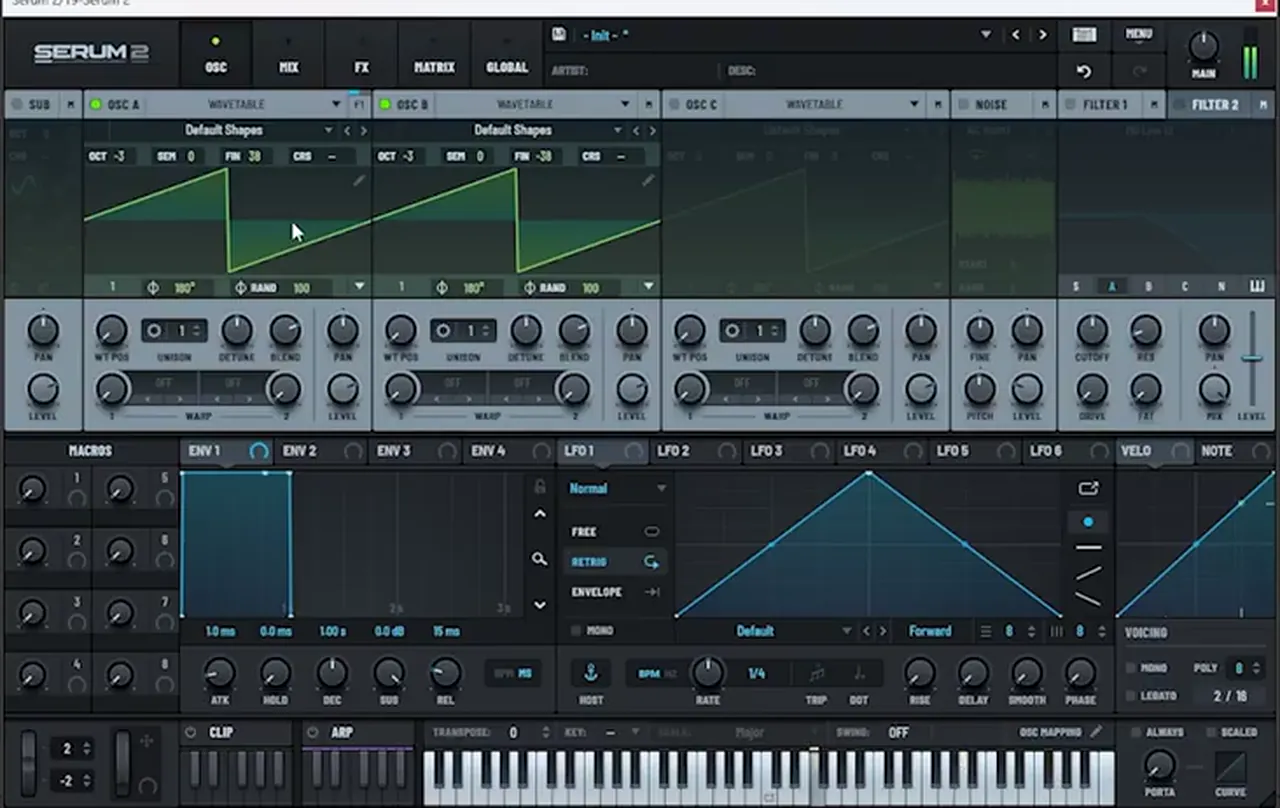
Start from an init patch. Turn on oscillators A and B with the default saw wave, drop both three octaves (OCT -3), then fine-tune one to +38 cents and the other to -38 cents. The two saws now beat against each other and you hear the classic reese roll.
Detuning in opposite directions keeps the sound centred on the right pitch while the saws phase against each other. In the video both oscillators also have their phase set to 180° with random phase at 100, which you can see on screen. On its own this is “really cool, but still obviously quite rough”, so the next steps tame it.
2.Notch filter, white noise and glide
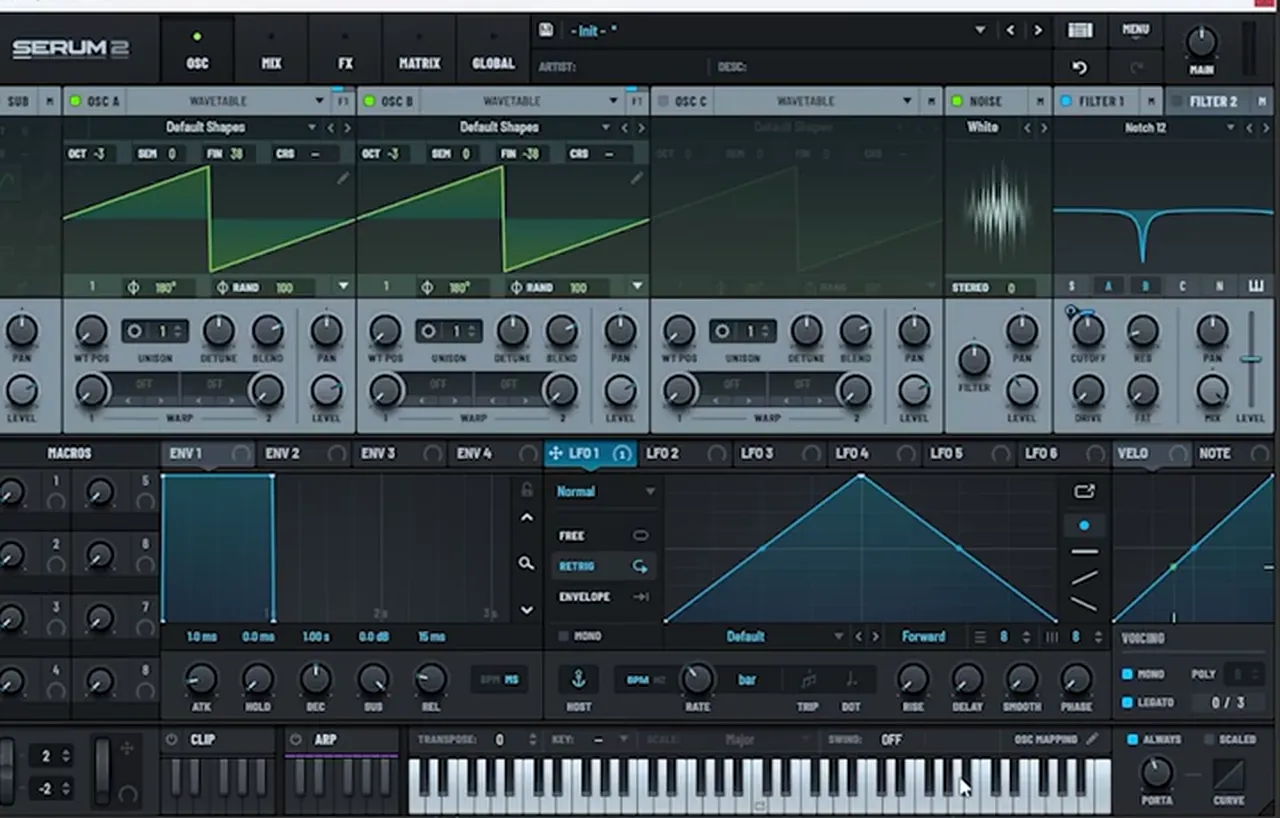
Next, add a notch filter (Filter 2 is set to Notch 12 on screen) and route both saws through it. The notch carves a hole in the spectrum; an LFO on its cutoff moves that hole around, which adds extra movement on top of the detune.
Then switch on the noise oscillator and load a plain white noise. Serum 2 has a new folder of noises, with white noise under the Color category. Pull it down low (the video lands on around 28%): it adds grit that the distortion will pick up later. Finally, set Voicing to Mono with Legato on, so the notes glide into each other, the way a reese should move in a bassline.
3.Glue it with tube distortion and a 500 Hz notch
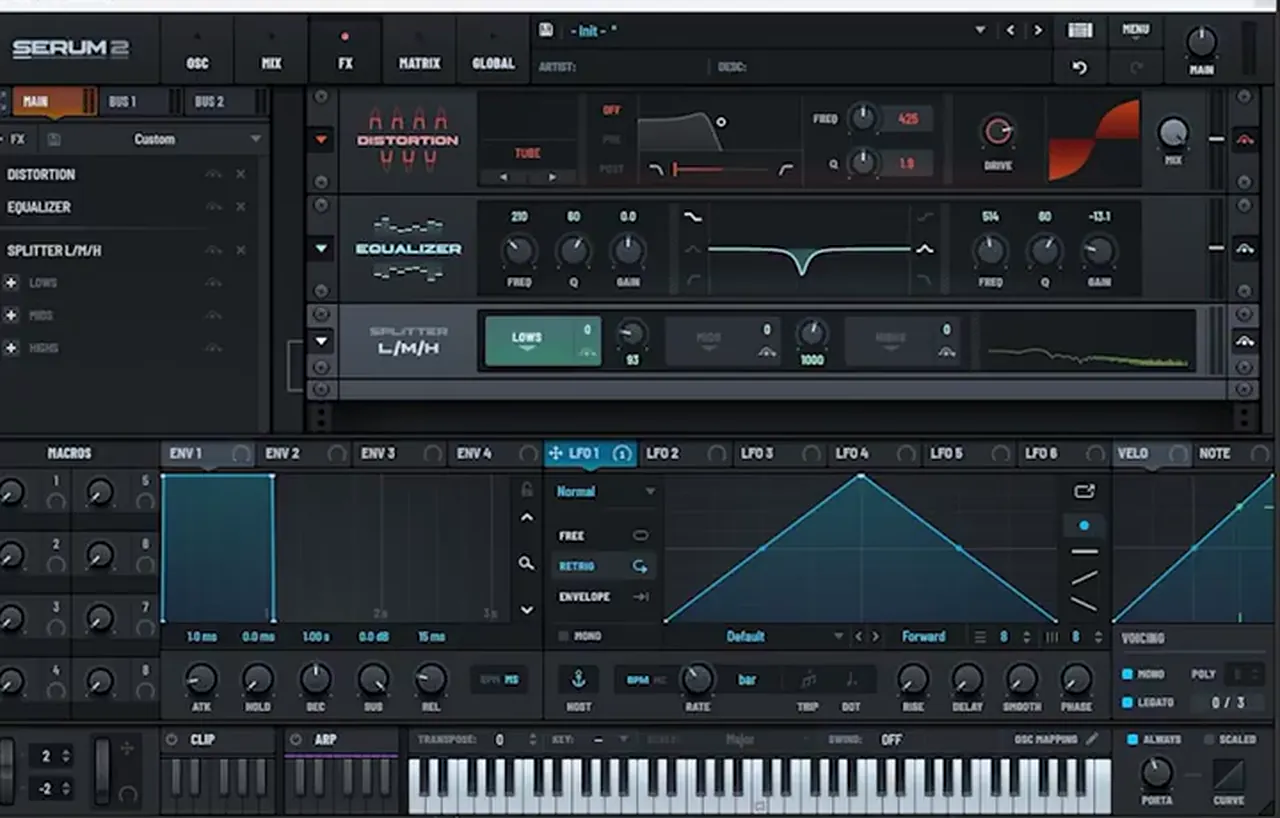
Flip to the FX page. Serum 2 has a main rack plus two buses; we keep everything on Main. The first two effects are the “default” processing that makes the saws and noise sound like one instrument:
- Distortion, Tube mode, set subtle. Then go back to the oscillator page and bring the noise down a little more.
- EQ with a notch at about 500 Hz (514 Hz, -13.1 dB on screen) to clear out boxy mids.
Listen: detuned saws with tube distortion7 sec
4.Split the reese into lows, mids and highs
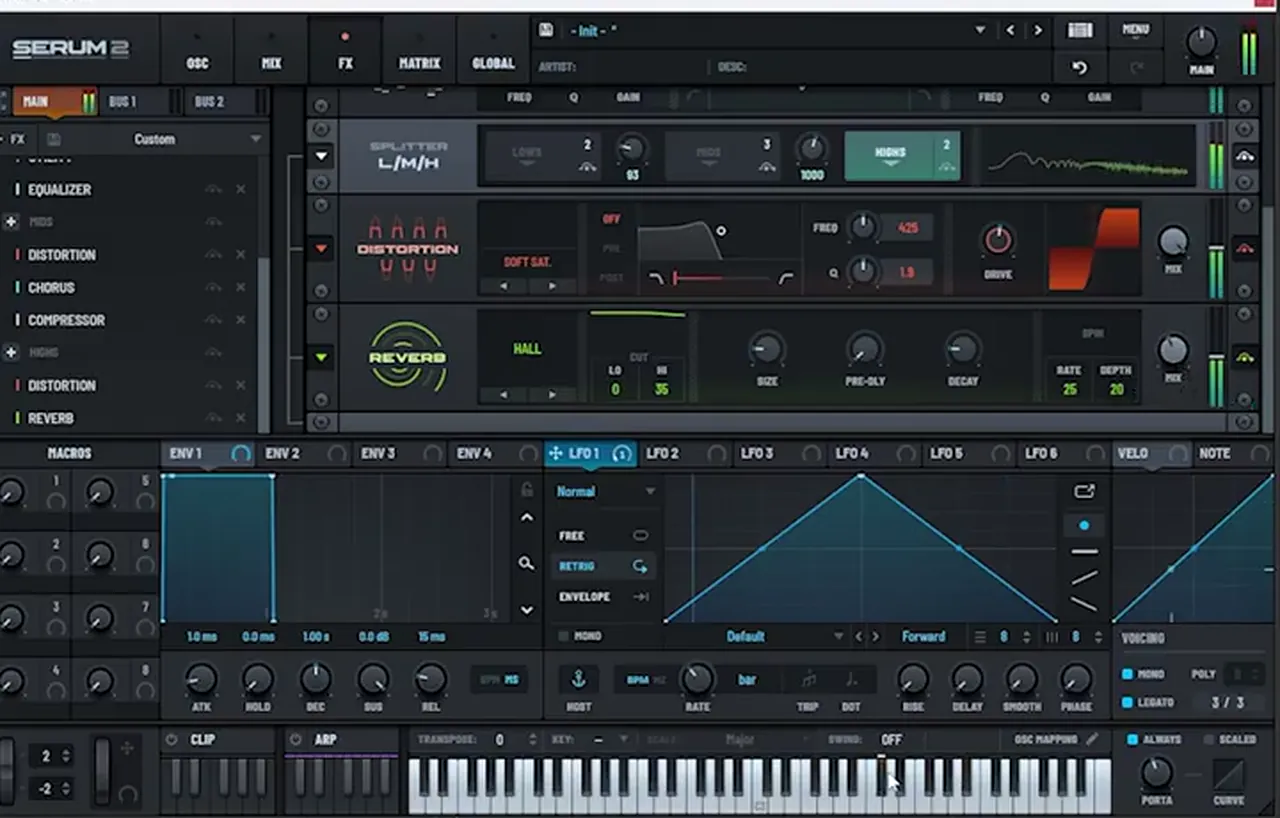
Add Serum 2’s Splitter L/M/H. It splits the sound into lows, mids and highs, and each band gets its own effects. On screen the low/mid crossover sits at 93 Hz and the mid/high crossover at 1,000 Hz.
A typical low crossover is around 180 Hz, depending on the sound, but for a reese we want the sub completely isolated, so it goes as low as about 90 Hz. This is the kind of processing you’d normally do later in your DAW; now you can do it inside the synth.
5.Lows: mono and a stronger sub
On a spectrum analyser the low end of a raw reese is uneven: the phasing makes the sub come and go. Select the Lows band and add:
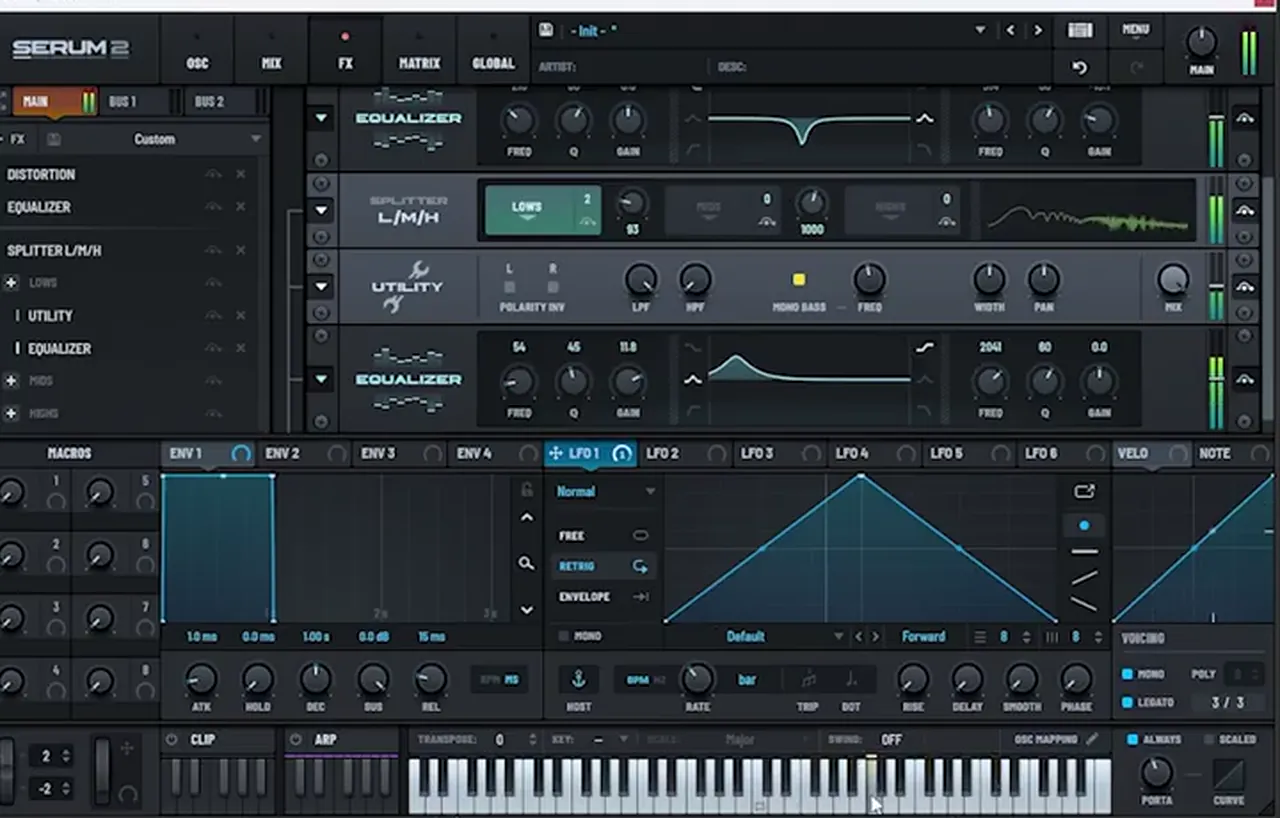
- Utility with Mono Bass on, so everything below roughly 80–90 Hz is fully mono.
- EQ with a narrow bell boost in the sub, on screen +11.8 dB at 54 Hz.
The sub is now much stronger and steadier. If the phasing still bothers you, the video suggests fixing it with Serum’s sub oscillator instead.
Listen: the reese with a mono, boosted sub6 sec
6.Mids: overdrive, chorus and multiband compression
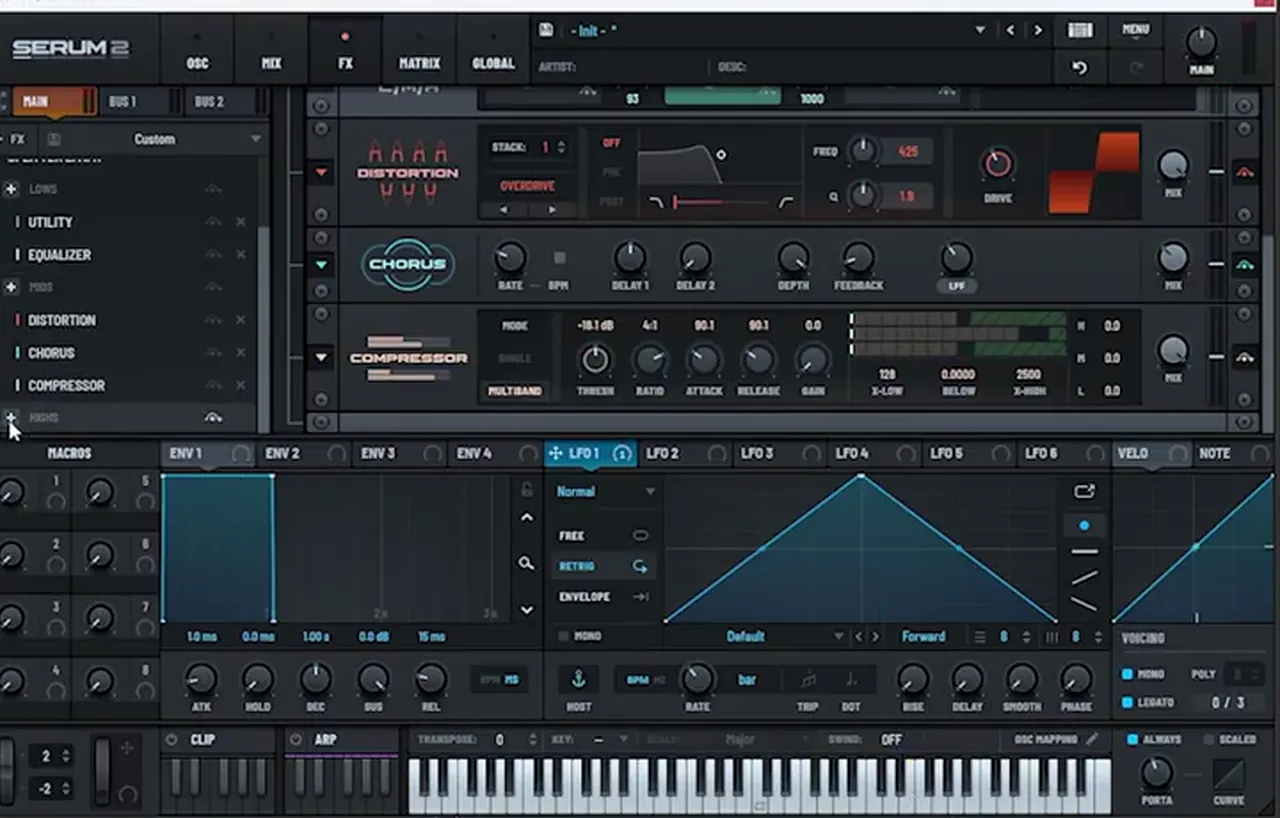
The mids are where the reese gets its character, and there are fewer rules here. Select the Mids band and stack:
- Distortion in Overdrive mode. Serum 2’s overdrive is “really cool for reeses”, and you barely need to filter it.
- Chorus after the distortion, set gently, so things don’t get messy.
- Compressor in Multiband mode, which works much like OTT. On screen: threshold -18.1 dB, ratio 4:1. Lift the compressed mids until they sit in front.
7.Highs: soft saturation and a short hall
After all that processing the top end gets lost. Select the Highs band and add Distortion in Soft Sat mode, gently, to bring the crisp back. For a bit of room, add a Reverb on the highs only: Hall mode, small size, short decay. Because the reverb only touches the top band, the sub stays dry and tight.
Listen: the finished Serum 2 reese10 sec
The result isn’t a finished mix sound yet (you’d still process it in your DAW), but it’s far more precise than Serum 1 allowed. For another Serum bass built on similar ideas, see our techy roller bass in Serum.
How to make a reese like Mefjus’ The Sirens
Our Mefjus-style recreation (inspired by “The Sirens”) is three layers: a main reese, a harmonics layer built with FM, and a plain sub. The main reese uses two phase-locked saws with a macro on the detune, and an EQ placed before the distortion to shape the texture.
Our Mefjus-style reese recreation in Serum and Ableton.
Our Kove-style reese recreation, covered below.
The main layer
- Oscillators: A and B on, both on the Basic Shapes wavetable, set to saw.
- Phase: random phase all the way down so every note sounds the same; leave A at its starting phase and set B to 120°.
- Detune: detune oscillator B to get phase cancellation, and map a macro to its fine tuning (unipolar). Automating that macro speeds up or slows down the roll on chosen notes.
- Sub and noise: turn both on, sub all the way up.
- EQ, then distortion: drive the distortion all the way, and put an EQ in front of it. Cut one bell, boost another, and sweep the frequencies: what you EQ before the distortion decides the texture.
- Phaser with depth and frequency all the way down, for an amp-like colour.
- Chorus set to high-pass, mix down. Then a filter with LFO 1 (sine, unipolar) on the cutoff for extra movement.
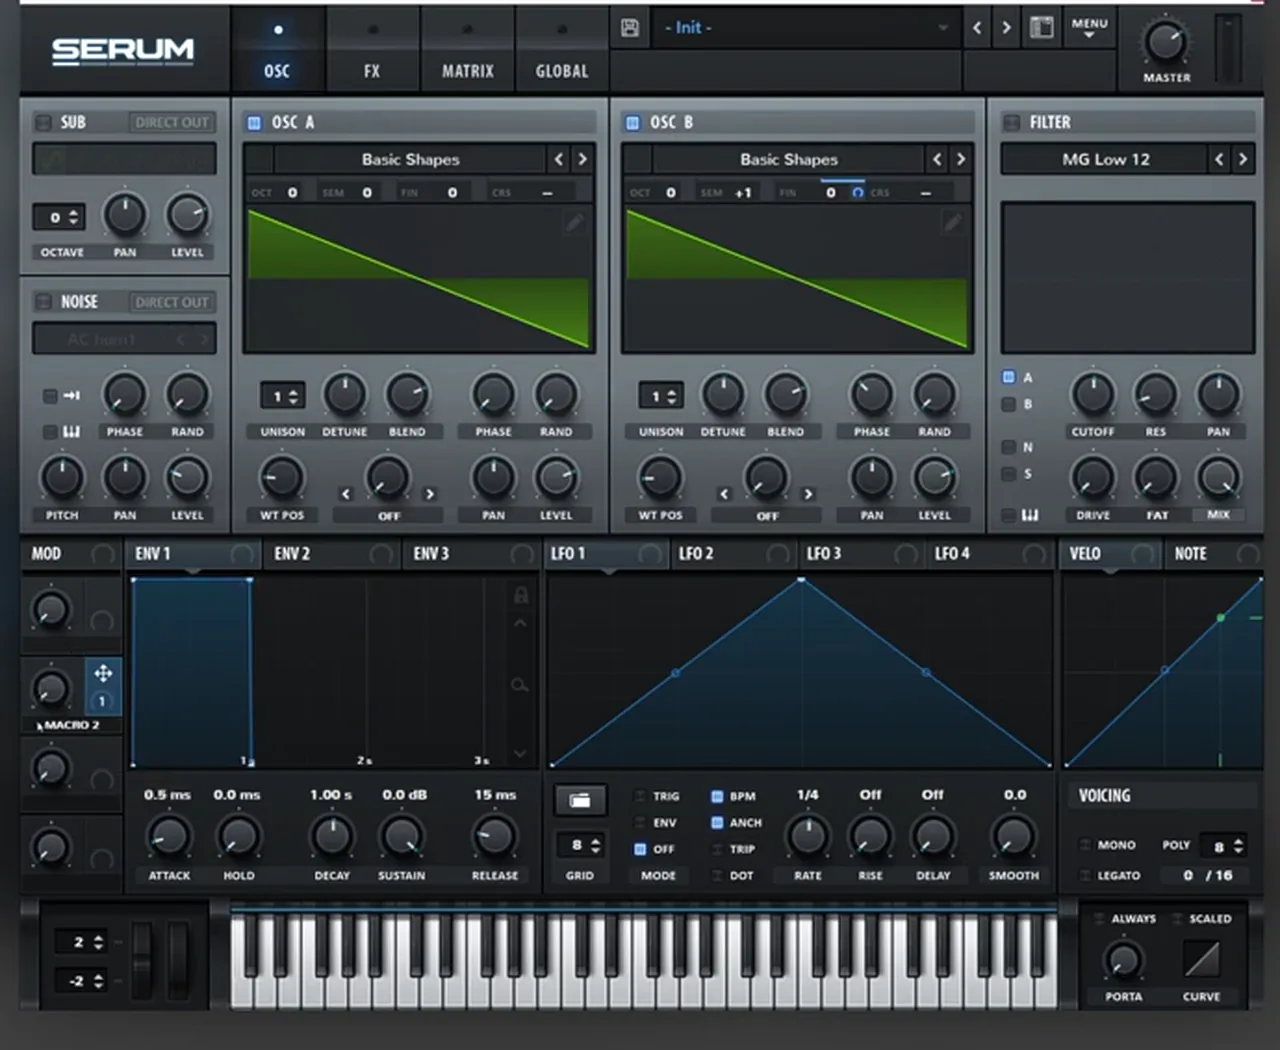
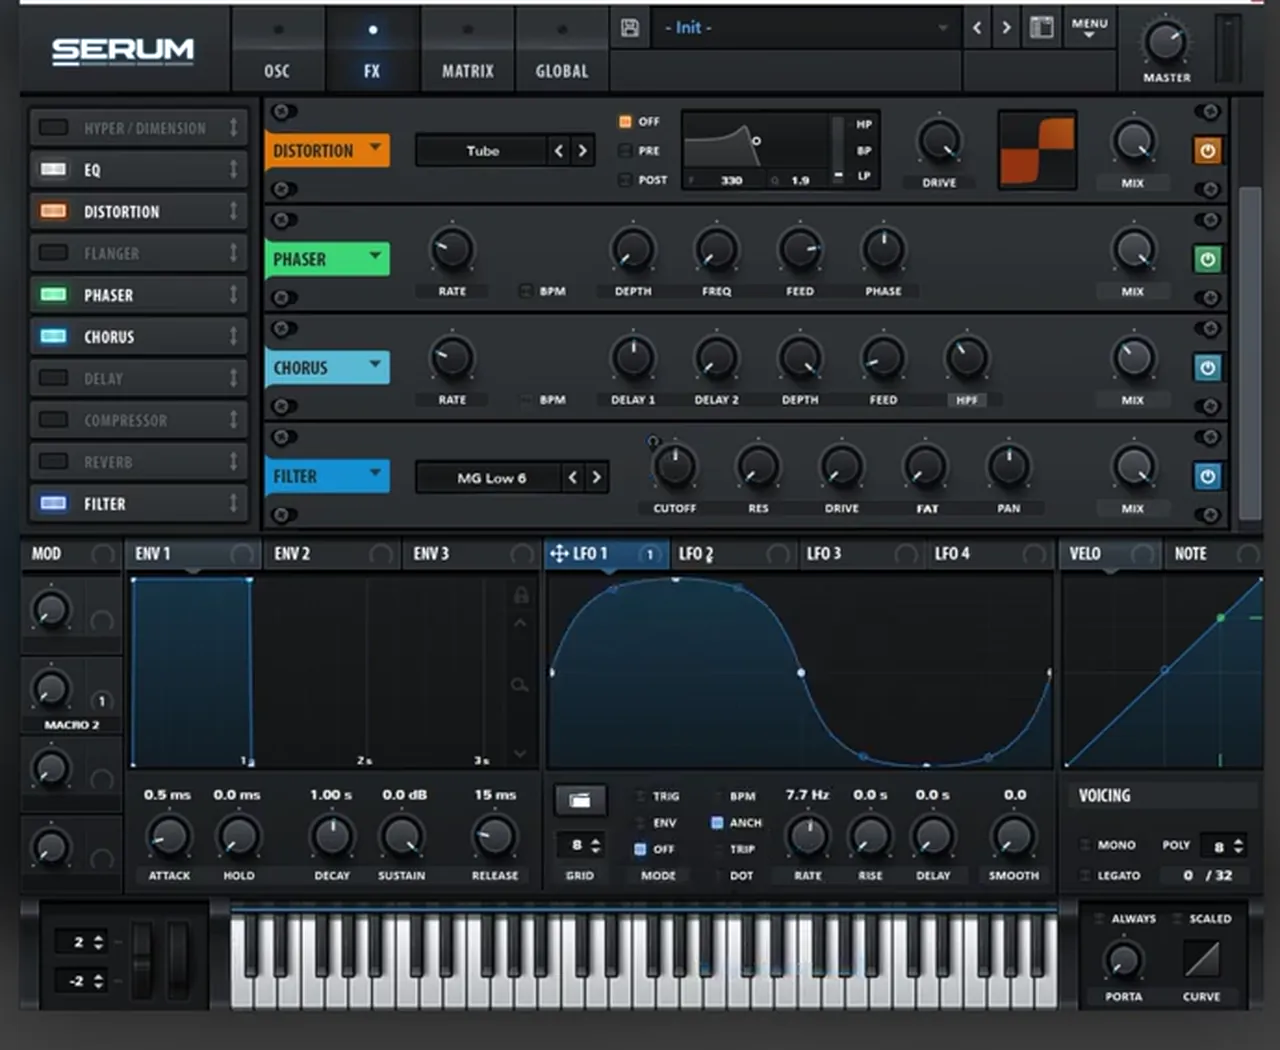
In Ableton the layer gets Erosion for noise in the top end (Wide Noise, 7.94 kHz, amount 55 on screen), an EQ Eight with drastic, narrow boosts on the frequencies you like and cuts on resonant ones, and a simple reverb to put it in a space.
Listen: our Mefjus-style main reese layer12 sec
The harmonics layer
On a new init patch, played an octave lower: set both oscillators to sine, turn oscillator B’s level all the way down and use it to FM oscillator A, with A two octaves down and B two octaves up. Turn the sub on, because without it the distortion loses its texture. The FM amount sets the formant of the harmonics; the video settles on 58. Add Hyper for width, a lower distortion, chorus, lots of reverb with low size and decay, and a multiband compressor. An LFO on oscillator A’s level gives a rhythm, and a band-pass filter with drive picks where the harmonics sit. In Ableton, cut the sub, add OTT with a reverb in front of it, and automate a Utility’s gain so the harmonics only come forward on certain notes.
How to make a reese like Kove’s Bearclaw
Our Kove-style recreation (inspired by “Bearclaw”) is a cleaner reese: a sine and a slightly detuned saw instead of two saws, a Sine Shaper distortion with a band-pass in front of it, big pitch bends, and a separate transient layer for the attack.
- Pitch bend: set the bend range to 12 semitones, then automate the pitch wheel in your DAW: a bend up 12 semitones in the first note, and a rise, hold and fall on the second.
- Oscillators: A on a sine, B on a saw. Detune the saw a little (+46 cents on screen) and play a sustained note: you hear rhythmic phase cancellation that gets slower as you go down to the playing octave. Add some noise.
- Distortion: Tube is too dirty for a sound this clean in the highs, so switch to Sine Shaper and bring it down. Turn on the pre-filter in band-pass mode at 168 Hz with the Q low (0.8 on screen), and turn Mono on.
- Compressor in multiband mode with the gain and release up, then a phaser with rate and depth down (so it stays put), frequency down for an amp feel, mix down.
- Filter to shave off the very highs, then a chorus left at its default.
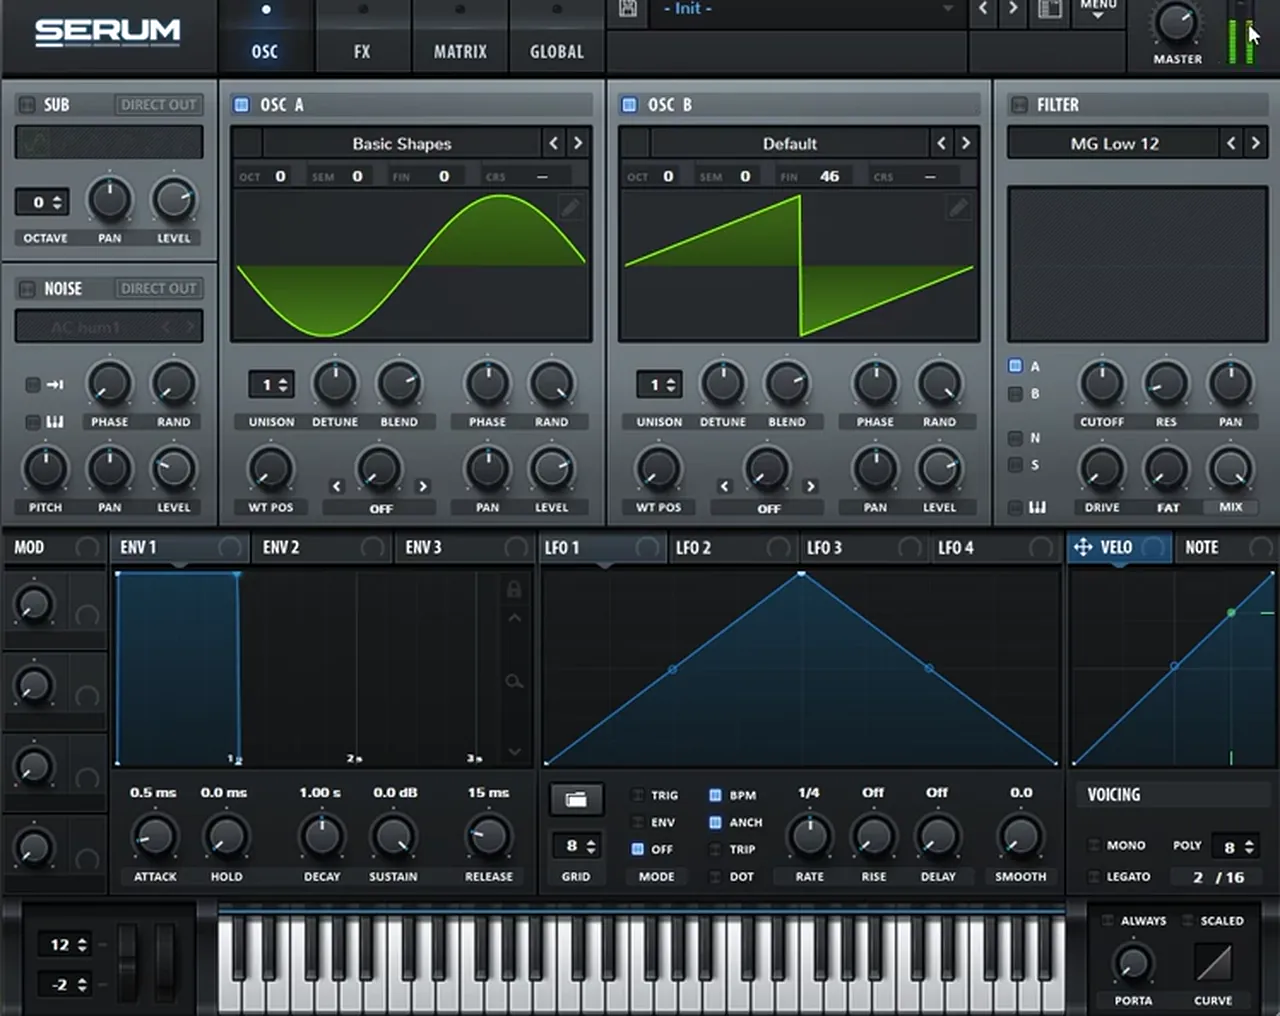
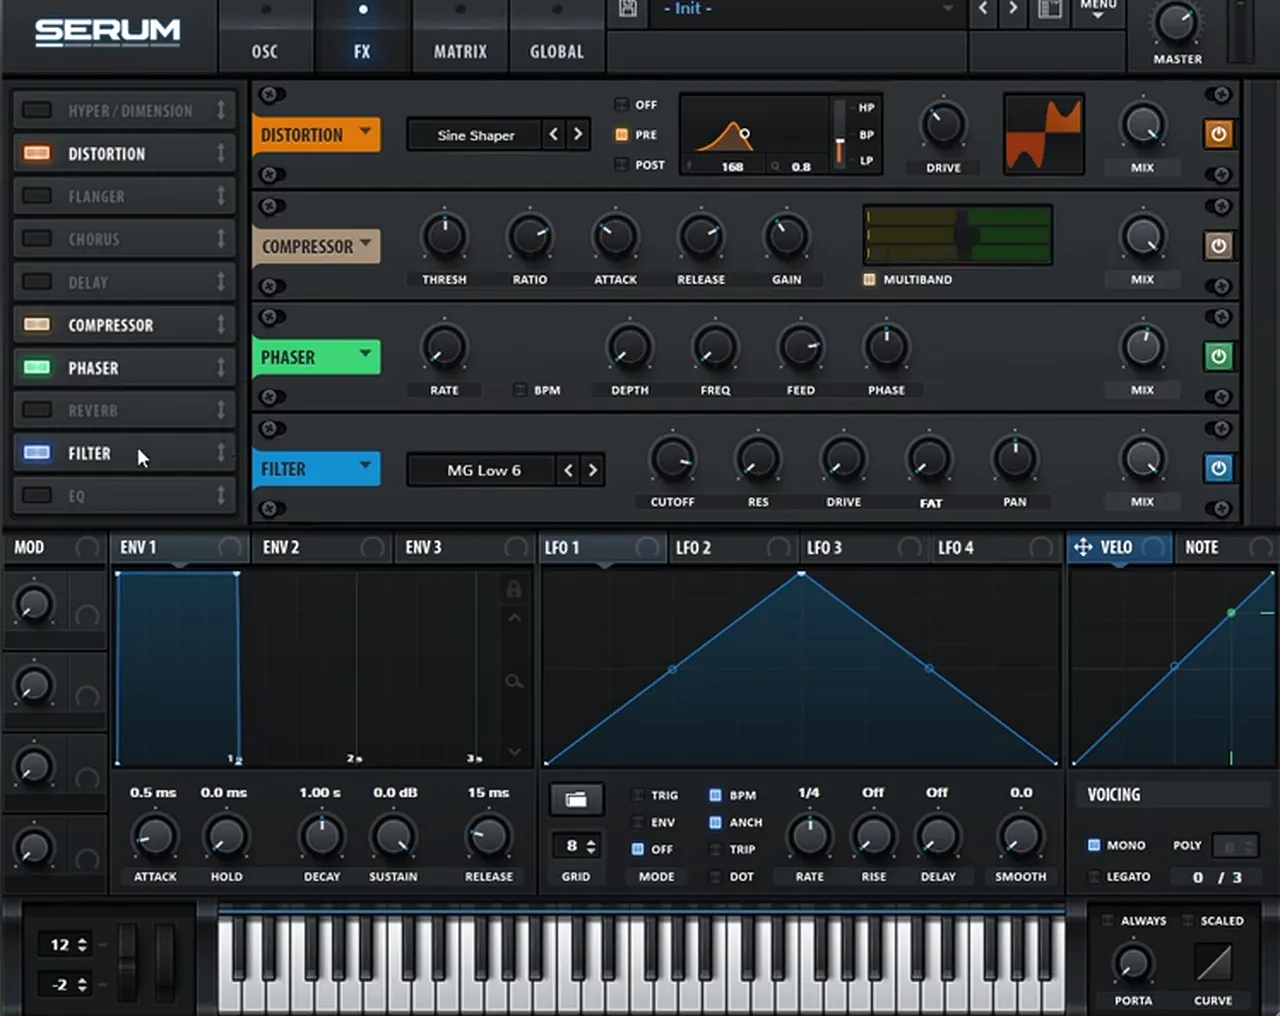
Listen: our Kove-style reese in Serum5 sec
After Serum, the chain is an EQ that boosts the fundamental and some mids (a sound-design EQ, not a mixing one), a filter automated to cut the sound on specific notes for a plucky rhythm, OTT to compress it and lift the highs, and a final EQ.
The transient layer
For a harder attack, duplicate the reese, turn off its effects and distort the patch more for extra highs. Map an LFO to the filter cutoff in envelope mode with a short shape, and optionally a second LFO on the master tune for a fast pitch drop (unipolar). Then delete the sustained parts of the MIDI so this layer only plays at the start of the notes you choose.
The three reeses compared
| Patch | Oscillators | Key processing | Movement |
|---|---|---|---|
| Serum 2 core reese | Two saws, OCT -3, +38 / -38 cents, white noise | Tube, 500 Hz notch, Splitter L/M/H: mono sub, overdriven mids, saturated highs | Detune plus an LFO on a notch filter |
| Mefjus-style (The Sirens) | Two saws, phase 0° and 120°, plus an FM sine layer and a sub | EQ before full distortion, phaser, chorus, Erosion | Macro automating the detune; sine LFO on a low-pass |
| Kove-style (Bearclaw) | Sine plus saw at +46 cents | Sine Shaper with a 168 Hz band-pass, multiband, phaser | 12-semitone pitch bends, filter automation, transient layer |
Processing a reese bass for a DnB mix
All three videos follow the same logic: be careful with the low end and creative with everything above it.
- Distortion: it’s what turns a polite detuned saw into a reese with teeth. EQ before the distortion to choose which harmonics get pushed (the Mefjus-style trick), and pick the mode to suit the sound: Overdrive for growl, Soft Sat for gentle crisp, Sine Shaper for a clean but bright tone.
- Multiband processing: heavy distortion, chorus and OTT-style compression on the mids and highs; almost nothing on the sub. Serum 2’s Splitter does it in the synth; in Serum 1 or Vital, do it in your DAW.
- A separate sub layer: the Mefjus-style recreation simply adds a sub as its own layer. That way the reese can phase as much as it likes while the sub stays steady.
- Mono low end: detuned saws are unstable in phase, which makes the sub come and go and can collapse badly on mono systems. Mono everything below roughly 80–100 Hz and check it on an analyser.
Reese basses sit at the heart of darker styles: see the neurofunk and techstep sections of our subgenres guide, and our neuro basses like Noisia in Vital for where the sound can go next.
Making a reese bass in Vital
Vital has a free version, and the core recipe carries straight over: two saw oscillators, pitched down, one fine-tuned up and one down; a notch filter with an LFO on the cutoff; a little noise; mono voicing with glide. Vital’s effects include distortion, EQ, chorus, a multiband compressor and reverb, so steps 3, 6 and 7 translate directly. The one thing it lacks is a band splitter, so keep the sub on its own layer or split the bands in your DAW. Our roller bass in Vital and DnB bass sound design in Vital tutorials cover the synth in detail.
Common reese bass mistakes
- Too much detune. The roll turns into a seasick wobble and the pitch gets vague. Start small and listen on a long note.
- Distorting the sub. Distortion on the full signal smears the low end. Keep the sub band clean and mono.
- A stereo low end. Wide, phasing lows sound huge in headphones and fall apart in a club. Mono below about 90 Hz.
- Leaving random phase on. Every note starts differently and the bassline sounds inconsistent. Turn random phase down, as in the Mefjus-style patch.
- Reverb on the whole bass. Keep any reverb on the highs only.
- Short notes only. The reese movement needs time. Mix sustained notes and glides with your short ones.
- Copying settings blindly. The values here are from the videos; crossovers, detune and EQ always depend on your sound and key.
Free download
Free drums to put under your reese
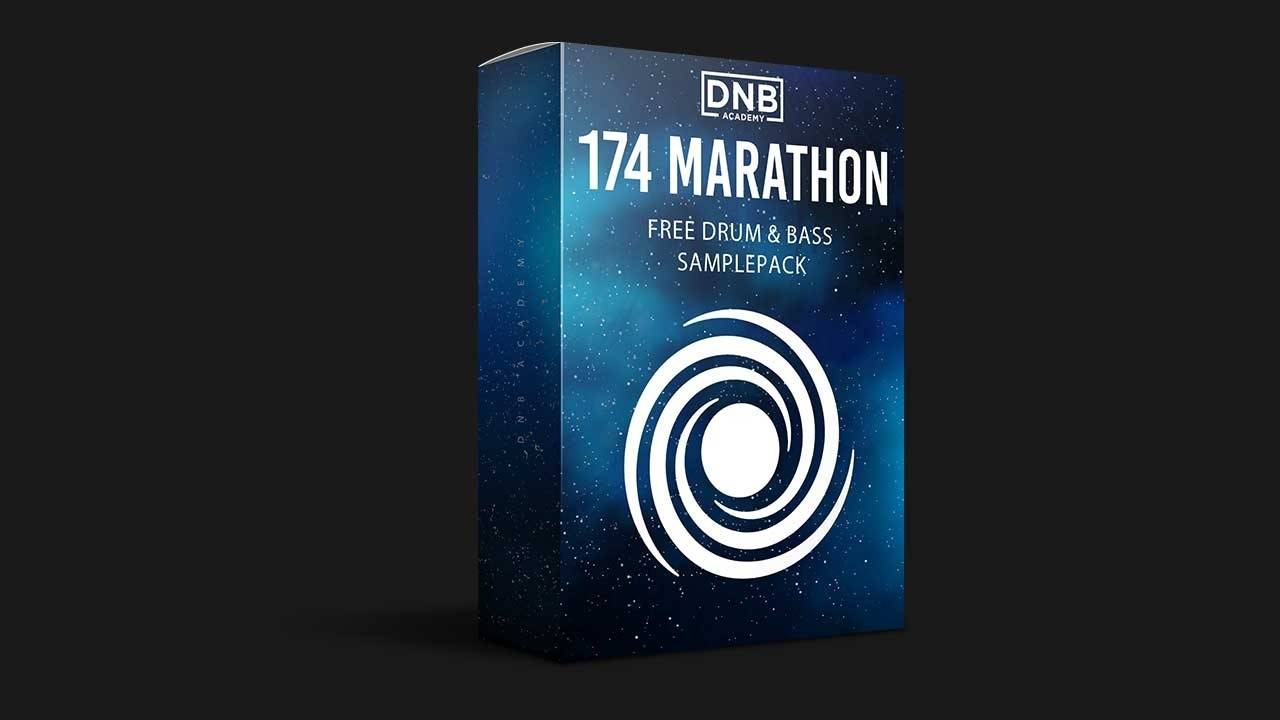
A reese only makes sense against a beat. The 174 Marathon Sample Pack gives you:
- 100+ royalty-free samples
- Drums, bass, FX, melodics and more
- Audio samples, so they work in any DAW
- Made for International Drum & Bass Day and our 174 Production Marathon
It’s one of seven free sample and preset packs in DNB Academy Free Access, with the mixing and mastering e-books and the 3‑day DnB challenge. Join 40,000+ producers in Free Access, no card needed.
Go deeper
Courses and Serum presets
Want to see these sounds inside full tracks? These go deeper.
 Production courseKove production courseA start-to-finish track in Kove’s style: 8+ hours of video, with the project files, presets and samples.
 Preset bundleNeuro Essentials Serum preset bundle100 Serum presets for neurofunk, including 50 basses, plus FX, drums, pads and synths.
 Sample packKove sample pack200+ sounds for liquid and dancefloor DnB: drums, basses, pads and FX, with Serum presets.
Every artist course, preset bundle and sample pack is also in The Vault. Browse courses
Related tutorials
All tutorials → Guide · BeginnersHow to Make Drum and Bass: A Step-by-Step Guide19 min read · Guide
 Serum · BassHow to Make a Techy Roller Bass Like DLR & Sofa Sound in Serum7 min read · Video + guide
 Vital · NeuroHow to Make Neuro Basses Like Noisia in Vital9 min read · Video + guide
 Vital · BassDark, Minimal DnB Bass Sound Design in Vital7 min read · Video + guide
FAQ: reese bass
What is a reese bass?
A reese bass is a bass sound made from two or more detuned saw waves. Because the oscillators sit slightly out of tune, they drift in and out of phase and create a rolling, growling movement. It is one of the core bass sounds of drum and bass, from 90s techstep to modern neurofunk.
Why is it called a reese bass?
The name comes from Kevin Saunderson's 1988 track "Just Want Another Chance", which he released under his Reese alias. Its detuned bassline was picked up by jungle and drum and bass producers, and the sound has been called a reese ever since.
How much should I detune a reese bass?
There is no single number. In our Serum 2 reese video the two saws are fine-tuned to +38 and -38 cents, and in the Kove-style patch the saw sits at +46 cents against a sine. More detune gives faster, wider movement; less gives a slower roll. Tune it by ear on a sustained note.
Can I make a reese bass in Vital?
Yes. Vital has a free version and everything a reese needs: two saw oscillators, fine tuning, unison, a notch filter, distortion, EQ, chorus and a multiband compressor. Vital has no built-in band splitter, so split the lows, mids and highs in your DAW or keep the sub on its own layer.
How do I stop a reese bass sounding muddy?
Keep the low end mono and clean. Split the sound so the sub band gets a mono utility and a small EQ boost while only the mids and highs get heavy distortion and chorus. Notch out boxy frequencies, around 500 Hz in our Serum 2 patch, and high-pass any extra layers.
Do I need Serum 2 to make a reese?
No. The Mefjus- and Kove-style reeses on this page were made in the original Serum, and the basic recipe works in any synth with two oscillators. Serum 2 adds the Splitter effect, which lets you process lows, mids and highs separately inside the synth instead of in your DAW.
What is the difference between a reese and a neuro bass?
A reese is one specific sound: detuned saws phasing against each other. Neuro bass is a wider family of heavily processed, modulated basses, and many neuro basses start from a reese before distortion, FM, filtering and resampling turn them into something new.
Where can I get free drum and bass samples to use with a reese?
The 174 Marathon Sample Pack in DNB Academy Free Access has 100+ royalty-free samples: drums, bass, FX, melodics and more. It is one of seven free sample and preset packs in Free Access, which is a free account with no card needed.
Next steps
Build the Serum 2 reese, write a bassline with long notes and glides, then try one of the artist-style variations. Here’s where to go next:
The full guide
Tempo, drums, bass, chords, arrangement and mixdown: every step of a DnB track.
Read the guideDNB Foundations
A structured course with weekly live feedback calls on your tracks. Beginners welcome.
See Foundations1:1 Mentorship
Personal guidance on your music from a mentor, built around your goals.
See the mentorship50,000+ producers have joined DNB Academy, and our producer Discord has 5,300+ members.