
Liquid · Bass design · Serum
How to Make a Liquid DnB Bass Like Random Movement in Serum
A liquid drum and bass bass should feel warm, round and rolling, never harsh. In our liquid bass video, Paulo from DNB Academy recreates two basses in Serum, inspired by Random Movement’s track “I Stayed Around”: a deep bass built from a sine wave and a single harmonic, and a brighter bass that glides between notes. Here is every step, with the settings from the screen, screenshots and audio.
Part of our how to make drum and bass guide: this page goes deep on step 5, designing the bass, for liquid DnB.
Quick answer
How do you make a liquid DnB bass in Serum?
Start from a sine wave, not a saw. Analyse your reference, then add the one harmonic that carries the sound in Serum’s harmonics editor (here D4 over a G2 fundamental). Move the oscillator level with a triggered LFO, add the sub an octave down, chorus only the top with a high-pass filter, and keep the low end mono.
- Analyse the reference.Find the fundamental and the harmonic above it with an EQ analyser.
- Build the wave.A sine plus one added harmonic in the harmonics editor.
- Add movement.LFO 1 on oscillator A level, trigger mode, dotted 1/8.
- Add the sub.Serum’s sub oscillator, one octave down, left steady.
- Chorus the top only.Chorus filter on high-pass at about 200 Hz.
- Add gain and clean the sides.A compressor, then a mid/side EQ low cut on the sides.
Our liquid bass video with Paulo from DNB Academy (7:46): two Serum basses inspired by Random Movement’s “I Stayed Around”. This is our own recreation; Random Movement isn’t involved in the video.
What is a liquid DnB bass?
A liquid DnB bass is a warm, round, rolling bass that supports the chords instead of competing with them. It is mostly fundamental: a clean, sine-like low end with one or two soft harmonics on top that let you hear it on small speakers.
Think of it as two layers in one sound. The sub is the deep, steady part you feel more than hear. The mid layer is the harmonic content above it that gives the bass its character and movement. In heavier styles that mid layer is a distorted reese or a neuro growl; in liquid it stays smooth and musical. If you want the bigger picture of where liquid sits among the styles, see the liquid section of our subgenres guide, and for every kind of DnB bass in one place, our drum and bass bass guide.
The video’s reference is Random Movement’s “I Stayed Around” on Fokuz Recordings (watch from 0:07). We use it only as a target to listen to and analyse; the sounds below are built from an empty Serum patch.
What you’ll need
| What | In our video | Alternatives |
|---|---|---|
| A synth | Xfer Serum, from an initialised patch | Vital (free version) or any synth with a harmonics or wavetable editor |
| An analyser EQ | FabFilter Pro-Q 3 on the reference and on the synth | Your DAW’s stock EQ analyser or a free spectrum analyser |
| A DAW | Ableton Live, project at 175 BPM, with EQ Eight and OTT | FL Studio, Logic, Bitwig: any DAW with a mid/side-capable EQ |
| A reference track | Random Movement, “I Stayed Around” | Any liquid track whose bass you love |
1.Analyse the reference with an EQ
Before touching the synth, find out what the bass is made of. Put an EQ analyser on the reference: a liquid bass usually shows a strong fundamental and only one clear harmonic above it, and that pair is what you need to rebuild.
Our video starts with an initialised Serum patch on its default saw and makes the point straight away: a saw is the wrong waveform for this sound. A sine is closer, but on its own it lacks the higher harmonic that makes the original sound so good (watch at 0:42). So the next move is to analyse the reference with FabFilter Pro-Q 3 (1:04).
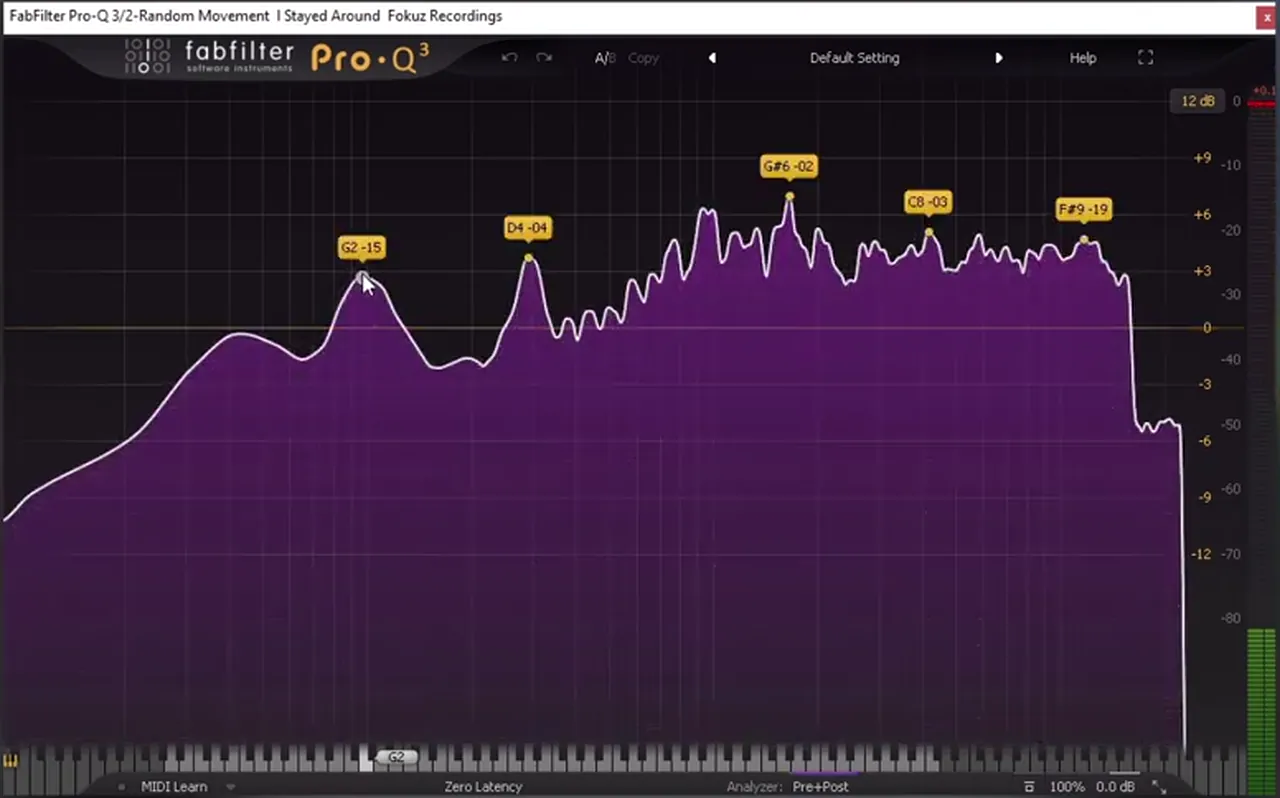
The analyser shows two main areas in the low end: the fundamental and an extra harmonic. Playing the bass from the start, the first peak sits on G2 and the next one on D4 (1:19). Then comes the test that proves it: a steep high cut (36 dB/oct, around 437 Hz on screen) removes everything above those two peaks, and the bass still sounds the same (1:30). The whole sound relies on the fundamental and the harmonic next to it.
2.Build the wave from a sine plus one harmonic
Load a sine into oscillator A, open Serum’s harmonics editor and add one harmonic by hand until the second peak on your analyser lines up with the reference. That gives you the whole tone of the bass in a single oscillator.
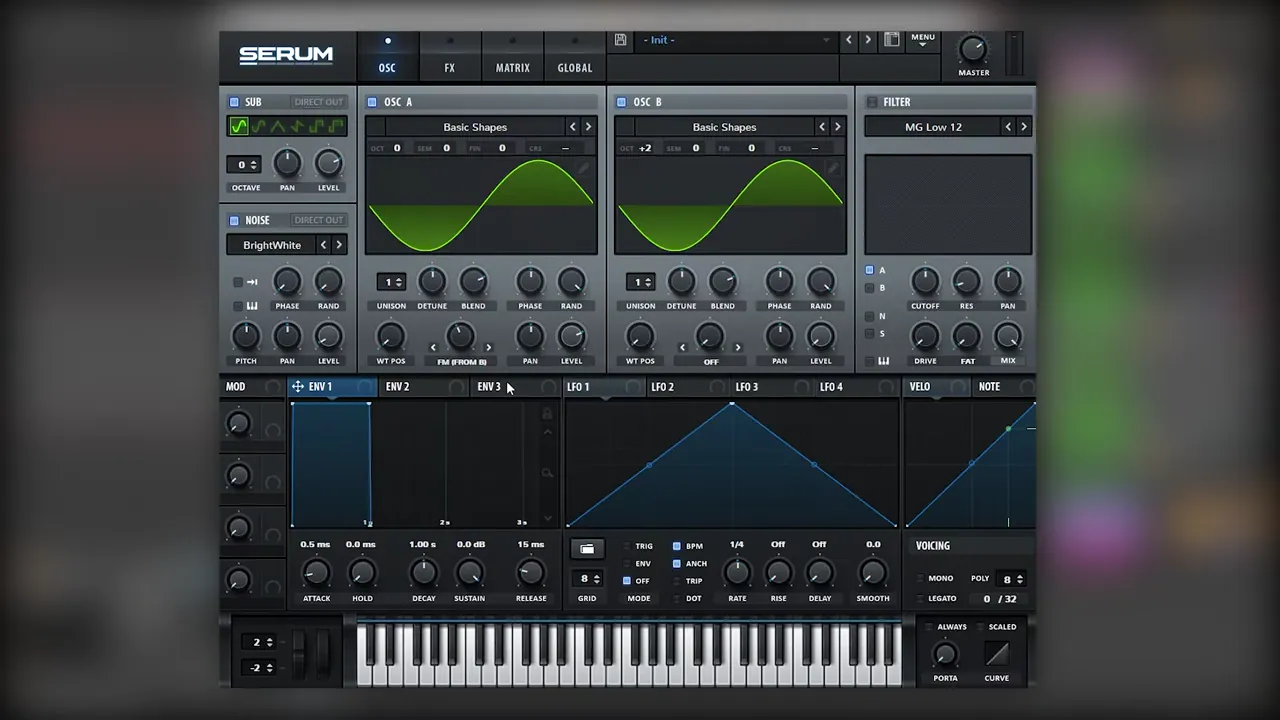
In the video, oscillator A starts as a sine from Serum’s Basic Shapes, which already gives the first harmonic, the G2 (1:52). To get the D, open the wavetable editor, translate the sine into its FFT (harmonics) view and draw in the next harmonic manually (2:00). The first try is too high; going lower lands on D4 (2:17). With Pro-Q 3 on the Serum track you can see the two peaks forming, matching the reference.
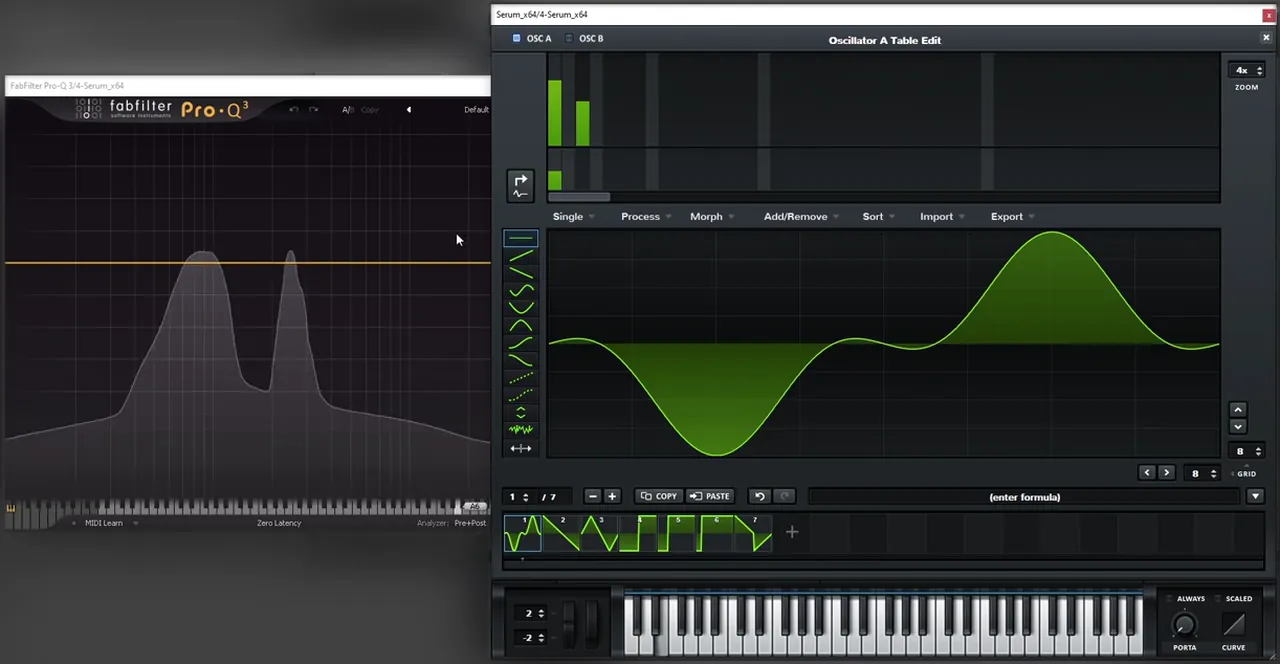
Now play the patch: you have the combination of harmonics. From here, you can play with the phase of the added harmonic and with how loud it is against the fundamental, depending on how you want the bass to feel (2:32). More harmonic level means a brighter, more present bass; less means a deeper, softer one.
Listen: the sine with one added harmonic5 sec
3.Add movement with an LFO on the level
Once the source sounds right, the rest is movement. Route LFO 1 to oscillator A’s level, set it to trigger mode so it restarts with every note, and draw a shape that swells and falls back so each note rolls.
In the video, LFO 1 modulates the level of oscillator A, with the LFO set to Trig (2:52). The rate goes to a dotted 1/8 (3:09), then the shape is changed by hand: a rise into a peak and a long, curved fall (3:15). Drawing the curve yourself is how you create the exact movement you hear in the reference.
Listen: the LFO moving the oscillator level5 sec
4.Add a sustained sub an octave down
Turn on Serum’s sub oscillator one octave below oscillator A. Because the LFO only moves oscillator A, the sub stays steady underneath, which makes the bass feel fuller without losing the rolling movement on top.
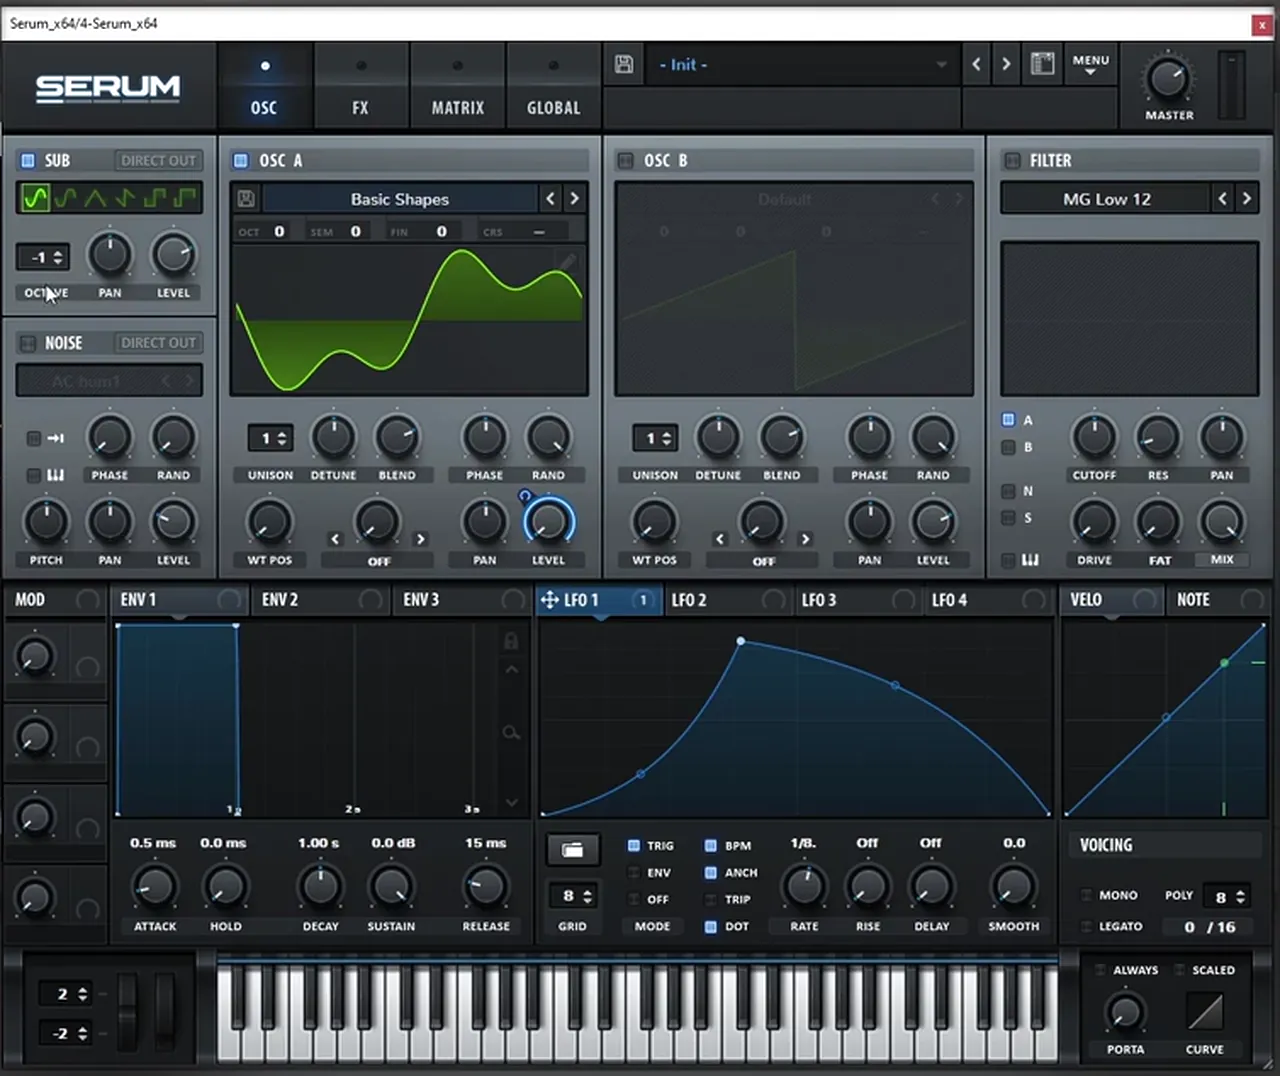
The video adds a sub “that gets sustained”, putting it one octave lower (3:33). On screen the sub oscillator is switched on with its octave at −1, on Serum’s default sine shape. For a deeper dive into the low layer itself, see our DnB sub bass guide and step 4 of the how to make drum and bass guide.
5.Chorus only the top of the bass
Add Serum’s chorus for width, but switch its filter to high-pass and set it just above the fundamental, around 200 Hz. Then only the harmonic on top is chorused, and the low end stays mono and free of phase issues.
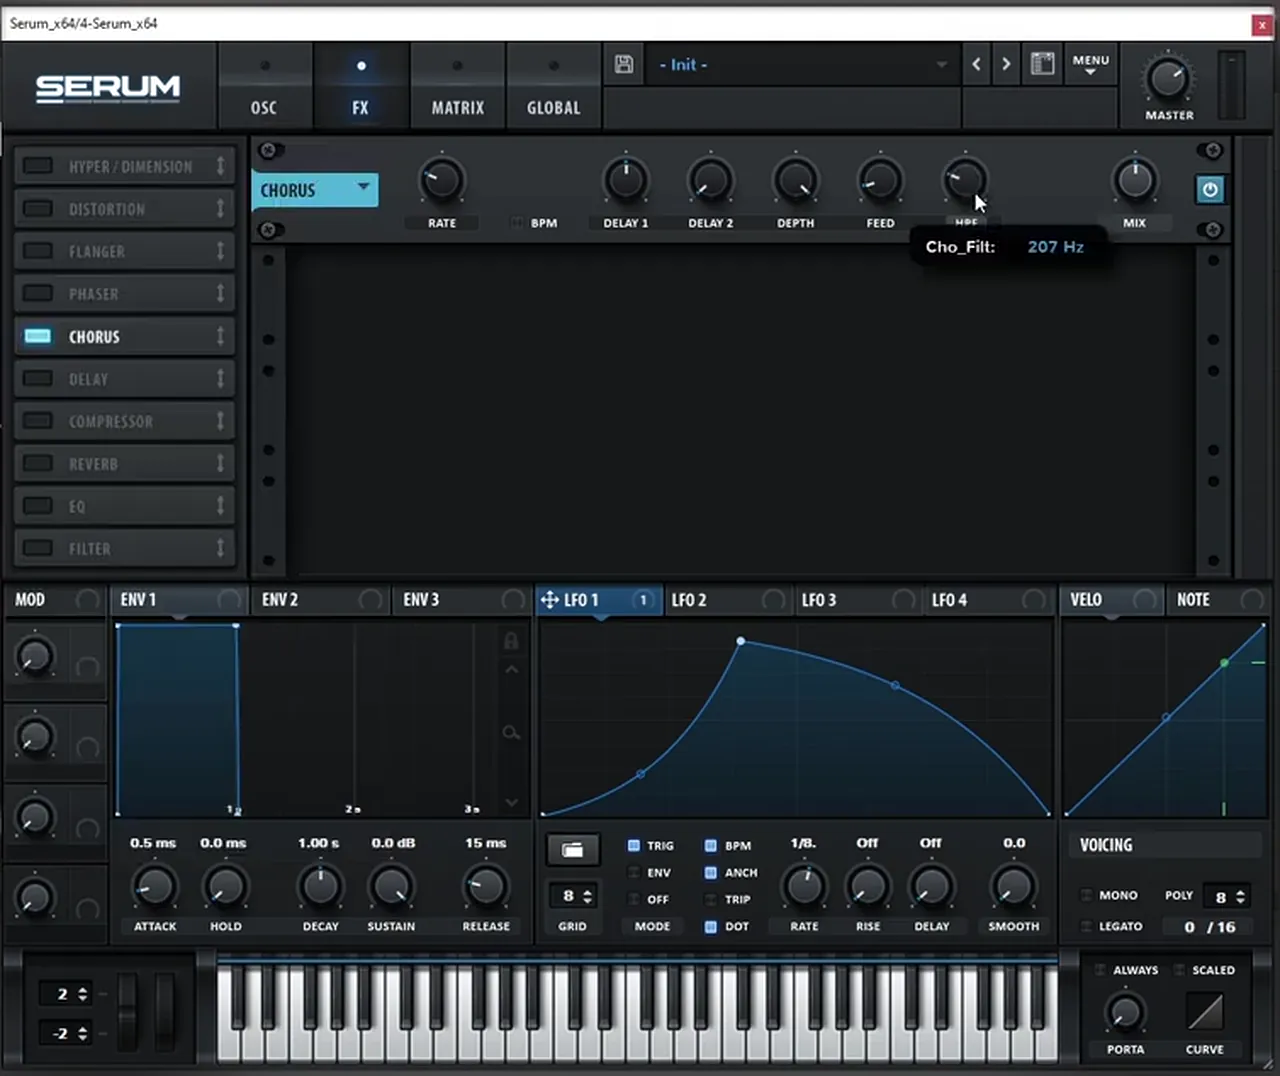
The chorus goes on at 3:49. The important change is the filter: set to high-pass so the low end doesn’t get affected and you don’t get any phasing issues (3:52). He looks at where the fundamental sits, says it’s around 150 Hz, and sets the filter to about 200 Hz (207 Hz on screen) (4:11). That way only the harmonic on top gets the chorus.
6.Add gain, then clean the sides
Finish the first bass with a compressor for extra gain, then a mid/side EQ that cuts the low end only on the side channel. The bass gets louder and wider on top while the low end stays clean and mono.
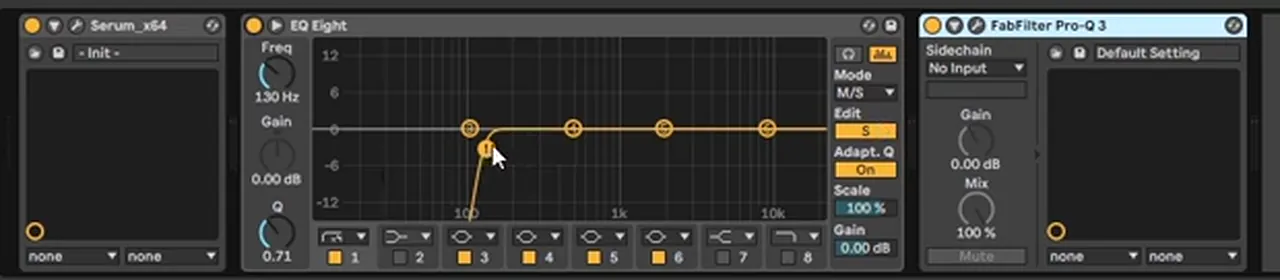
After the chorus, a compressor adds some gain (4:27). The final tip is mid/side EQ: in the video, Ableton’s EQ Eight is switched to M/S mode and edits the S (side) channel only, with a steep low cut that he sweeps up to roughly 130–190 Hz (4:31). Cutting the lows only on the sides keeps the bass clean, with no phasing issues, and keeps the low end mono.
Listen: the finished first bass, with a little talking7 sec
7.The second bass: glide and unison
The second bass is brighter and slides between notes. Start from a fresh patch, switch on Mono, Legato and Portamento, overlap your MIDI notes slightly so Serum glides between them, then thicken the saw with about 10 unison voices.
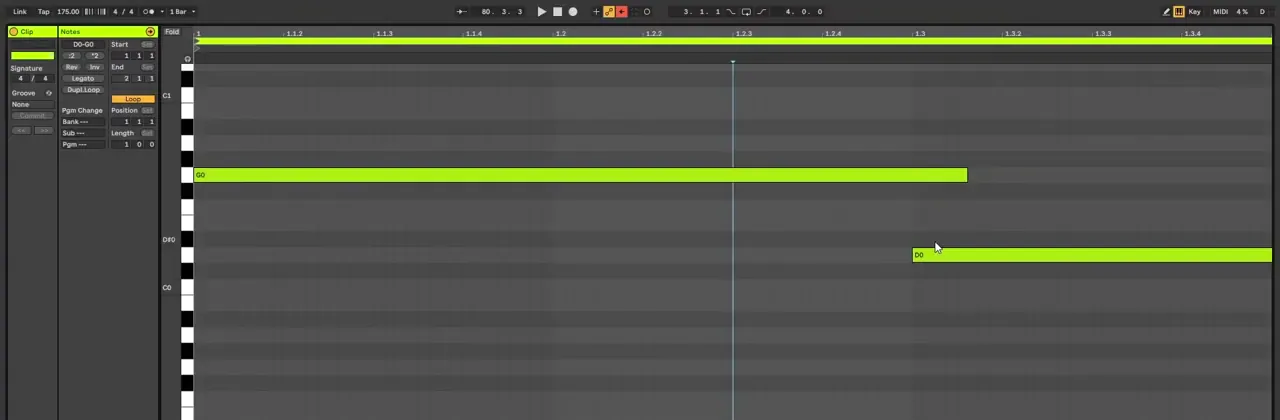
The second sound starts from an initialised patch again (4:56). The MIDI is two notes, a G then a D, with a bit of overlap between them (5:04). That overlap matters: in Serum, turn on Mono and Legato and add some Portamento, the glide between the two notes (5:14). With legato on, Serum only glides when the next note starts before the previous one ends.
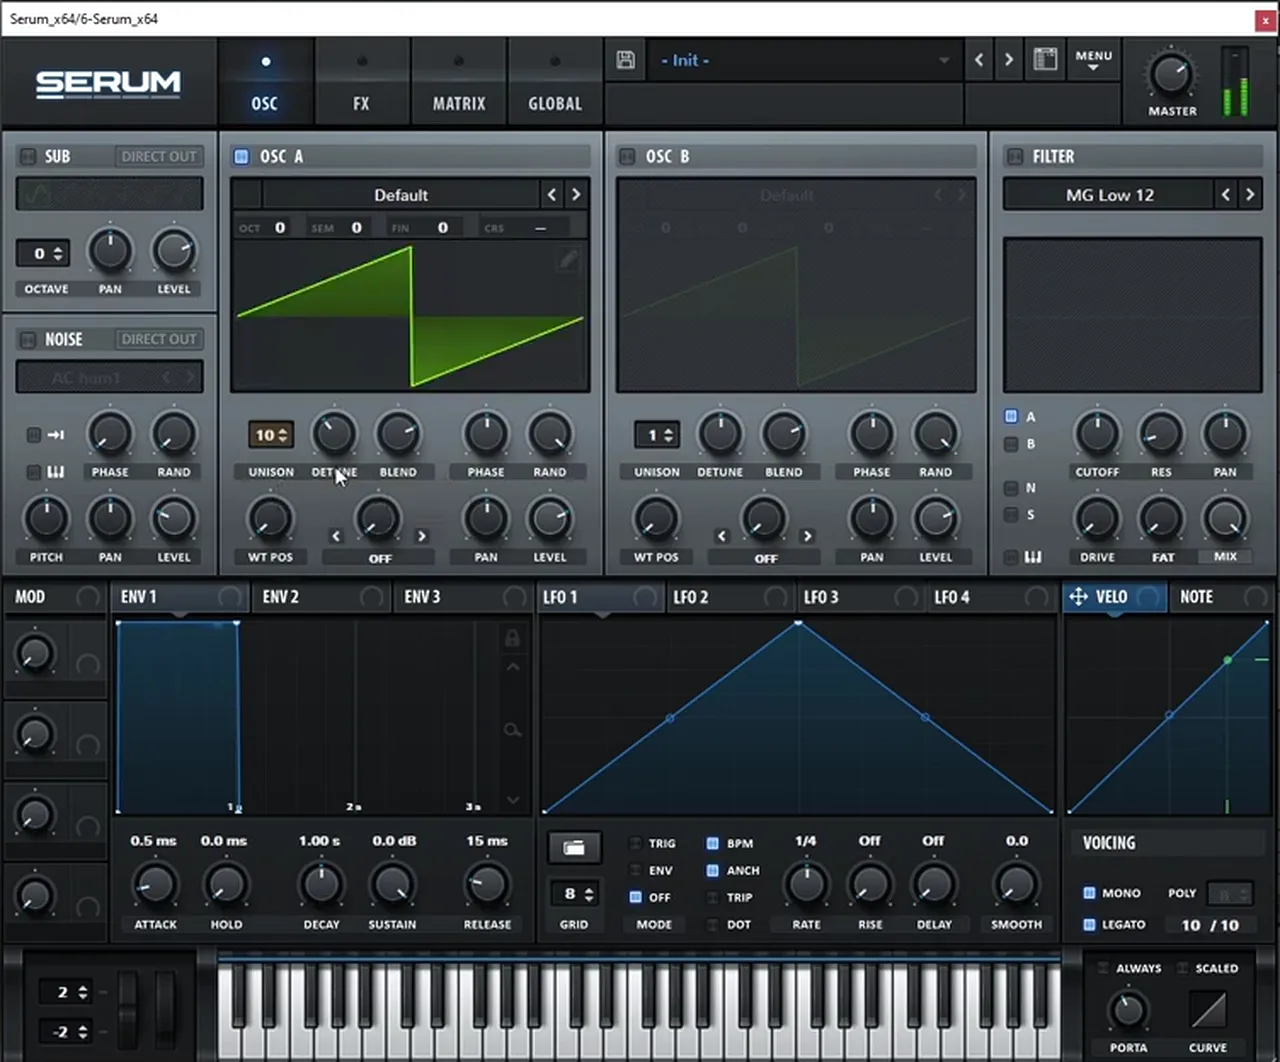
Next comes the shaping of the sound, starting with unison: around 10 voices on the default saw (5:28), then the detune adjusted by ear (5:33).
8.Distortion and a moving EQ peak
Give the second bass some drive with distortion, then add a peak EQ and move its frequency with an LFO in envelope mode. That sweep creates the vowel-like, bowl-shaped movement on each note.
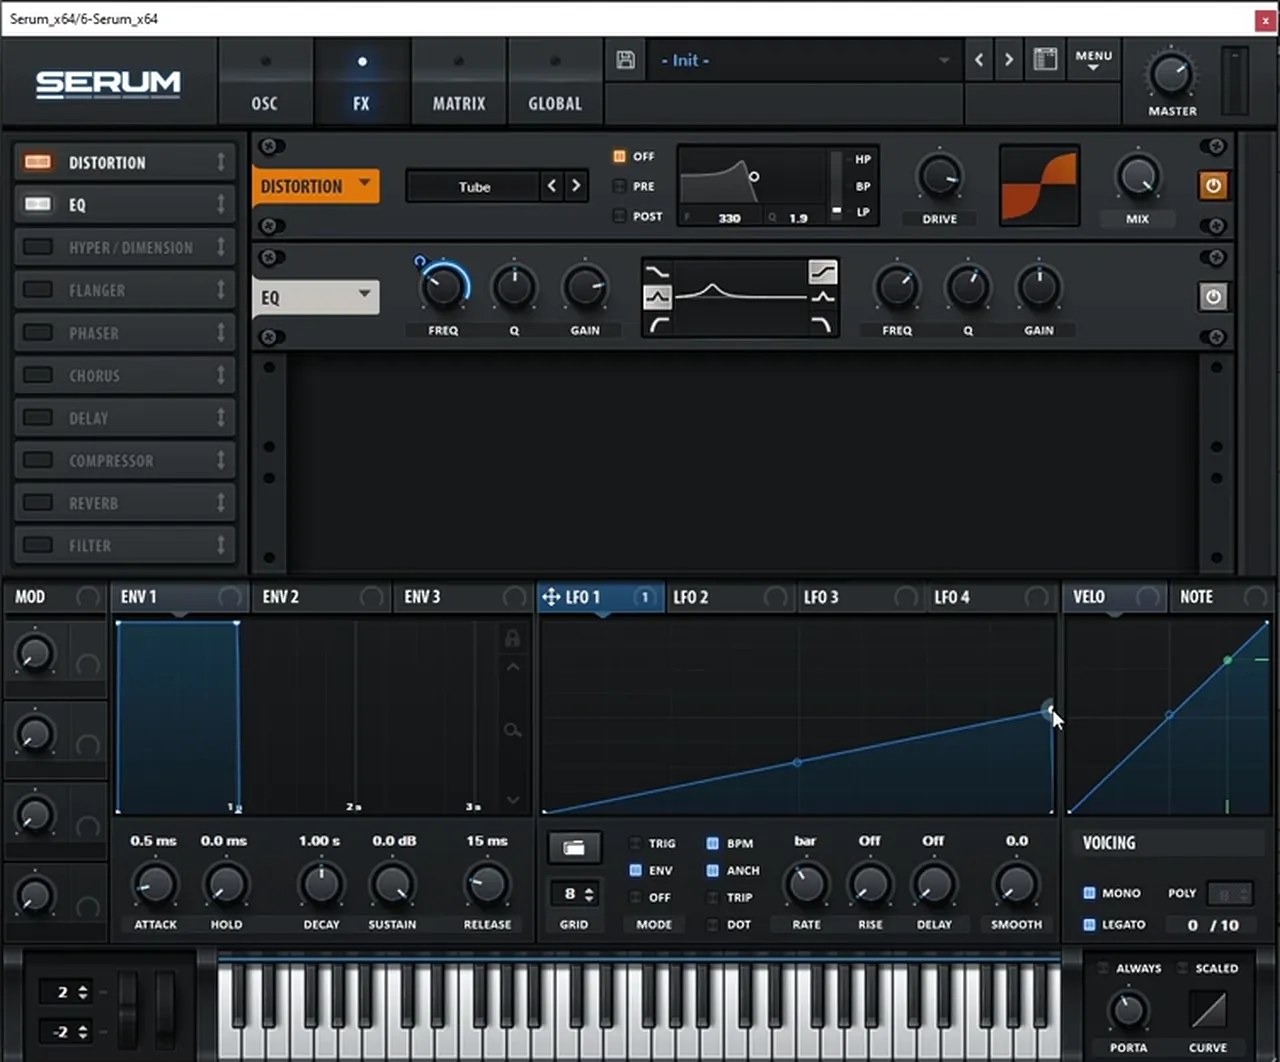
In Serum’s FX rack, the video adds Distortion (Tube mode, with the drive at 88% on screen) (5:37). To create the “bowly” movement, an EQ is added: use a peak and play with its frequency knob by hand to find the sweet spot (5:45).
Listen: the gliding unison saw with distortion5 sec
Then LFO 1 is dragged onto the EQ frequency and set to envelope mode, so it runs once per note like an envelope. It is made slower, then even slower (it ends up on a one-bar rate with a rising ramp shape), and the modulation amount is brought down (6:01). As the video says, this stage is all about trial and error.
9.Chorus, compression, filter and post-processing
Finish the second bass the same way as the first: chorus on high-pass, then a multiband compressor with extra gain for brightness. Then tame it with a steep 24 dB low-pass filter at about 800 Hz, and add EQ and OTT after Serum.
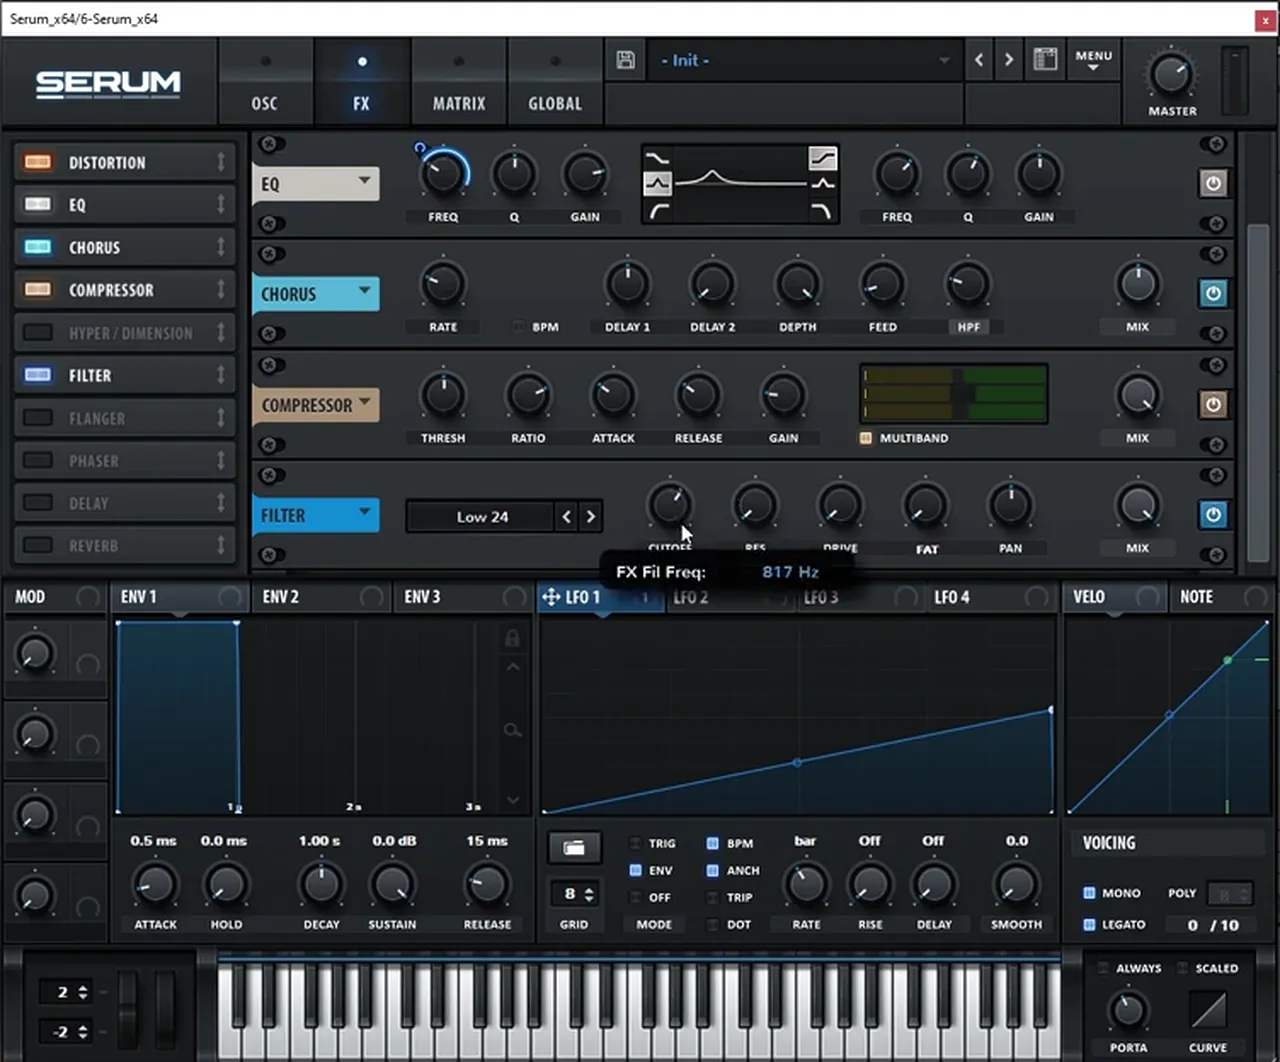
A chorus goes on, and once again its filter is set to high-pass (218 Hz on screen) to keep the low end relatively clean (6:21). Then a multiband compressor with the gain boosted, 5.8 dB on screen, makes the sound super bright (6:34).
The final step in Serum is to filter everything: Serum’s Filter effect set to Low 24, a steep 24 dB per octave curve, then play with the cutoff (6:43). You can also try some resonance while you move the cutoff (27% while he experiments) but here it stays at about 800 Hz (817 Hz on screen) (7:08).
Listen: the second bass through the Low 24 filter5 sec
For post-processing, the video adds an extra EQ and some OTT after Serum (7:13). On screen that is Ableton’s EQ Eight with a low-pass band around 640 Hz, then OTT with the amount at 38%. The bass is then compared against the reference (7:22).

10.Playing it under liquid drums and chords
Keep liquid basslines simple: long notes on the chord roots, changes that land with the kick, and a glide or two for movement. The bass should follow the chords and leave the snare and vocals room to breathe.
The project in our video runs at 175 BPM in Ableton, and both sounds are built around the same two notes: the first bass sits on a G2 fundamental, and the second slides from G to D. That is a useful habit: write the bassline from your chord roots, then add movement with the sound (the LFO and EQ sweeps above) rather than with lots of extra notes.
- Root notes first. Play the root of each chord under it. If your chords come from our liquid DnB chords guide, the lowest note of each voicing is usually your bass note.
- Land with the kick. Start a new bass note where a kick hits and let it ring over the snare, so the two lock together.
- Use glides sparingly. A slide into the next root at the end of a phrase sounds great. Gliding every note loses the groove.
- Leave gaps. A short rest before a change gives the drums room and makes the next note hit harder.
To hear the bass in context, drop it under a rolling liquid beat like the one in our liquid drum and bass in FL Studio tutorial. For a heavier alternative to the second bass, the detuned saws in our reese bass guide use some of the same unison and filtering ideas.
Common liquid bass mistakes
- Starting from a saw. For the deep liquid bass, a saw brings far too many harmonics. Start from a sine and add only what the reference shows you.
- Guessing instead of analysing. One look at the reference in an analyser tells you which harmonic to add. Low-pass the reference to check you’ve found the part that matters.
- Chorus on the whole bass. A full-range chorus smears the low end and causes phase problems. Switch the chorus filter to high-pass, around 200 Hz.
- Modulating the sub. Keep the sub steady and put the movement on the upper oscillator, so the low end stays solid on a club system.
- Notes that don’t overlap. Legato portamento needs overlapping MIDI notes. If the glide doesn’t happen, extend the first note slightly.
- Too much modulation. Big LFO or EQ sweeps sound exciting solo but busy in the mix. Bring the amount down, as the video does, until the movement supports the groove.
- Stereo low end. Use mid/side EQ to cut the lows on the sides so everything below the harmonic stays mono.
Free download
Liquid drums for your new bass
A bass only makes sense against a beat. The Motion Liquid DnB Starter Pack gives you:
- 16 kicks, snares and top loops for rolling liquid drums
- 10 musical and FX samples
- 26 royalty-free samples in total
- FL Studio project files
It’s one of seven free sample and preset packs in DNB Academy Free Access, along with the mixing and mastering e-books and the 3‑day DnB challenge. Join 40,000+ producers in Free Access. Free account, no card needed.
Go deeper
Liquid presets and artist courses
Want ready-made liquid basses to study, or to see full liquid tracks built from the first sketch?
 Preset bundleRandom Movement Vital presets100+ liquid funk presets for Vital, including 23 basses, 24 keys and 25 pads, with every preset also included as a WAV file.
 Production courseTelomic production courseLiquid / Deep: an artist course on deep, liquid drum & bass.
 Production courseEdlan production courseA liquid track from the first sketch to the master, with songwriting, vocal processing, sound design and sample flipping, plus the project files, presets and samples.
Every artist course, preset bundle and sample pack is also in The Vault. Browse courses
Related tutorials
All tutorials → Liquid · ChordsHow to Write Liquid Drum and Bass Chords and Pianos18 min read · Video + guide
 FL Studio · LiquidHow to Make Liquid Drum and Bass in FL Studio11 min read · Video + guide
 Serum · BassHow to Make a Reese Bass for Drum and Bass15 min read · Video + guide
 Serum · Bass designHow to Make a Techy Roller Bass in Serum7 min read · Video + guide
FAQ: liquid DnB bass
What makes a bass sound liquid in drum and bass?
A liquid DnB bass is warm, round and rolling rather than aggressive. It usually rests on a clean sine-like low end with only a few soft harmonics on top, gentle movement in volume or tone, and little distortion, so it supports the chords instead of fighting them.
How do you make a bass like Random Movement in Serum?
In our recreation, inspired by Random Movement's I Stayed Around, we start from a sine wave, add one harmonic in Serum's harmonics editor (D4 over a G2 fundamental), move the level of oscillator A with a triggered LFO at a dotted 1/8 rate, add the sub one octave down, then chorus only the top with a high-pass filter and add gain with a compressor.
Which waveform should I use for a liquid bass?
Start with a sine wave. A saw has far too many harmonics for this kind of bass. Analyse your reference with an EQ, find the one or two harmonics that carry the sound, and add only those to the sine.
Why put a high-pass filter on the chorus?
Chorus spreads the sound in stereo, which causes phase problems in the low end. Setting the chorus filter to high-pass at around 200 Hz means only the harmonic on top gets chorused, while the fundamental and sub stay solid and mono.
How do I make a bass glide between notes in Serum?
Switch on Mono and Legato in Serum's voicing section, turn up the Portamento knob, then make your MIDI notes overlap slightly. Serum only glides when a new note starts before the previous one ends.
Can I make this liquid bass in Vital instead of Serum?
Yes. The ideas work in any synth that lets you build a sine-based wave with an extra harmonic, modulate level and filters with LFOs, and add chorus, compression and filtering. Vital has a free version and has all of these tools.
Is this Random Movement's own preset?
No. It is our own recreation, inspired by his track, built from scratch in Serum by ear and with an analyser. If you want Random Movement's own sounds, his Vital preset bundle in our store includes 23 basses.
Next steps
Rebuild the first bass from a sine, swap the harmonic for one you find in your own favourite liquid track, and play it under a rolling beat. Then build the rest of the track around it:
Free Access
Seven free DnB sample and preset packs, including the Motion Liquid starter, plus e-books and a 3-day challenge.
Get free packsThe full guide
Tempo, drums, sub, bass, chords, arrangement and mixdown: every step of a DnB track.
Read the guide1:1 Mentorship
Personal guidance on your music from a mentor, built around your goals.
See the mentorship50,000+ producers have joined DNB Academy, and our producer Discord has 5,300+ members.