
Mixing · Mixdown guide
How to Mix Drum and Bass: A Mixdown Guide for DnB
Mixing drum and bass comes down to three things: drums that hit, a low end that is mono, clean and audible on any speaker, and enough headroom to master. This guide walks through a full DnB mixdown, from gain staging to the drum bus, sub, stereo width, space and loudness, using the settings shown in four of our mixing videos.
Part of our how to make drum and bass guide: this page goes deep on step 9, the mixdown and master.
Quick answer
How do you mix drum and bass?
To mix drum and bass, gain stage so nothing peaks near 0 dB, group and glue the drums on a bus, keep the sub mono and ducked under the kick, make it audible on small speakers with harmonics, keep width in the mids and highs, add space with reverb and delay sends, then check on several systems at matched loudness.
- Gain stage.Pull faders down and leave headroom.
- Drums.Group, balance, EQ, shape transients.
- Drum bus.Saturate, EQ, glue, tame, clip.
- Low end.Mono sub, kick vs sub, ducking, harmonics.
- Width and space.Wide tops, tight bass, reverb and delay.
- Check.Headphones, monitors, phone, mono, matched loudness.
Watch our “Mixing Drums Made Simple” video: grouping, balancing and bussing the drums of a liquid roller in Ableton. The drum and low-end steps below follow it and three more of our mixing videos.
What you’ll need
- A finished arrangement. Mixing goes faster when the parts are written. If you are still at the loop stage, our BPM and structure guide helps you turn it into a track first.
- Any DAW. All four videos use Ableton Live (EQ Eight, Glue Compressor, Saturator, Utility), but every move here exists in FL Studio, Logic, Bitwig or Cubase.
- An EQ, a compressor, a saturator and a clipper. Our drum bus video also uses third-party tools (a tape saturator, a dynamic EQ and a free distortion and clipper plug-in); stock devices can do the same jobs.
- A spectrum analyser and a stereo meter. Our videos use a spectrum analyser for the low end and a stereo imager with a correlation meter for width.
- Two or three ways to listen. Headphones or monitors you trust, plus a phone or laptop speaker for the small-speaker check.
TipGroup your tracks (drums, bass, music, FX) before you start. Every step below gets easier when one fader controls one job.
1.Gain staging and headroom
Gain staging means setting levels so every channel and bus has room to move before anything clips. Pull the faders down until the balance feels right, keep the drums and the master peaking clearly below 0 dB, and only then start EQ and compression.
DnB drums have big, short peaks, and loud samples straight out of a pack eat your headroom before you have added a single effect. Turn things down first: as in our start-to-finish guide, pull every fader down until the balance feels right. Then watch two places:
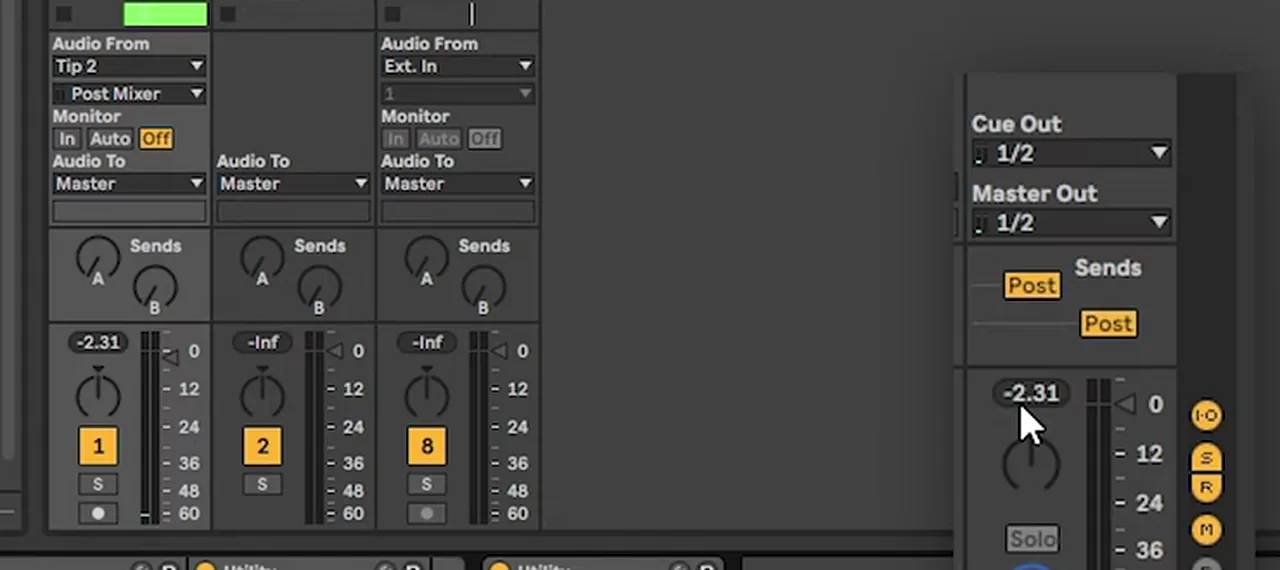
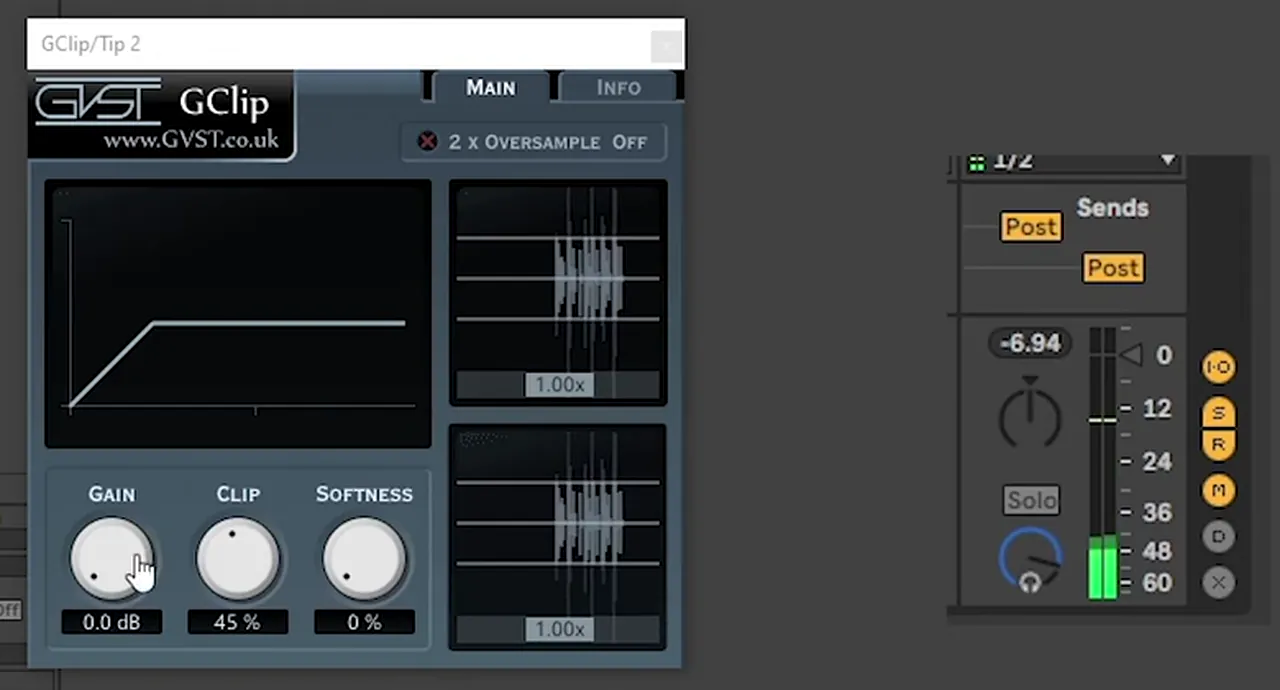
- The drum group. In our punchy drums video, a Utility after the parallel compressor brings the drum peak back to -2.3 dB, and a soft clipper with Clip at 45% drops the peak to -6.94 dB with almost no change in loudness: more than 6 dB of headroom gained.
- The master. If the master is already slamming into 0 dB in the mix, there is nothing left for mastering. Leave room and let the limiter do its job at the end.
2.Mix the drums: balance, EQ, transients, saturation
Group similar drums (kicks, snares, tops) so each is one fader, balance the kick and snare so their peaks sit at a similar level, high-pass the tops, tighten splashy loops with a transient shaper, and add weight with parallel compression or saturation.
Group similar sounds
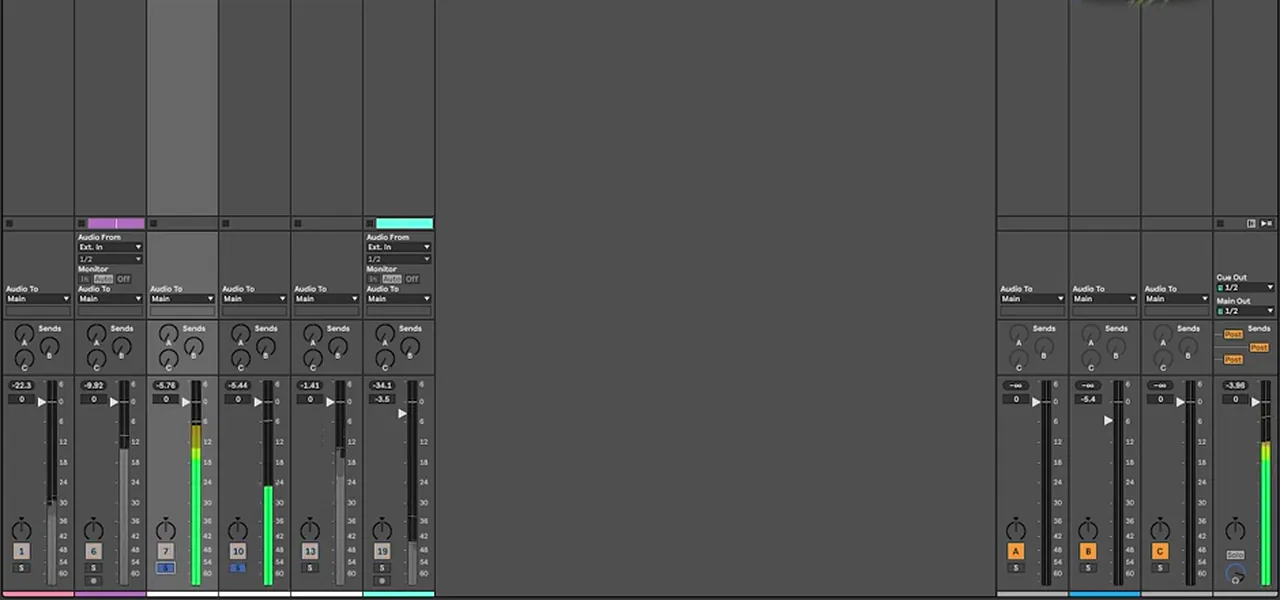
Our drums video starts by grouping: two kick layers into a Kicks group, two snares into Snare and every hat, shaker and shuffle into Tops (1:27). Right-click and Group Tracks, or press Cmd/Ctrl + G. Layered hits are “literally one sound”, so now one fader turns the whole kick up or down, one channel carries filters and automation, and the meters show where each part peaks relative to the others.
Balance the kick and snare
With the groups in place, the peaks of the kick and snare sit “pretty level” (3:11). The Tops group was peaking louder than both; the culprit was one shuffle loop, so turning that single loop down evened out all three groups. Use the meters to spot problems like that, then decide by ear: a 0.3 dB difference between kick and snare is not worth worrying about (7:07).
EQ and transients
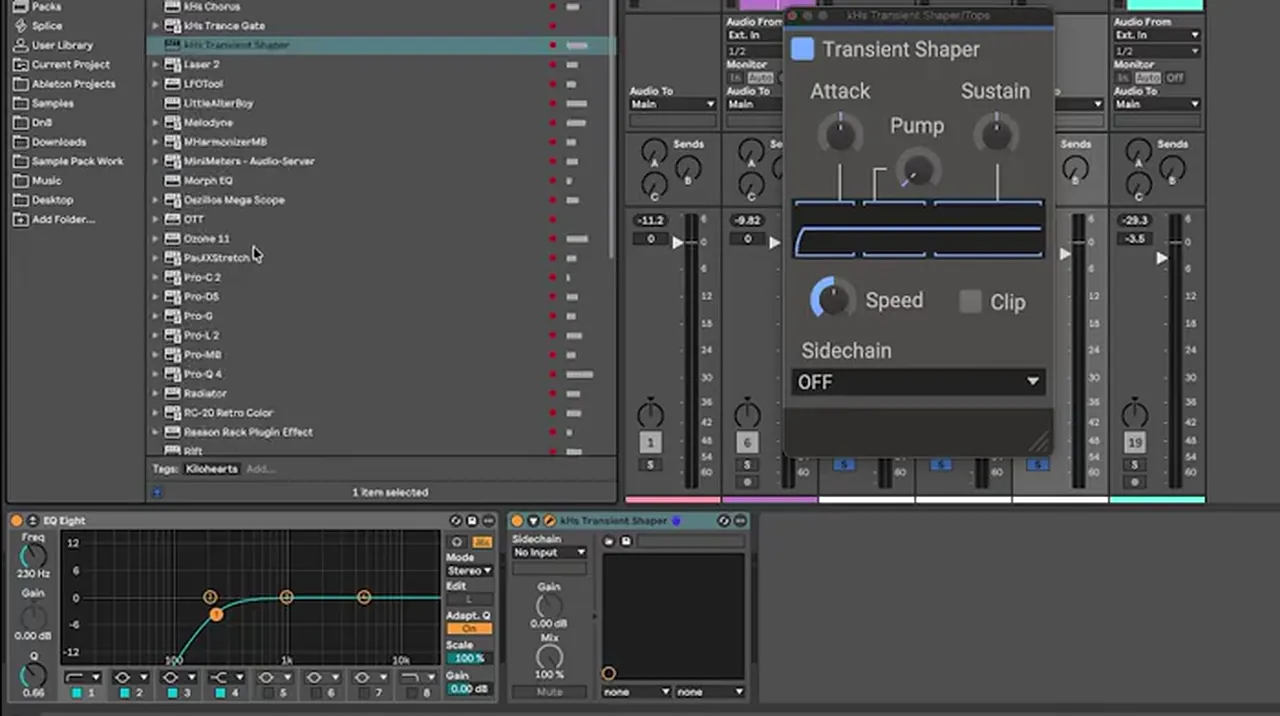
Top loops carry low-end information they don’t need. Our video puts an EQ Eight on the Tops group and high-passes it (around 230 Hz on screen) to clear that out (4:18). Then a transient shaper on the same group, set to only a “tiny little percentage difference”, tightens up the splashiness of the loops (4:38).
Weight: parallel compression and saturation
If a break sounds thin, blend a heavily compressed copy under the dry signal. In our punchy drums tutorial the compressed chain runs at an infinite ratio with a 0.01 ms attack and a 53.6 ms release, tucked under the dry chain at -2.7 dB. Saturation adds weight and grit too; we use it first in the drum bus chain below.
Listen: a break without, then with parallel compression6 sec
For drum programming itself, see our drum and bass drum patterns guide.
3.The drum bus: saturate, EQ, glue, tame, clip
A drum bus processes all the drums together so they sound like one kit. A proven DnB chain is: saturation, a corrective EQ, a glue compressor (4:1, about 5 dB of gain reduction), a dynamic EQ for harsh tops, then a clipper. EQ again after anything that changes the tone.
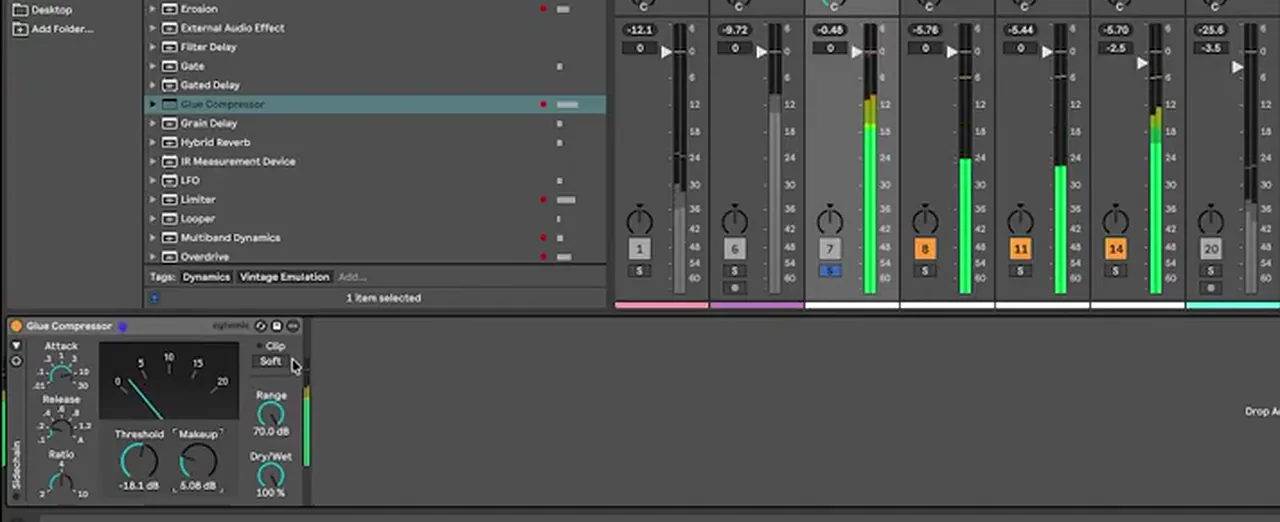
Our drums video shows the idea: you can “group in groups”, so the Kicks, Snare and Tops groups go into one Drums group, which becomes the bus for drum reverb, compression and soft clipping (5:18). On screen its Glue Compressor sits at a -18.1 dB threshold with 6.08 dB of makeup and soft clip on. Adjust the group faders to change what hits the compressor hardest.
Our drum bus video goes further. It starts from drums that sound “too shy” against a loud bass, with no processing on the kick or snare, and builds this chain in order:
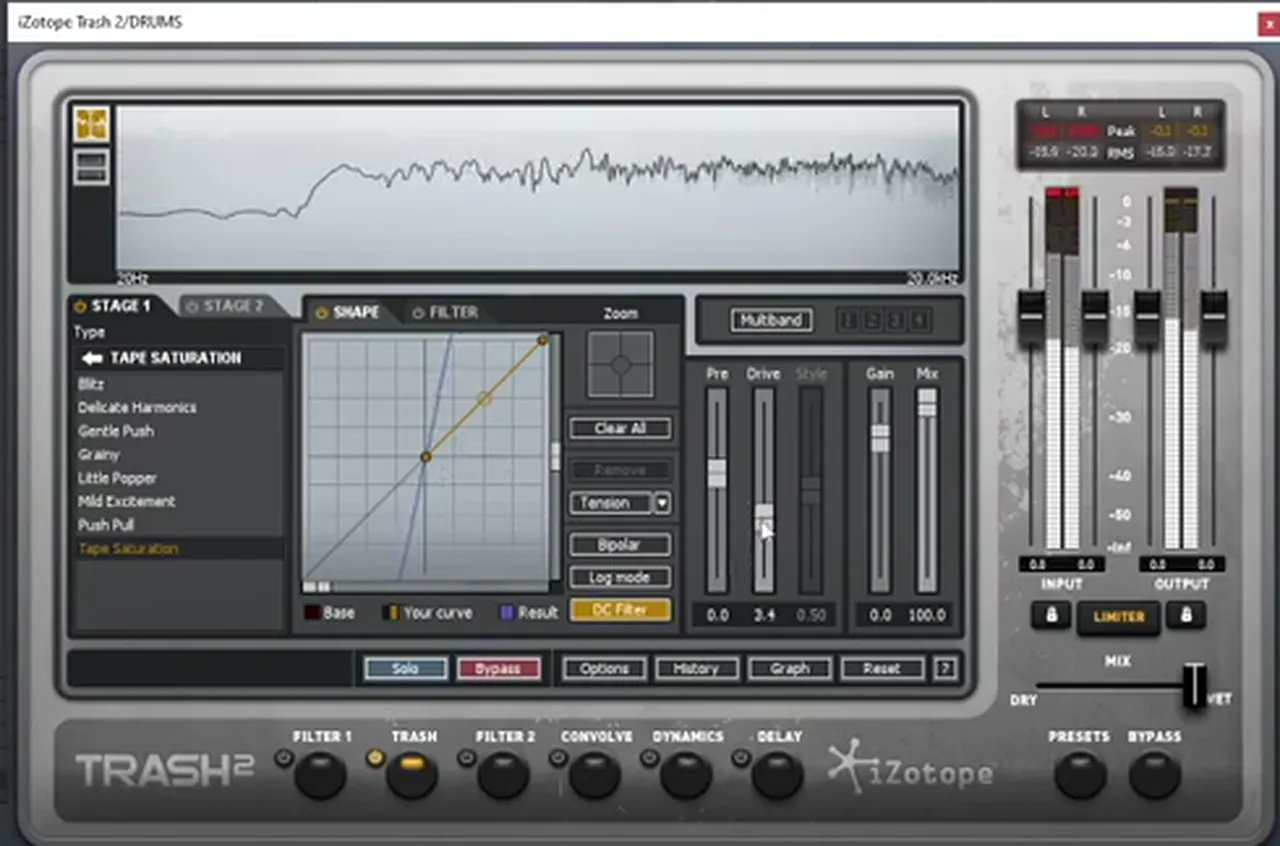
- Saturation first. iZotope Trash in Tape Saturation, drive pushed up only a little (around 3.4 on screen) and no wave-shaping (2:35). Some transient is lost; compression brings it back.
- Corrective EQ. A Pro-Q 3 cuts the extreme lows (around 20–30 Hz) and highs (around 20 kHz) on the bus (3:57).
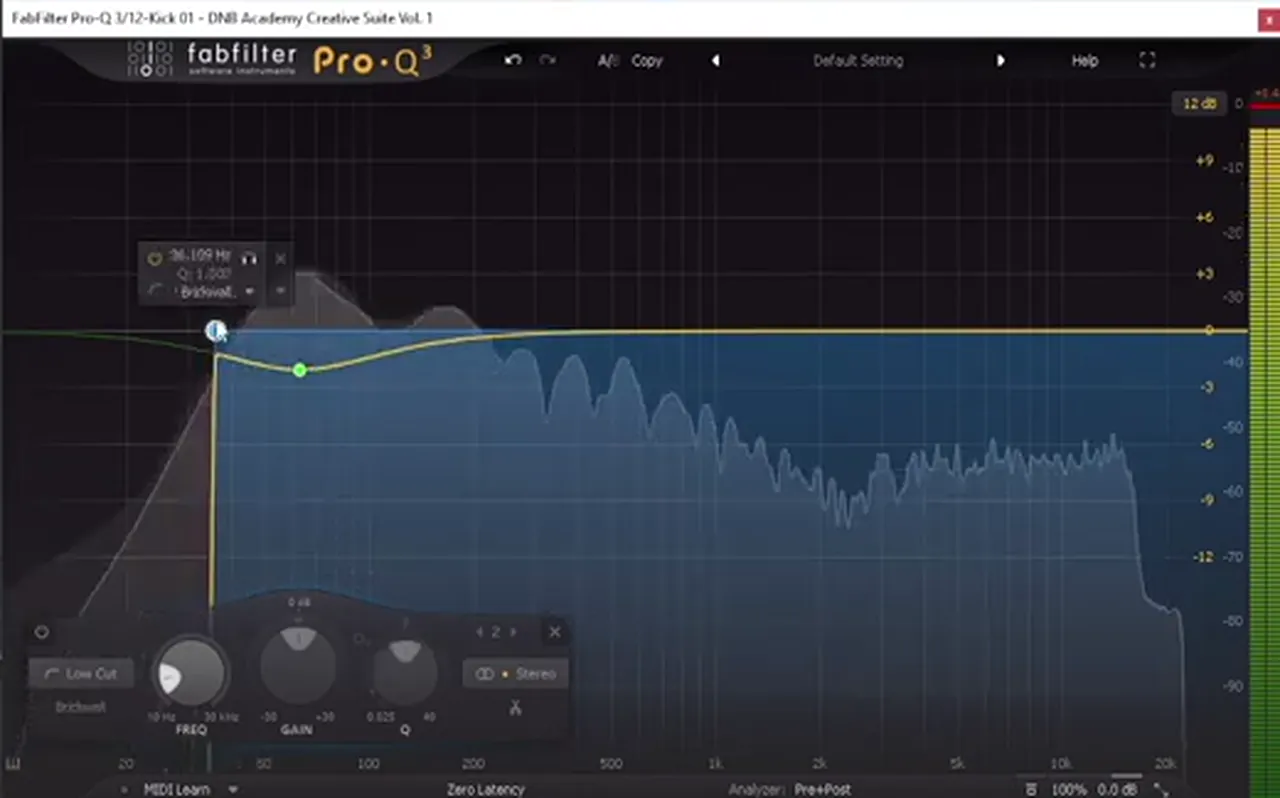
- EQ the kick. Saturation hits the kick first, adding mess to the low end, so the kick gets a brickwall low cut (about 36 Hz on screen). “Just keep EQing after you add a processing plugin” (5:00).
- Glue compression. Ableton’s Glue Compressor with a slower attack, faster release and a 4:1 ratio; lower the threshold until the meter shows about 5 dB of gain reduction on the kick peaks, make up the gain and switch soft clip on (6:25).
- Tame the tops. A dynamic EQ (Gullfoss here: Tame 52%, Brighten -15%, Recover fast) removes ear-piercing crispness without dulling the drums (8:06).
- Shorten the kick so it stands out and leaves room for the bass (10:35).
- Clip and excite. A free distortion plug-in (CamelPhat, from a cleared preset) at the end of the chain works as a clipper, so the Glue’s soft clip can go off. A mild exciter brings back the top end the dynamic EQ took, plus 1–2% distortion (11:03).
Listen: drums and bass, bus chain off, then on8 sec
Both halves are cut from one moment of the video and level-matched together, so the loudness difference you hear is the chain.The demo in that video plays the drums with a bass and no sidechain at all, to prove the point: processing makes the drums cut through on its own. Sidechain or ducking comes next and makes it better still. Treat the chain as a starting point you keep tweaking as the track changes.
Listen: drums without, then with soft clipping9 sec
4.Low end: mono sub, kick vs sub, ducking, small speakers
Keep one mono sub, separate it from the mid bass with EQ, duck the bass around every kick and snare, and give the sub harmonics so it still shows up on phones and laptops, which roll off somewhere around 200–400 Hz.
Go deeperHow to make DnB sub bass · Every DnB bass type explained
Our drum bus video: saturation, EQ, glue, dynamic EQ and clipping.
Our sub video: five ways to make a sine sub audible on small speakers.
Mono sub, clean split
A pure sine sub is a single frequency. In our sub video the sine never goes above about 67 Hz on the analyser (1:46). Keep that sub in mono and put the character in a mid bass above it. Our start-to-finish guide high-cuts the sub around 125 Hz and low-cuts the mid bass around 90 Hz, and our reese bass guide covers the mid bass side.
Kick vs sub: ducking
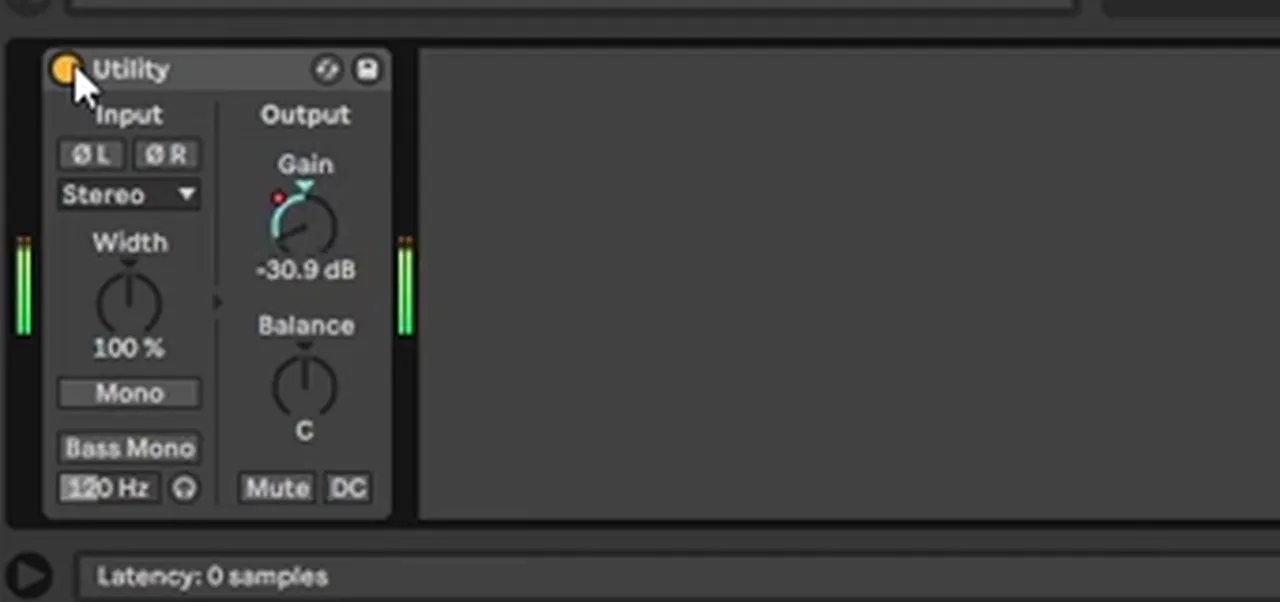
The kick and the sub fight for the same space. Duck the bass whenever the kick or snare hits. Grouping helps: our drums video points out that a Kicks or Snare group can be the sidechain input for a compressor (6:50). Without a compressor, automate a Utility’s gain to dip on every hit, as in our punchy drums tutorial.
Make the sub audible on any speaker
“A lot of people are gonna be listening to your music on iPhones,” and those speakers cut off somewhere between 200 and 400 Hz (0:56). Dancefloor and jump-up basses already live up there; liquid and minimal tracks need more care. Our video shows five fixes:
- Double it with an octave. Raise a copy of the sine one octave and dial it in. It doesn’t reach 400 Hz, but adds energy closer to 200 Hz (2:13).
- Layer a richer waveform an octave above, filtered if it gets hissy. It doesn’t clash with the sine, because the sine has no harmonics of its own (3:17).
- Saturate it. Ableton’s Saturator in Bass Shaper mode with the level compensated: harmonics show up instantly on the analyser. Soft Sine sounds rounder (4:51).
- Add a low-pass reese. Two saws in Serum detuned roughly equally up and down (+27 and -28 on screen), random phase down, the fundamental taken out of both oscillators so the sine stays clean, and key tracking on the filter, then a little surgical EQ (6:08).
- Combine them. Sine plus reese, distorted together, then EQ after; check the analyser and play it against the drums (8:14).
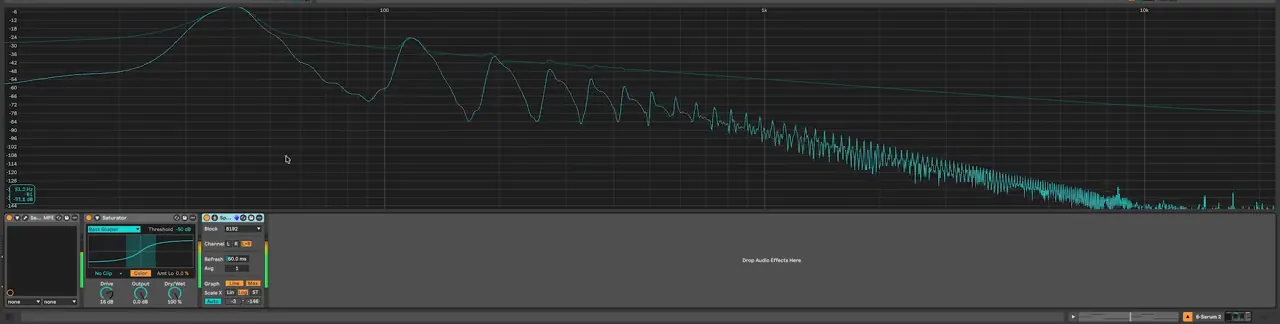
Listen: the plain sine sub, then with Bass Shaper saturation11 sec
Normalised as one clip, so the level change between the halves is real. Try it on phone speakers.Listen: the sub with the octave layer toggled off and on8 sec
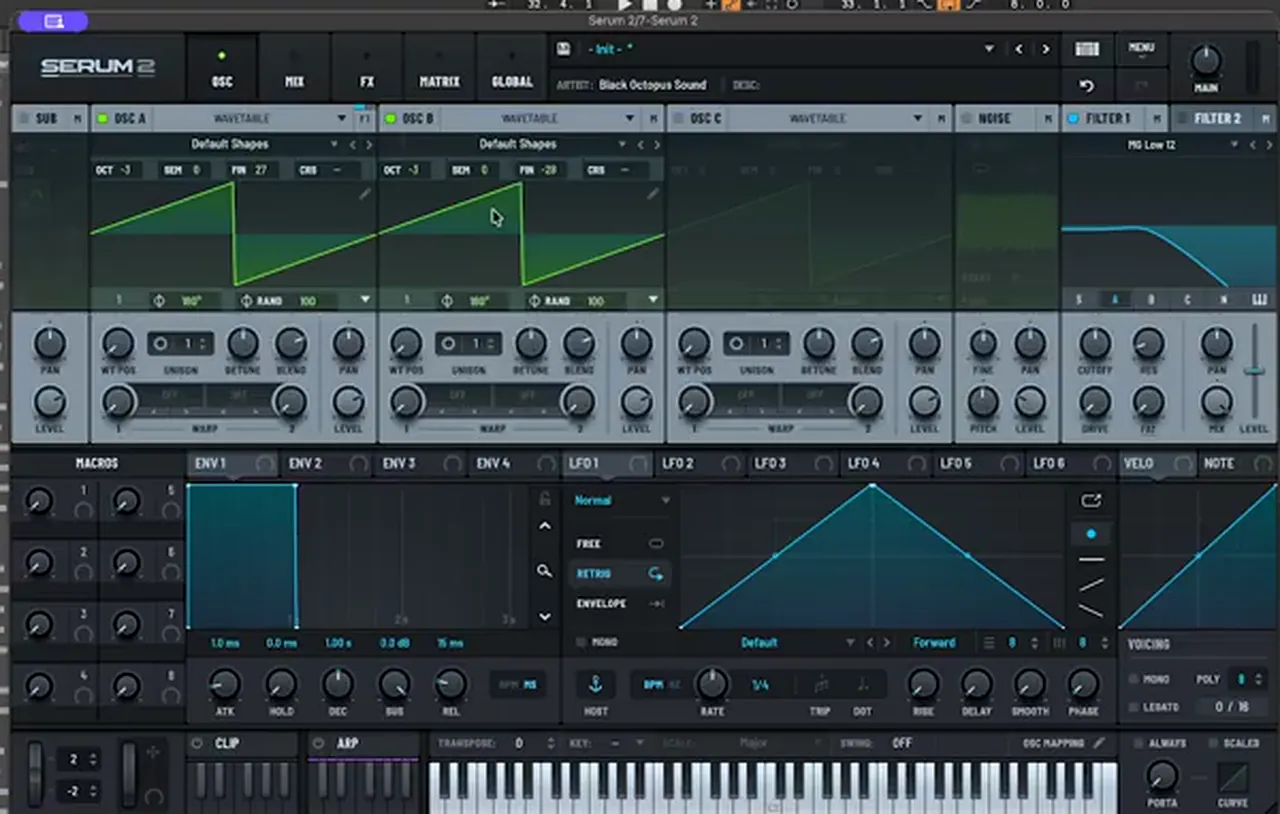
Listen: the combined sub (sine, reese, distortion, EQ) with drums12 sec
5.Mid bass and stereo width: wide mix, tight low end
Think of the stereo image as an upside-down triangle: widest in the highs, narrowing to mono at the bottom. Get width from reverb, delay and layers rather than wideners, keep the sub and kick centred, and remove low-end side information with a mid-side EQ.
Our stereo imaging video: the upside-down triangle, correlation and the mid-side EQ trick.
In our stereo imaging video, rides, splashes and FX sit wide at the top, while the sub and kick are mono at the bottom (2:18). Two reasons: width in the bass costs power, and “for a lot of club systems, the low end is mono”, so the bass has to sum perfectly to mono.
- Bass: most of it sits under about 180 Hz with no width. If you want width, keep a mono sine as the actual sub and layer a reese on top (3:25).
- Drums: the low end of the kick is dead centre; the width comes from the transient. Snare and tops are the same: centred at the bottom, wider at the top (5:34).
- Vocals: several panned takes for width, but the lower end stays mostly in the middle, with airy width at the top (7:12).
- Correlation: +1 means the part sums to mono perfectly, 0 is in between, -1 means it cancels out completely. Stay near +1 in the low end (4:26).
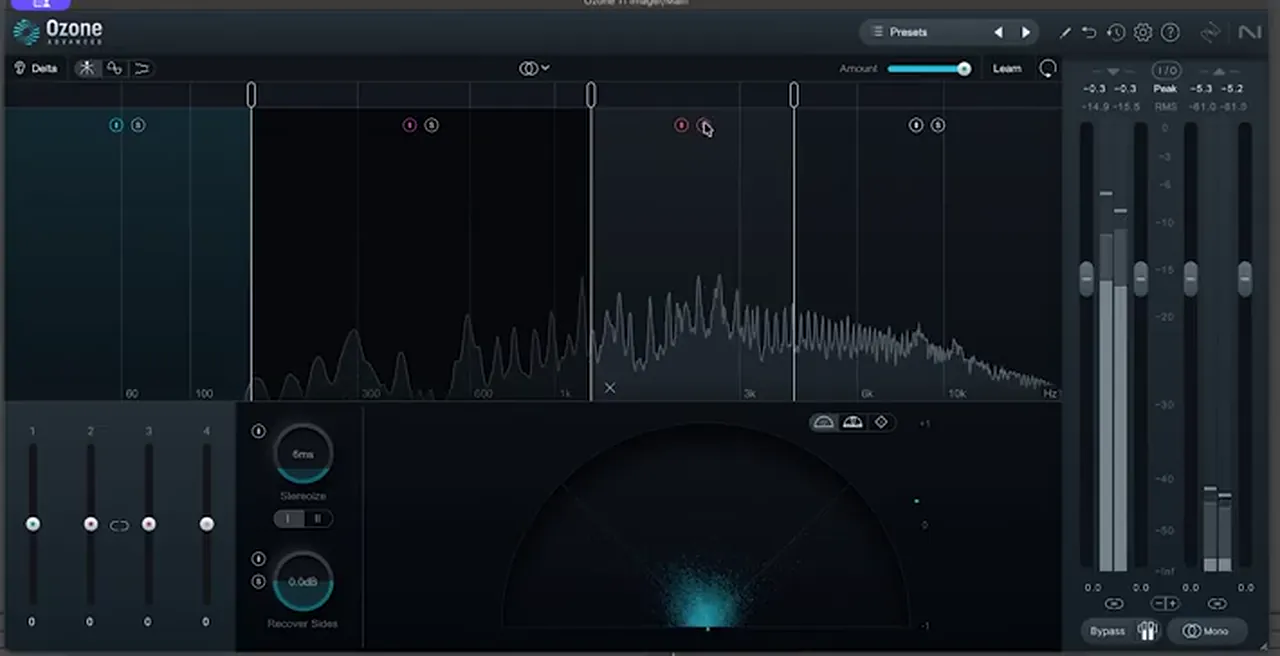
Mono the low end without phase problems
A Utility’s Bass Mono smashes left and right together below a set frequency. If those sides differ, that can cause phase cancellation. Our video prefers a mid-side EQ: EQ Eight in M/S mode, editing the Side channel, with a high-pass (around 160 Hz on screen). It removes the low side information and keeps everything that’s mono, so mono compatibility is untouched (12:00).
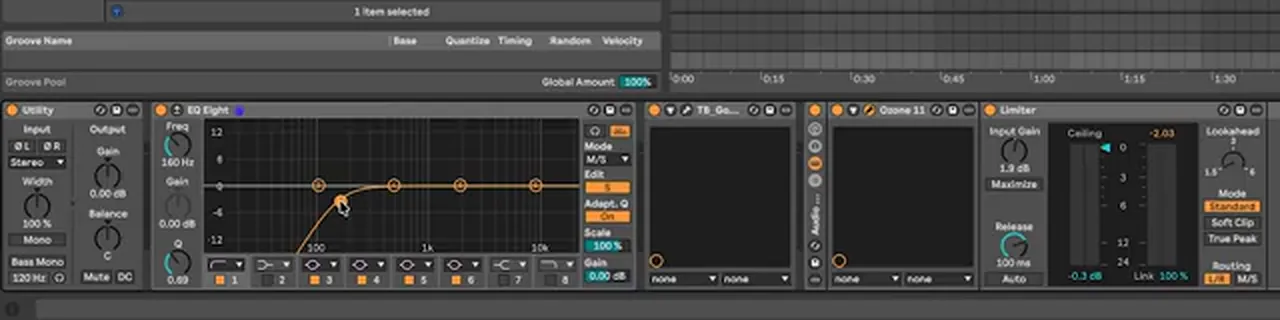
6.Space and depth: reverb and delay sends
Use reverb and delay, usually on sends or group channels, to create width and depth instead of widening dry sounds. A shared drum reverb glues the kit; reverb and ping-pong delay on chords, arps and FX spread them across the stereo field while the low end stays dry and mono.
Our stereo video gets most of its width this way: “I tend to get my stereo from effects rather than from anything like a widener” (1:05). The chords and arps are fairly simply produced with a bit of reverb, one part has a ping-pong delay, and FX get wider as they open up (8:23). Wideners cranked all the way up may look good on an analyser but are never fully trustworthy when summed to mono.
- Drum reverb on the group. Our drums video puts the drum reverb on the Drums bus, so the whole kit shares one space (5:34).
- Keep the low end dry. Reverb on a kick or bass adds width at the bottom of the triangle. Filter the lows out of reverb returns or keep them off the sub.
- Use contrast. Wetter, wider intros and breakdowns make a drier, tighter drop hit harder.
7.Referencing and checking your mix
Check the mix on more than one system: headphones or monitors you trust, a phone or laptop speaker for the sub, and in mono for the low end. Compare against released tracks you like, always at matched loudness, because louder sounds better.
- Headphones or monitors you know. “I trust these headphones”: meters show the problem, your ears make the call (7:04).
- Phone and laptop speakers. If the sub disappears, go back to step 4 and add harmonics.
- Mono. Sum the mix or watch the correlation meter. The low end should barely change.
- An analyser. Check where the sub sits and whether the harmonics you added actually reach 200–400 Hz.
- Reference tracks at matched loudness. Turn the reference down to your mix’s level before you compare, or you are just hearing volume.
- Fresh ears. Take breaks and check again later at a moderate volume.
How loud should a DnB master be?
There is no single correct loudness for drum and bass. Streaming services normalise playback to a reference level, so an over-limited master is simply turned down, while club and label loudness varies by label and engineer. Compare with released tracks at matched volume rather than chasing a number.
Streaming platforms adjust playback volume so tracks play back at a similar level. Spotify, for example, says it normalises to around -14 LUFS (integrated) by default. That is a platform playback setting, not a target you must hit: a louder master is turned down, so limiting harder than the music needs only costs you punch.
For club releases, how loud a master should be varies by label and engineer. Ask for their specs if you are sending a track, keep a dynamic, unclipped mix with headroom, and let the master stage deal with loudness.
Mastering, briefly
Mastering is the final polish: subtle EQ and compression on the whole track, then a limiter for release loudness. Use it to finish a good mix, not to fix a bad one. The DNB Mastering Roadmap in Free Access has a 7-step mastering checklist for this stage.
DnB mixdown checklist
Run through this before you bounce a mix. Each row links back to the step that covers it.
| Check | What good looks like | Where |
|---|---|---|
| Headroom | Faders down, drums and master peaking clearly below 0 dB | Step 1 |
| Drum balance | Kick, snare and tops grouped; kick and snare peaks at a similar level | Step 2 |
| Tops | Low end high-passed out of top loops; splashiness tightened | Step 2 |
| Drum bus | Saturation, EQ, glue (about 5 dB GR), harsh tops tamed, peaks clipped | Step 3 |
| Sub | One mono sine sub, clear of the mid bass | Step 4 |
| Kick vs sub | Bass ducked on every kick and snare | Step 4 |
| Small speakers | Sub audible on a phone thanks to harmonics | Step 4 |
| Stereo | Wide highs, mono lows; correlation near +1 in the bass | Step 5 |
| Space | Width from reverb and delay; low end dry | Step 6 |
| Checks | Headphones, monitors, phone and mono; references at matched loudness | Step 7 |
Want the full version? The DNB Mixing Roadmap in Free Access turns this into a 10-step checklist you can work through with any DAW.
Common DnB mixing mistakes
- No headroom. Everything peaking near 0 dB before the master leaves nothing for mastering.
- Mixing every drum layer separately. Group layered kicks, snares and tops so one fader does one job.
- Low end in top loops. High-pass them; that rumble muddies the kick and sub.
- Processing without re-EQing. Saturation and distortion change the kick and low end first. EQ after them.
- A wide or distorted sub. Keep one mono sine and put the character in the layers above it.
- A sub that only exists on big speakers. Check on a phone and add harmonics if it vanishes.
- Wideners on everything. Get width from reverb, delay and layers, and check mono.
- Comparing at different volumes. Level-match every A/B and every reference.
- Chasing a loudness number. Streaming normalises playback anyway; club loudness varies by label and engineer.
Free download
Two free checklists to finish your track
Mix with a plan, then master with one. Both e-books are in DNB Academy Free Access:
- DNB Mixing Roadmap: intro to mixing drum and bass
- A 10-step mixing checklist (23 pages)
- DNB Mastering Roadmap: intro to mastering drum and bass
- A 7-step mastering checklist (17 pages), any DAW
Free Access also has seven free sample and preset packs, the DNB Production Bible and the 3‑day DnB challenge. Join 40,000+ producers in Free Access. Free account, no card needed.
Go deeper
Watch a full track get mixed and mastered
See the mixdown in context, inside a complete track from first idea to master.
 Production courseIcicle production courseA start-to-finish course with 4+ hours of video, from idea generation to the mixing, mastering and last details, plus the project file, samples, presets and stems.
 Production courseBOP production courseMicrofunk and atmospheric DnB: drum layering and programming, sound design, and mixing and mastering, with the project file, samples, presets and stems.
 Production courseSynergy production course6+ hours of neurofunk production: multi-layered basslines, custom drum design, arrangement, mixing and mastering.
Every artist course, preset bundle and sample pack is also in The Vault. Browse courses
Related tutorials
All tutorials → Guide · BeginnersHow to Make Drum and Bass: A Step-by-Step Guide19 min read · Guide
 Mixing · DrumsHow to Make DNB Drums Punchy: 3 Mixing Techniques8 min read · Video + guide
 Drums · PatternsDrum and Bass Drum Patterns: How to Program DnB Beats14 min read · Video + guide
 Serum · BassHow to Make a Reese Bass for Drum and Bass15 min read · Video + guide
FAQ: mixing drum and bass
How do you mix drum and bass?
Gain stage first so nothing peaks near 0 dB, then group and balance the drums, glue them on a drum bus and control their peaks. Keep the sub mono and clear of the kick, duck the bass around the drums, keep width in the mids and highs, add space with reverb and delay sends, and check the mix on headphones, monitors and a phone at matched loudness.
Should sub bass be mono in drum and bass?
Yes. In our stereo imaging video the sub and the low end of the kick sit dead centre, because width in the bass costs power and many club systems play the low end in mono. Get width from mid bass layers, reverb and delay instead, and high-pass the side signal with a mid-side EQ rather than forcing everything to mono.
How do I make my sub bass audible on phones?
Phone and laptop speakers roll off somewhere around 200 to 400 Hz, so a pure sine sub can disappear. Give it harmonics: double it an octave up, layer a more harmonic waveform, saturate it (Ableton's Saturator in Bass Shaper or Soft Sine mode), or add a filtered reese with its fundamental removed. Then check the result on a phone.
What goes on a DnB drum bus?
In our drum bus video the chain is saturation first (tape saturation with a little drive), a corrective EQ cutting the extreme lows and highs, a glue compressor at a 4:1 ratio with about 5 dB of gain reduction, a dynamic EQ to tame harsh tops, and a clipper with a touch of excitement and distortion at the end. EQ again after every processor that changes the tone.
How loud should a drum and bass master be?
There is no single right number. Streaming services turn loud tracks down to their own reference level (Spotify, for example, normalises to around -14 LUFS by default), while club and label loudness varies by label and engineer. Compare your master with released tracks at matched volume rather than chasing a figure.
Should I use a stereo widener on my bass?
Not on the sub. Wideners can sound impressive on headphones but may cancel out when the mix is summed to mono. Keep a mono sine sub, let a reese or mid bass layer carry any width, and watch the correlation meter: readings near +1 are mono-safe, readings towards -1 mean parts will cancel.
Do I need paid plugins to mix drum and bass?
No. Our videos use some third-party plugins, but the core moves work with stock tools: group tracks, EQ, a glue or bus compressor, a saturator, a utility for ducking and a mid-side capable EQ. Ableton's EQ Eight, Glue Compressor, Saturator and Utility cover the core of every step on this page.
Where can I get a free DnB mixing checklist?
DNB Academy Free Access includes the DNB Mixing Roadmap, a 23-page e-book with a 10-step mixing checklist, and the DNB Mastering Roadmap, a 17-page e-book with a 7-step mastering checklist. Both work with any DAW, and Free Access is a free account with no card needed.
Next steps
Open your latest track, group the drums, check the sub on your phone and work down the checklist. Then keep going:
Free Access
The Mixing and Mastering Roadmaps, seven free DnB sample and preset packs and a 3-day challenge.
Get free packsThe full guide
Tempo, drums, bass, chords, arrangement and mixdown: every step of a DnB track.
Read the guideDNB Foundations
A structured course with weekly live feedback calls on your tracks. Beginners welcome.
See Foundations1:1 Mentorship
Personal guidance on your music from a mentor, built around your goals.
See the mentorship50,000+ producers have joined DNB Academy, and our producer Discord has 5,300+ members.