
Serum · Neuro bass · Recreation
How to Make Basses Like Enei’s “Sinking VIP” in Serum
To make basses like the ones in Enei’s “Sinking VIP” in Serum, turn a bass sample into a wavetable, morph between its frames and move through it with LFOs, then add the sub, distortion and a multiband compressor. The second bass starts from Serum’s Monster 4 wavetable and gets its metallic, resonant edge from a band-pass filter, a reverb filter and a moving EQ. Below is our own recreation, presented by Paulo from DNB Academy, with the settings from the screen and audio of both basses.
This is a learning recreation inspired by the basses in “Sinking VIP”, not the original sounds or presets. The main lesson is a workflow you can use on any bass: resampling it into a wavetable and building new sounds from it. For every bass type in one place, see our drum and bass bass guide.
Quick answer
How do you make basses like “Sinking VIP”?
For the first bass, open Serum’s wavetable editor, type the bass’s note (E0) into the formula field and drag a bass sample in. Remove the frames that only repeat, run X-Fade Edges, Remove DC Offset and Normalize each, then morph the frames with Spectral. Map LFOs to the wavetable position and the level, and add the sub, Tube distortion, a multiband compressor, chorus and EQ. For the second bass, use Monster 4 with a slow LFO, 16 unison voices, Bend+ warp, sub and noise, a resonant band-pass filter, a reverb filter, a moving EQ, chorus and a multiband compressor.
- Resample.A bass sample into a wavetable at E0.
- Trim.Keep only the frames that carry the movement.
- Clean.X-fade edges, remove DC offset, normalise.
- Morph.Spectral morph between the frames.
- Move.LFOs on wavetable position and level.
- Bass 2.Monster 4, band-pass resonance and a moving EQ.
The full walkthrough with Paulo from DNB Academy: two basses inspired by “Sinking VIP”, built from an initialised Serum patch in Ableton Live. Each step below links to its moment in the video.
What you’ll need
- Serum. Both basses use oscillator A with its wavetable editor, the sub and noise oscillators, the filter, LFOs 1 and 2 and the built-in Distortion, Filter, Chorus, Compressor and EQ effects. Don’t have Serum? Vital is free and can do the same job: it can import audio as a wavetable and modulate the position, level and filter with LFOs.
- A bass sample to resample. Paulo uses basses from our Discord DnB Production Toolkit, a sample and preset pack first made for our Discord community and now one of the free packs in DNB Academy Free Access. Any bass you’ve made or downloaded works; you need to know its root note.
- A DAW. The video uses Ableton Live, with each bass on its own track.
Bass 1: a wavetable made from a bass sample
1.Resample a bass into a wavetable
Serum can cut any bass sample into single-cycle frames. Tell it the sample’s note first, then drag the sample into the wavetable editor.
Start from an initialised patch (watch at 0:38). The main lesson of this bass is how to turn basses into wavetables and create new sounds out of them. Paulo picks a bass from the Discord pack; on screen it’s DNB Academy – Discord Bass 08.
Open oscillator A’s wavetable editor (watch at 1:05). In the formula field at the bottom, type the key of the bass you want to resample, in this case E0, and press Enter. Then drag the bass sample into the editor. Serum confirms the split on screen: “split at: 1070 samples (41 Hz, note: E0 and 0 cents)”, and the table now holds 56 frames.
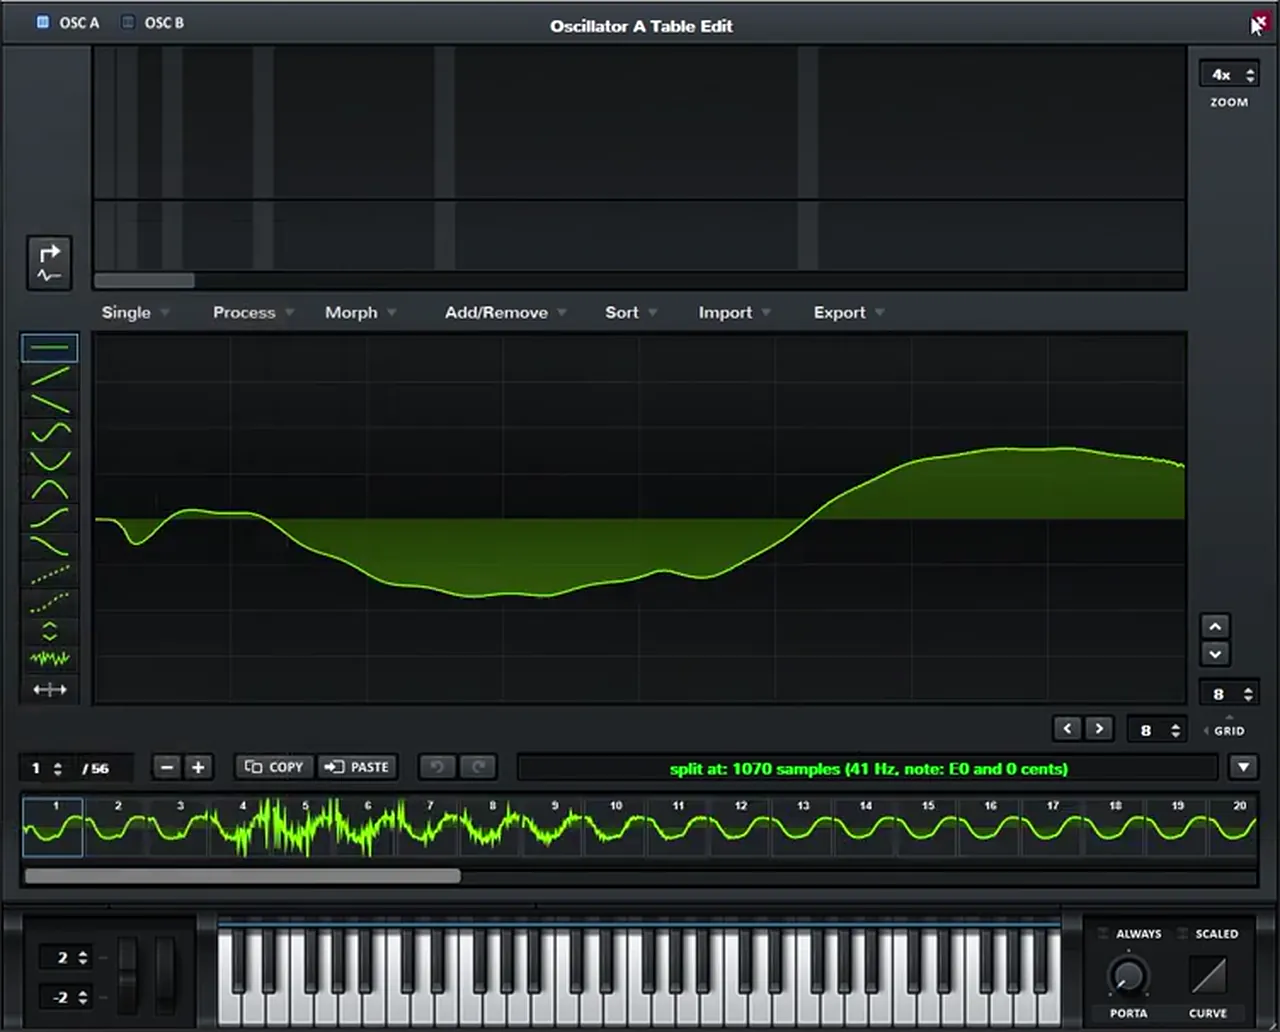
Go back to the main window and play it (watch at 1:20). The new wavetable already sounds pretty similar to the original sample, but it isn’t very usable yet.
2.Remove the frames you don’t need
Keep only the frames that carry the main movement of the sound. Everything after the point where the waveform starts repeating can go.
Back in the wavetable editor (watch at 1:36), select the last frame, then hold Shift and click the frame where the waveform starts to repeat itself many times; here that’s around frame 12. Open Add/Remove and choose Remove: multiselection.
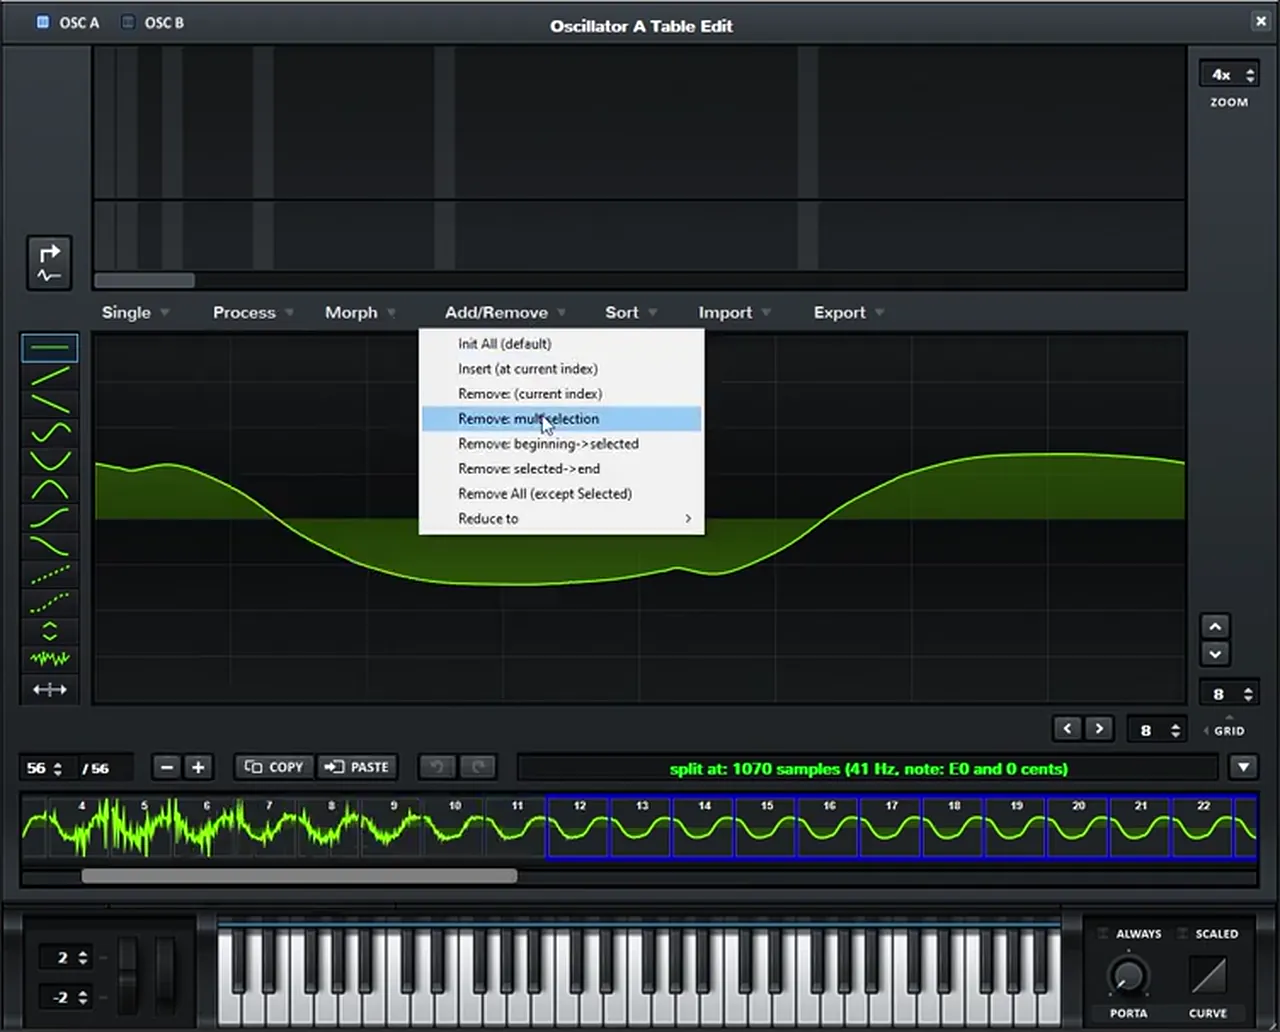
Then get rid of the first two frames with the minus button (watch at 2:03). You’re left with 9 frames: only the key single-cycle waveforms that create the sound.
3.Clean up the single cycles
Cut-up audio rarely gives perfect single cycles. Three Process commands fix the joins, the offset and the levels.
Scroll through the frames (watch at 2:17) and you’ll notice that the start and the end of each waveform don’t really match. Open the Process menu and select X-Fade Edges. Some frames also sit a little off the centre line on the y-axis, so run Remove DC Offset too. Finally, use Normalize each, so every frame has the maximum volume possible.
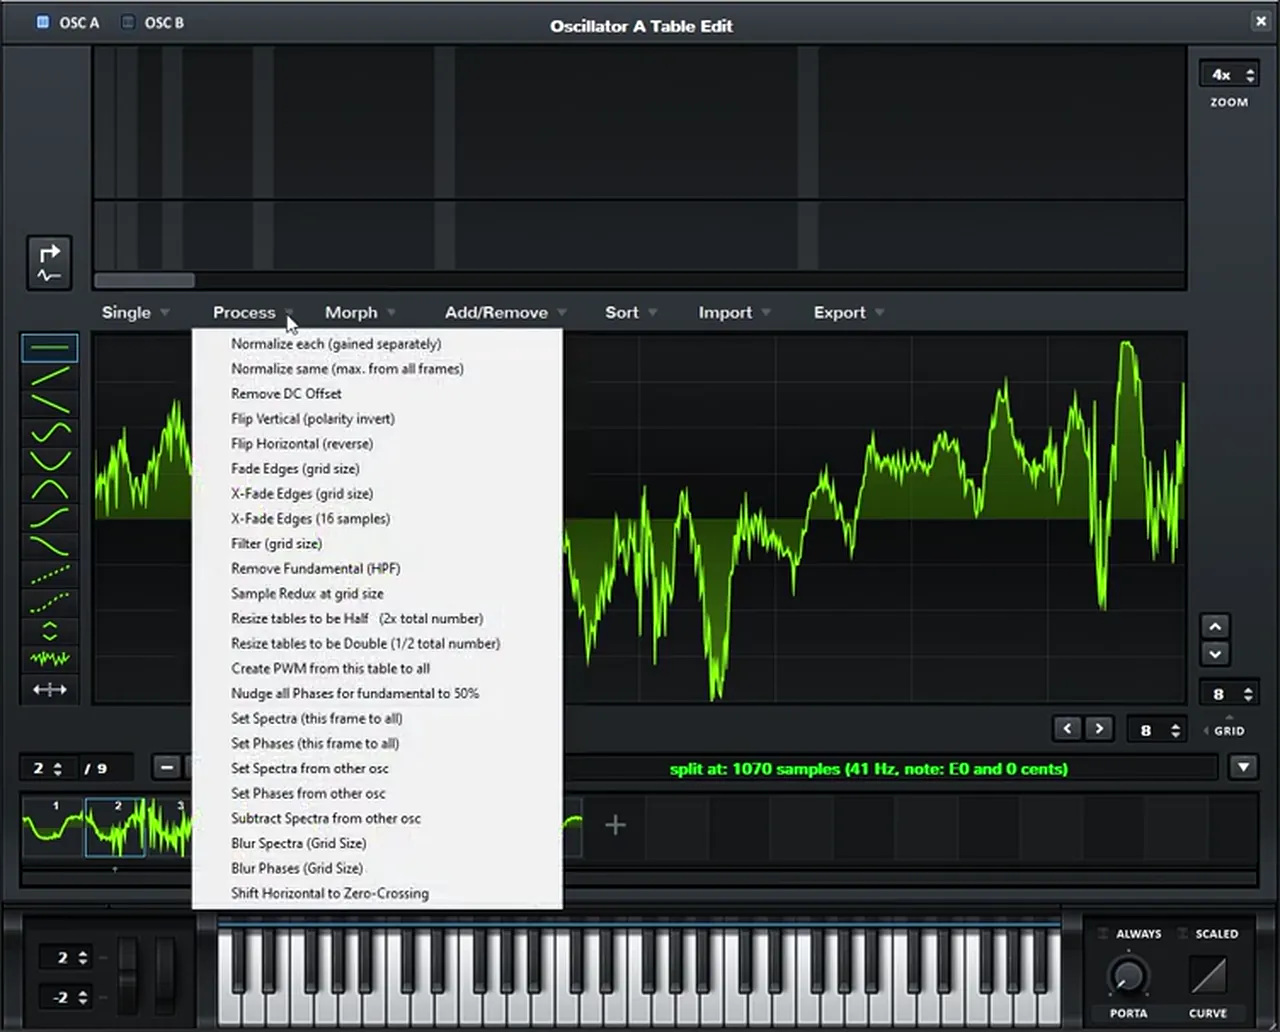
Scroll through again and all the waveforms are now even.
4.Morph between the frames
Nine separate frames jump from one to the next. A morph fills in the steps between them, so the wavetable scans smoothly.
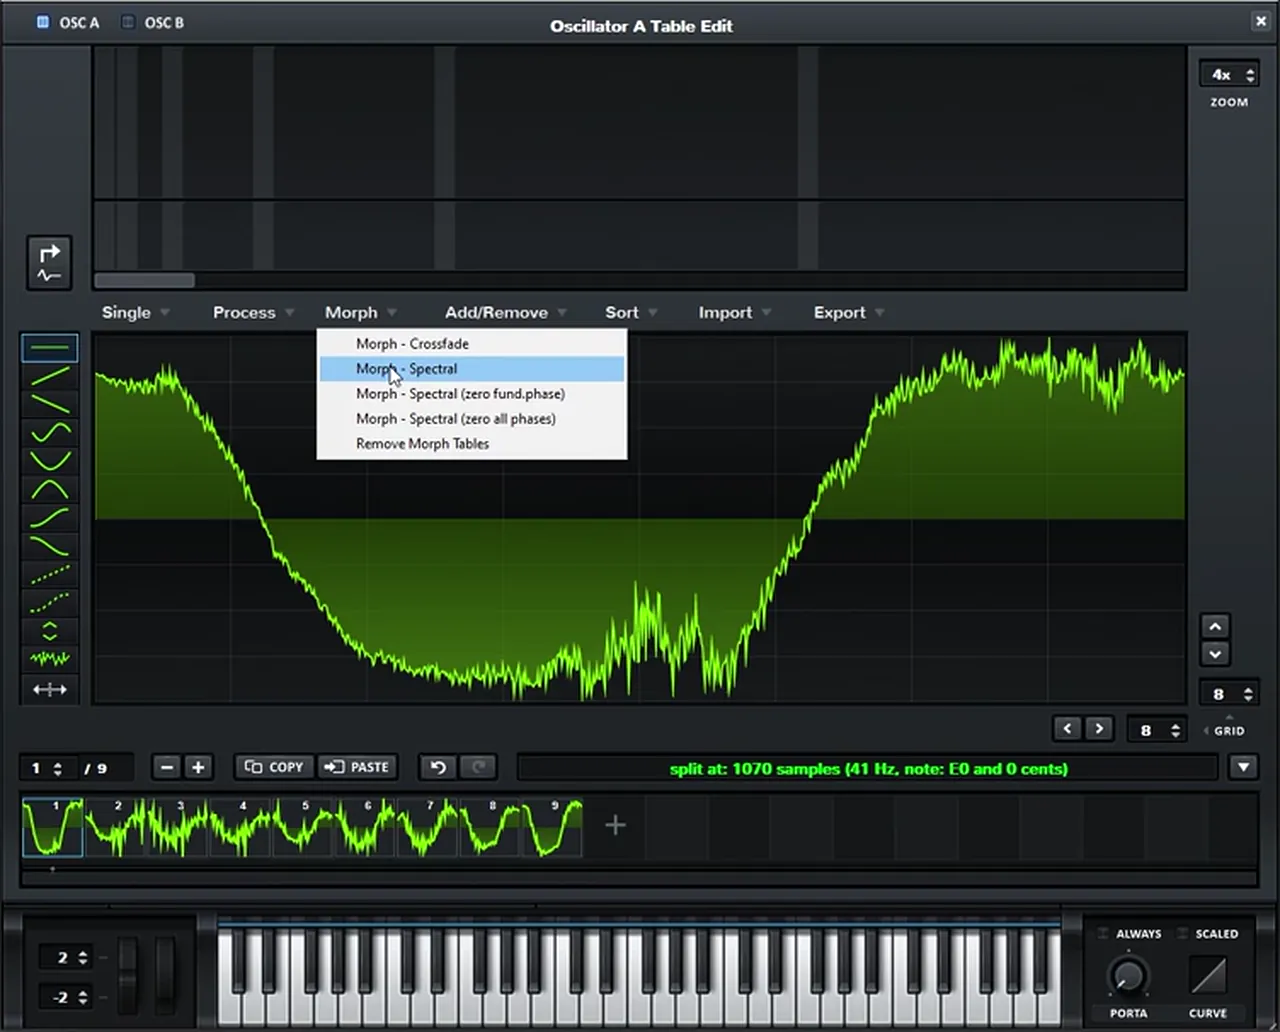
Open the Morph menu (watch at 2:56). You can choose Crossfade or Spectral; Paulo picks Morph – Spectral. The table grows to 256 frames, and you now have a proper wavetable made out of that bass.
5.Add LFO movement
The wavetable only comes alive when something moves through it. One LFO scans the wavetable position, a second shapes the level.
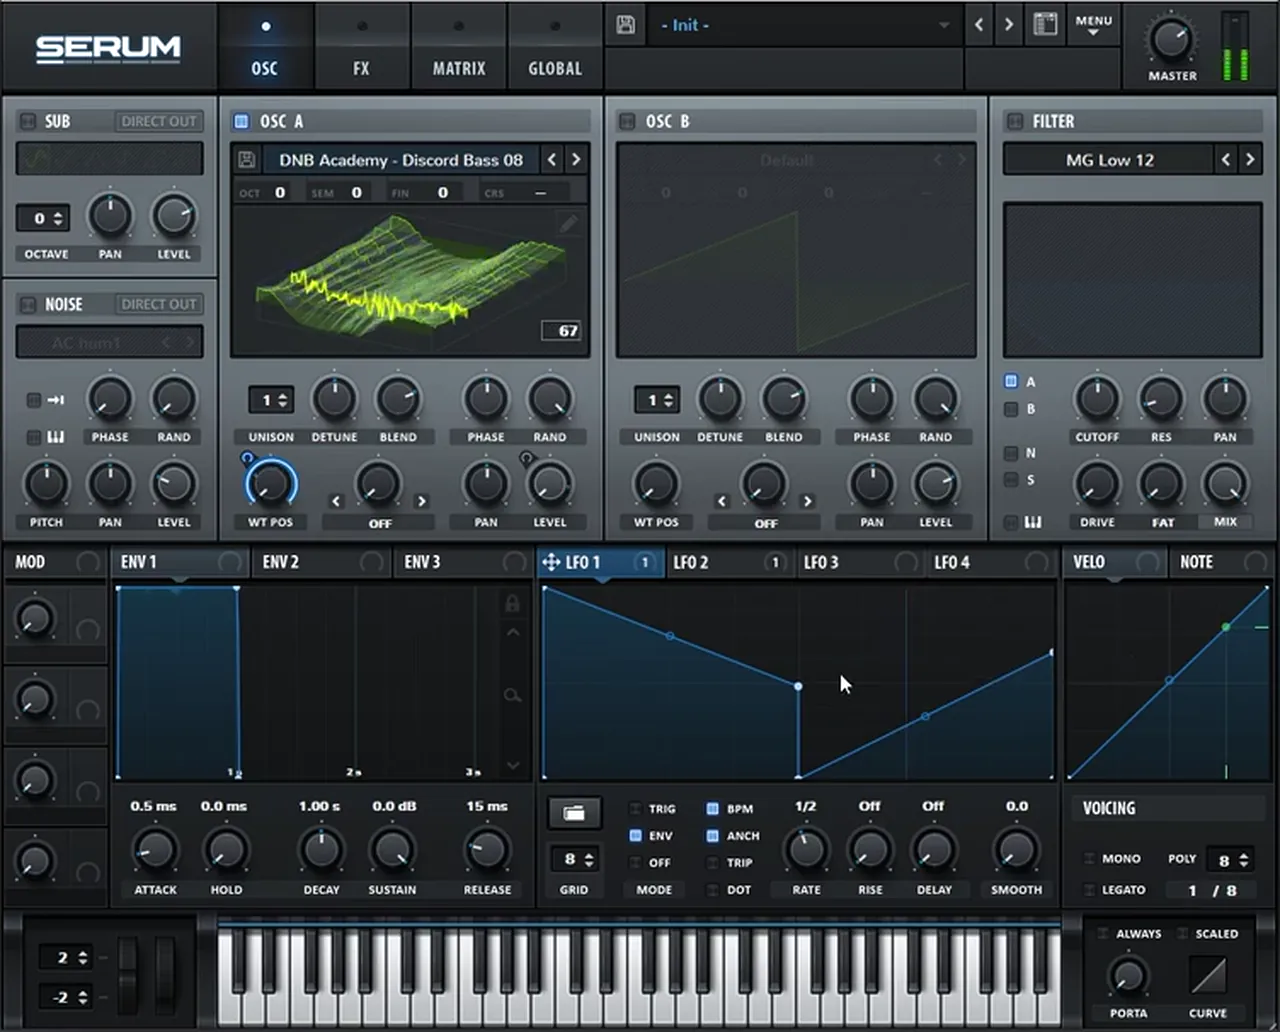
Assign an LFO to the wavetable position and make it slower (watch at 3:11); on screen LFO 1 goes from 1/4 to 1/2. Then assign a different LFO to the level of this oscillator to create a different movement. Here it’s LFO 2, also at 1/2, with a custom shape drawn in. Play it and you’re already hearing a different sound out of that first bass.
Now go into LFO 1 and draw different movements for the wavetable (watch at 3:45): one movement for the first half of the sound and another for the second half. Click the Env mode button so the LFO retriggers with each note instead of running freely.
6.Process the first bass
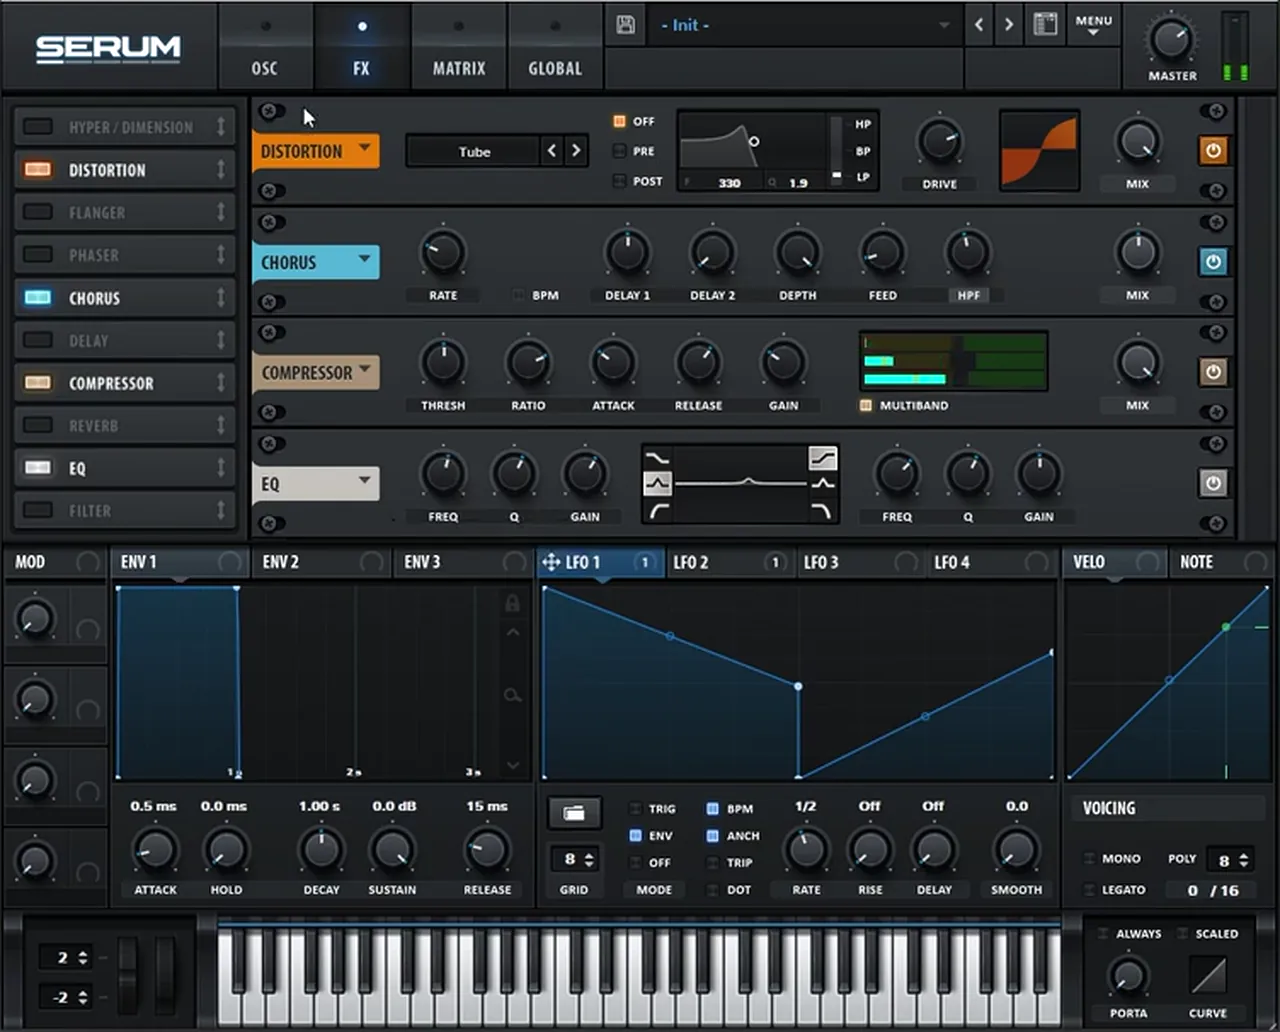
With the movement in place, process the sound with Serum’s own tools: the sub, distortion, a multiband compressor, chorus and EQ.
Turn on the sub (watch at 4:09), then distort the two together; on screen the Distortion is set to Tube. Add a multiband Compressor (its gain reads 9.0 dB on screen), then something like Chorus and a bit of EQ. In the chain on screen, the chorus filter is switched to HPF.
7.Swap in other basses
Once the post-processing and movement work, go back to step one and replace the wavetable with another bass. The chain stays, the sound changes.
This is where the workflow pays off (watch at 4:35). Paulo drags another bass from the Discord pack into the wavetable editor (Discord Bass 04 on screen) and repeats the process. This time there are no frames to remove, so it’s straight to Normalize each, Remove DC Offset, X-Fade Edges and a Spectral morph. You get a totally different bass, and you can create different movements with the LFO shapes you’ve already drawn.
Listen: the same chain with a second Discord pack bass as the wavetable9 sec
You can repeat this as many times, with as many different sounds, as you want (watch at 5:26). For the final version of this bass, Paulo used a random bass from his throwaway bass folder (Bass 25 on screen). Same process: Normalize each, Remove DC Offset, X-Fade Edges, Morph – Spectral, then normalise again. After that it’s all about the movements you introduce into the wavetable, so keep experimenting with the LFOs.
Listen: the first bass with the Bass 25 wavetable8 sec
That’s as close as Paulo got with this bass (watch at 6:34). The last 10% comes from different post-processing and EQ, and from more experimenting. The bigger idea: resample all of your different basses this way and you’ll get tons of new sounds. For another take on heavy Serum basses, see our bass like Noisia’s Diplodocus.
Bass 2: Monster 4 with a resonant band-pass
8.Start the second bass from Monster 4
The second bass also uses a complex wavetable. To keep it simple, it starts from one of Serum’s factory tables, with a slow LFO, lots of unison and Bend+ warp.
You can use the resampling method above to make your own wavetable for this sound too, but Paulo uses a default Serum wavetable: Monster 4 (watch at 7:19). Pick a cool wavetable position by ear (around 85 on screen), then assign a slow LFO to it (watch at 7:48) so the sound has a bit of movement in it. On screen LFO 1 is a falling ramp at 4 bar.
Next, use a lot of unison voices (16 on screen) (watch at 8:07) and set the warp mode to Bend+. Then turn on the sub and the noise oscillator; the noise on screen is AC hum1.
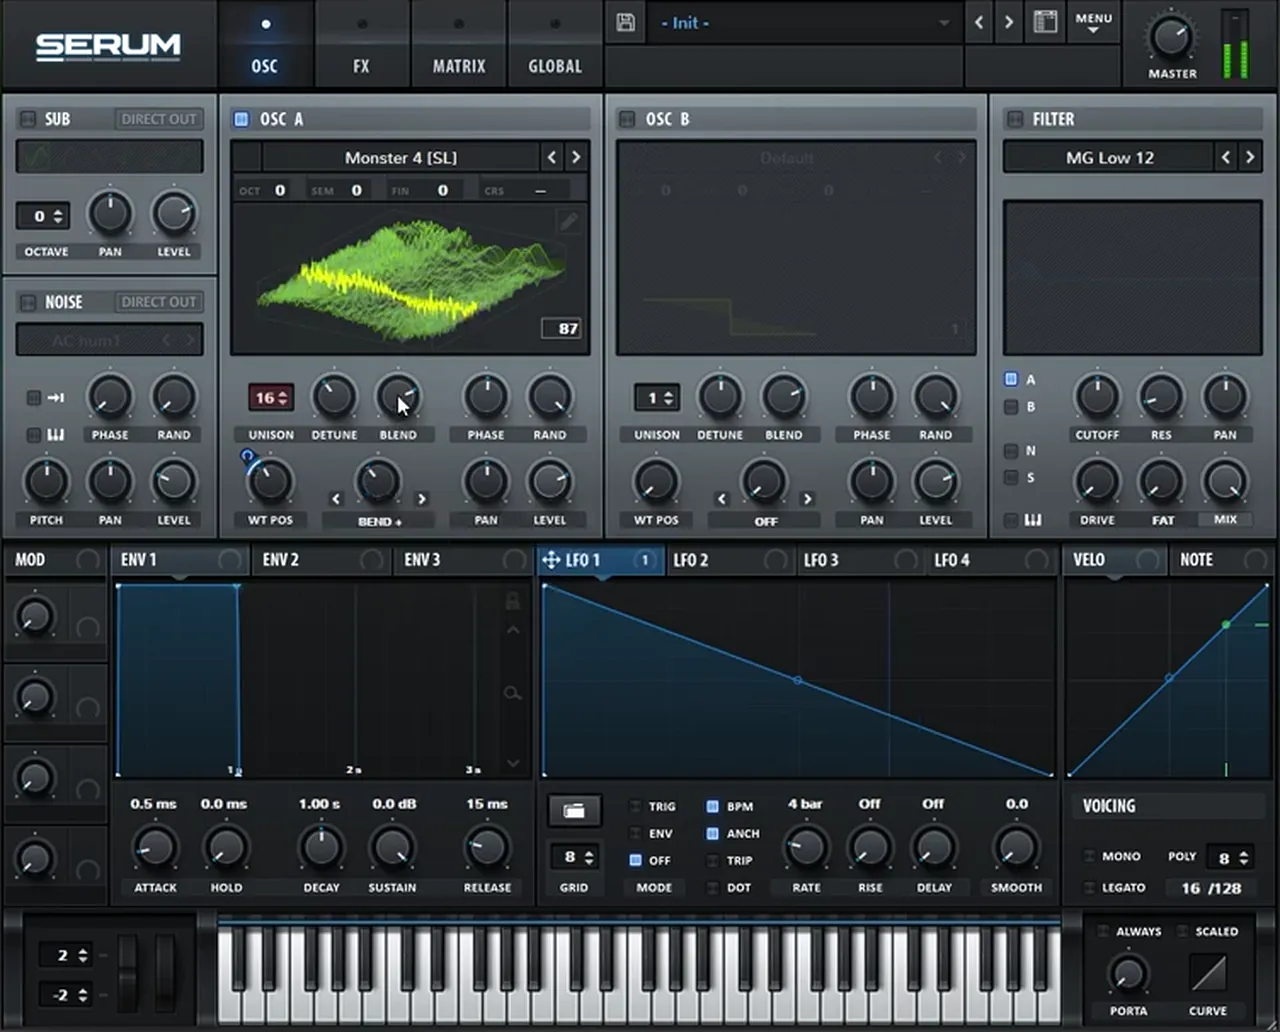
Then distort all of it together (watch at 8:28). On screen it’s the same Tube distortion as the first bass.
9.Add a resonant band-pass filter
A band-pass filter with its resonance up accentuates specific frequencies and adds a different feel. An LFO in envelope mode moves the cutoff on each note.
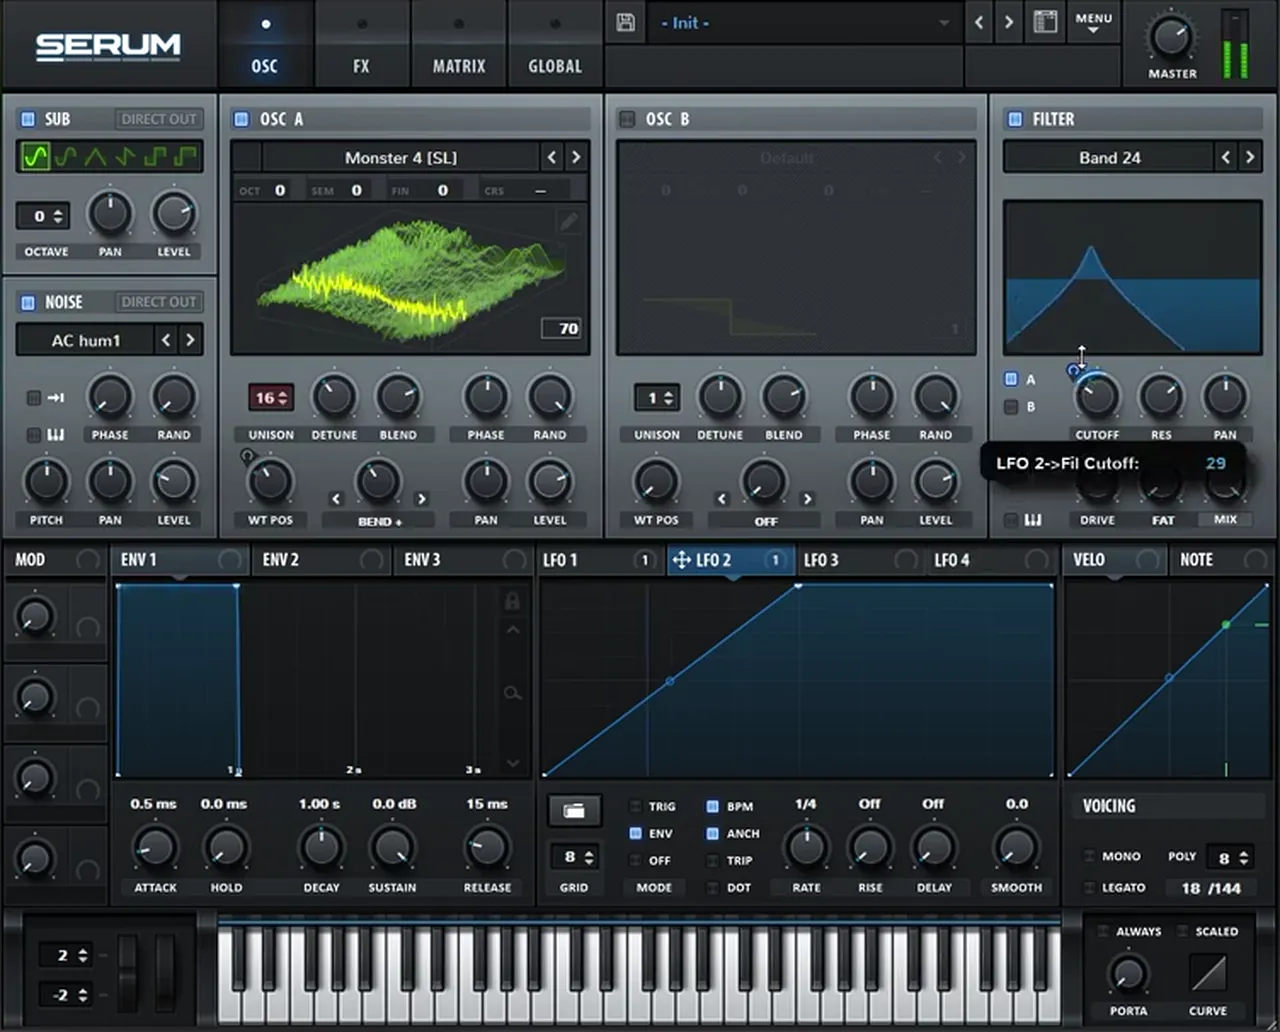
Back in the main window (watch at 8:36), turn on the filter and choose a band-pass; on screen it’s Band 24. Boost the resonance and the drive, and play with the cutoff depending on which frequencies you want to accentuate.
Use a separate LFO to add movement to the cutoff (watch at 9:03). On screen it’s LFO 2, a rising ramp at 1/4. Turn on its Env mode and bring the cutoff down, so the filter begins in a lower position and then stays up. Then play with the filter mix (it reads 70% as it moves). Paulo changed his mind and set the cutoff a bit higher afterwards, so there’s lots of room to experiment here.
Listen: the second bass through the band-pass filter and its LFO7 sec
10.Add a reverb filter and a moving EQ
Two more effects add grit and movement: a second filter set to the Reverb type, and an EQ band with an LFO on its frequency.
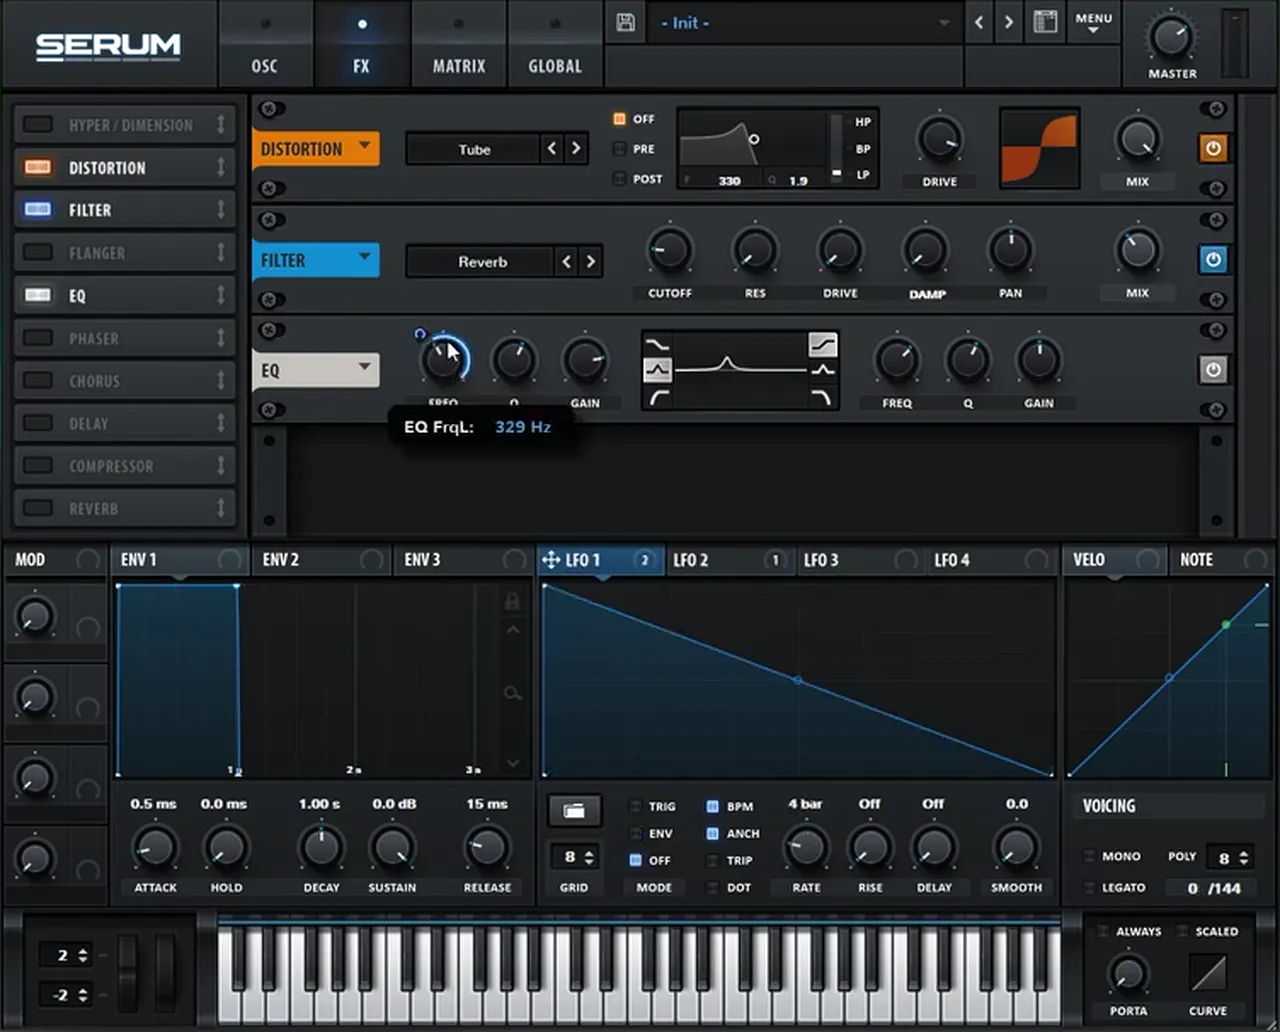
Go back to the FX section (watch at 9:43) and add another Filter, this time the Reverb type. It adds more grittiness and a bit more of a metallic feel to the sound. Play with its mix as well.
Then add a bit of EQ (watch at 10:00) and repeat the band-pass idea: map the first LFO to the frequency of the low band, to add more movement to certain frequencies. On screen the band reads 329 Hz while the knob is being set, and LFO 1 now shows two destinations.
11.Finish with chorus and multiband compression
Chorus in high-pass mode widens the top without touching the lows. A multiband compressor then sets the balance between sub, mids and highs.
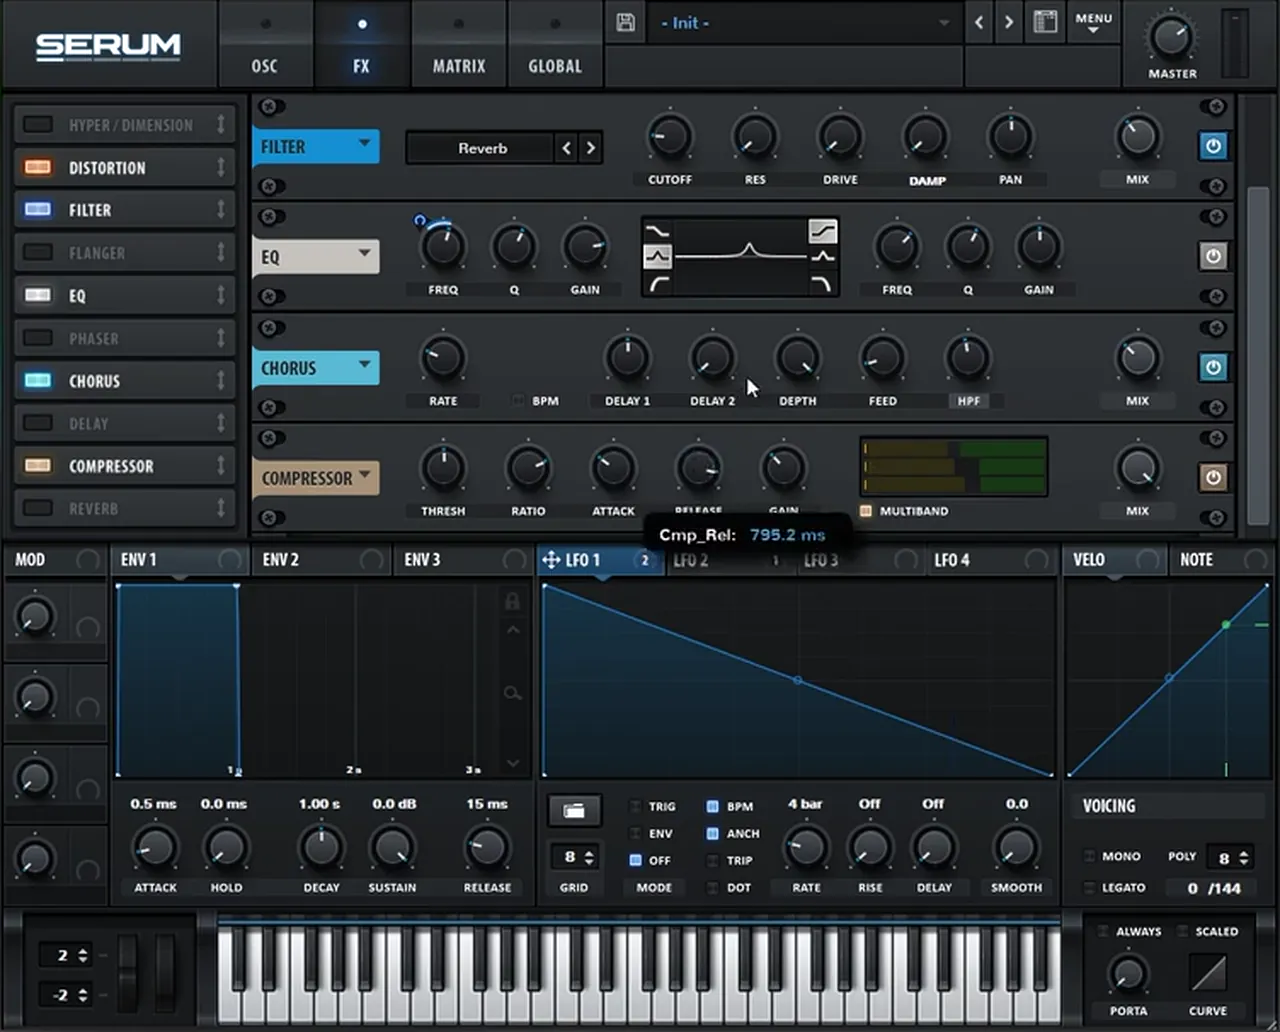
Add a bit of Chorus (watch at 10:25) and switch it to high-pass mode (HPF), so the lows aren’t fully affected by the chorus. Play with the mix.
Then add a multiband Compressor (watch at 10:37) and shape the bands: Paulo wants more sub, more mids, a bit less highs and a long release (795.2 ms on screen).
Just like the first bass, you can go back to the wavetable selection and try others (watch at 10:54). Paulo clicks through more factory tables, such as Monster 7, and you could also use the resampling trick from bass 1 here.
Listen: the second bass with the full effects chain, trying other wavetables11 sec
12.Post-processing in the DAW
Very little happens outside Serum: some EQ on the highs and a filter automated on the first section of the sound.
For post-processing (watch at 11:17), the only things added are some EQ on the highs and a filter automating the first section of the sound, the same way the main track does. In Ableton Live that’s an EQ Eight and an Auto Filter after Serum. At the end of the video (watch at 11:37) you can hear both basses in context.
For where basses like these sit, read the neurofunk section of our subgenres guide. For another resonant, metallic Serum bass, try our foghorn bass like Skantia & Annix’s “Clapper”.
Common mistakes with resampled wavetable basses
- The wrong note in the formula field. Serum splits the sample at the note you type. If it doesn’t match the bass’s root note (E0 here), the frames won’t be clean single cycles.
- Keeping every frame. Once the waveform starts repeating, the extra frames add nothing. Keep only the ones that carry the main movement.
- Skipping the clean-up. Without X-Fade Edges, Remove DC Offset and Normalize each, the joins click, frames sit off centre and the level jumps as the wavetable scans.
- A free-running LFO. Switch the wavetable LFO to Env mode so it retriggers on every note; otherwise each note starts somewhere different.
- Chorus on the lows. Use the chorus in HPF mode so the sub stays solid.
- Making one bass and stopping. The point of this workflow is that the chain stays and the wavetable changes. Try several basses before you decide.
Free download
Free samples to build a neuro loop around
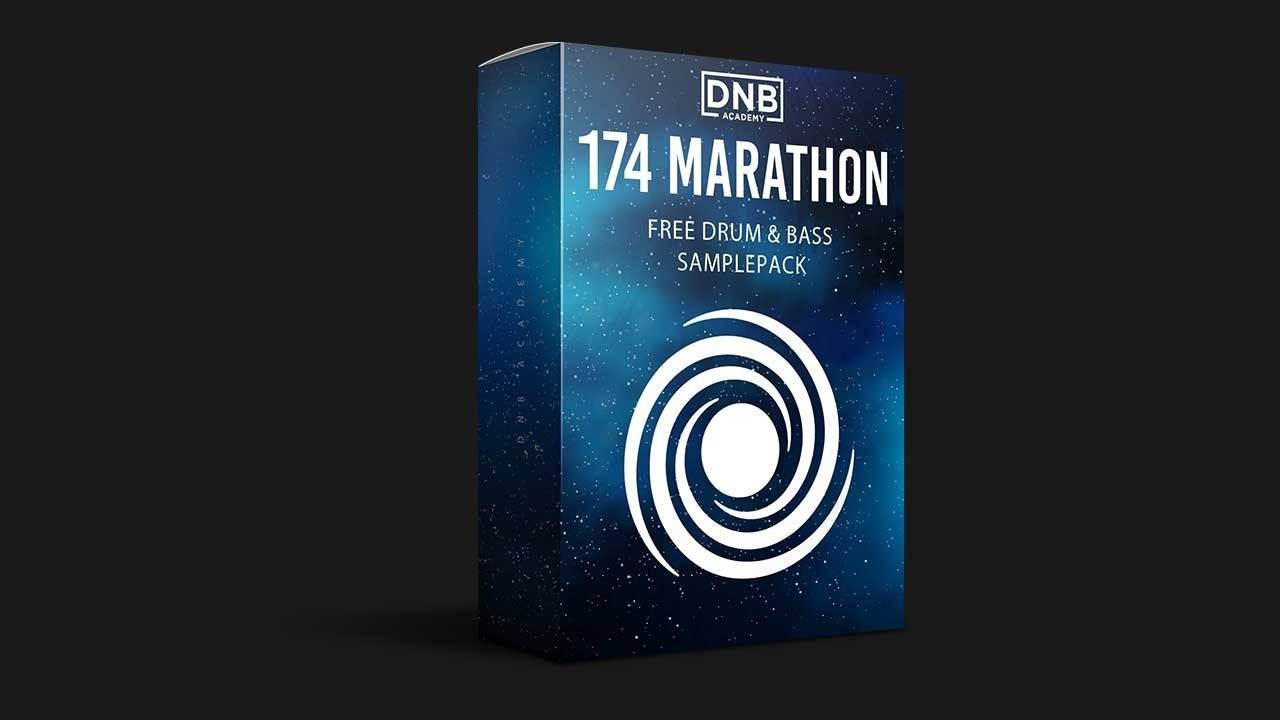
Basses like these only make sense once there’s a beat under them. The 174 Marathon Sample Pack gives you:
- 100+ royalty-free samples
- Drums, bass, FX, melodics and more
- Audio samples, so they work in Ableton Live or any other DAW
- Made for International Drum & Bass Day and our 174 Production Marathon
It’s one of seven free sample and preset packs in DNB Academy Free Access, alongside the mixing and mastering e-books and the 3‑day DnB challenge. Join 40,000+ producers in Free Access. Free account, no card needed.
Go deeper
More neuro basses and full tracks
Want ready-made Serum basses to take apart, or a whole neurofunk track built from start to finish?
 Preset bundleNeuro Essentials Serum preset bundle100 Serum presets for neurofunk, including 50 basses, plus FX, drums, pads and synths.
 Production courseMaztek production courseNeurofunk: a technical approach to neuro drum & bass, from start to finish, in 6+ hours of video.
 Production courseCurrent Value production courseAbout 5 hours of a full track built with synthesis: drum, bass and pad synthesis, Serum and Ableton Operator workflows, post-processing, arrangement and mixing.
Every artist course, preset bundle and sample pack is also in The Vault. Browse courses
Related tutorials
All tutorials → Serum · NeuroHow to Make a Bass Like Noisia’s Diplodocus in Serum9 min read · Video + guide
 Serum · RecreationHow to Make a Bass Like Buunshin’s “Acolyte” in Serum9 min read · Video + guide
 Serum · Bass designHeavy DnB Bass Sound Design in Serum with Current Value10 min read · Video + guide
 Serum · RecreationHow to Make a Foghorn Bass Like IMANU & Buunshin’s “Nagow” in Serum8 min read · Video + guide
FAQ: making basses like “Sinking VIP”
How do you make a bass like Enei’s “Sinking VIP” in Serum?
For the first bass, resample a bass sample into a wavetable: type its note (E0 in the video) into the wavetable editor’s formula field, drag the sample in, remove the frames you don’t need, then X-fade the edges, remove the DC offset, normalise each frame and morph between them with Spectral. Put LFOs on the wavetable position and the oscillator level, then add the sub, Tube distortion, a multiband compressor, chorus and EQ. For the second bass, start from Serum’s Monster 4 wavetable with a slow LFO, lots of unison, Bend+ warp, sub and noise, then add a resonant band-pass filter, a reverb filter, a moving EQ, chorus and a multiband compressor.
Is this Enei’s actual preset?
No. It’s our own recreation in the style of the basses in “Sinking VIP”, built by Paulo from DNB Academy from an initialised Serum patch. The aim is to learn the resampling workflow and use it to make your own sounds.
How do you turn a bass sample into a wavetable in Serum?
Open the oscillator’s wavetable editor, type the sample’s root note into the formula field and press Enter, then drag the sample into the editor. Serum splits it into single-cycle frames at that pitch. Remove the frames that just repeat, process the rest with X-Fade Edges, Remove DC Offset and Normalize each, then use Morph Spectral to create smooth steps between them.
Why process the frames before morphing?
When a bass is cut into single cycles, the start and end of a cycle often don’t match, some frames sit off the centre line and the levels vary. X-Fade Edges smooths the joins, Remove DC Offset centres each frame and Normalize each brings every frame to full volume, so the morphed wavetable scans evenly.
What gives the second bass its metallic, resonant tone?
A band-pass filter with the resonance and drive boosted accentuates specific frequencies, and an LFO in envelope mode moves the cutoff. In the effects, a Reverb-type filter adds grit and a metallic feel, and an EQ band with the first LFO on its frequency adds more movement.
Can I make this in Vital?
Vital is free and has the main ingredients: you can import audio into a wavetable, edit and morph the frames, and modulate the wavetable position, level and filter cutoff with LFOs, plus distortion, filter, EQ, chorus and compressor effects. Names and menus differ, so use the workflow here as your guide.
Next steps
Pick one bass you’ve already made, resample it into a wavetable and get the movement right before you touch the effects. For more heavy bass design in Serum, try our heavy DnB bass sound design with Current Value; to build a whole track around basses like these, read our guide to making drum and bass; and for more bass types and when to use them, see the neuro section of our drum and bass bass guide.
Free Access
Seven free DnB sample and preset packs, including the 174 Marathon Sample Pack and the Discord DnB Production Toolkit, plus mixing and mastering e-books and a 3-day challenge for Ableton Live and FL Studio.
Get free packsThe full guide
Tempo, drums, sub, mid bass, chords, arrangement and mixdown: every step of a DnB track.
Read the guideDNB Foundations
A structured drum and bass course with weekly live feedback calls on your tracks.
See Foundations1:1 Mentorship
Personal guidance on your music from a mentor, built around your goals.
See the mentorship50,000+ producers have joined DNB Academy, and our producer Discord has 5,300+ members.