
Mixing · Vocals · Ableton Live
How to Process Vocals for Drum and Bass: Telomic’s Vocal Chain Tips
To process vocals for drum and bass, start with a clean recording, then run a short chain: a touch of preamp distortion, a low cut, compression, a dynamic EQ on the harsh highs plus a small low-mid lift, a filtered dotted delay and a little reverb. Here is that exact vocal chain from Telomic, using the lead vocal by flowanastasia on their liquid tune, with every setting we could read off the screen.
Vocals are a big part of liquid drum and bass. This page is the vocal step: how to make a sung vocal sit inside a DnB mix.
Quick answer
What is a good vocal chain for drum and bass?
A simple DnB vocal chain is: saturation or preamp drive for grit, a high-pass EQ to clear the lows, a compressor for about 6 dB of gain reduction, an EQ that tames the highs and lifts the low mids, a filtered delay on a dotted rhythm and a short reverb at the end. Telomic’s point: it is simpler than people think.
- Start with a great recording.It is far easier than fixing a bad one.
- Add grit.Preamp-style distortion first in the chain.
- Cut the lows before compression.So rumble doesn’t trigger the compressor.
- Compress.About 6 dB of gain reduction.
- Shape the tone.Dynamic EQ on the highs, a small low-mid bump.
- Tame resonances.A resonance suppressor, mix turned down.
- Add space.Filtered dotted delay, then a little reverb.
Top Tips for Processing DNB Vocals with Telomic ft. flowanastasia: the full vocal chain in Ableton Live, with a before and after at the end.
What you’ll need
- A DAW. Telomic works in Ableton Live, but the chain works in any DAW. Every step has a stock version: EQ, compressor, delay and reverb.
- A dry lead vocal. A sung vocal with little or no processing on it. If you don’t have a singer yet, a royalty-free vocal pack with dry versions is the easiest way to practise.
- An instrumental to mix it into. You judge a vocal against the tune, not soloed. In the video the project is at 174 BPM.
- The plugins from the video (optional). Soundtoys Radiator, Ableton EQ Eight, Waves RVox, FabFilter Pro-Q 3, oeksound soothe2, Ableton Delay and Valhalla VintageVerb. Stock alternatives are fine for all of them.
1.Start with a great recording
The best vocal processing starts before any plugin. A well-recorded, well-comped vocal needs only light processing; a bad one is much harder to fix than a good one is to polish.
Telomic plays the drop of the tune first, a “deep rolling liquid” track, then solos the dry lead vocal stem. flowanastasia’s engineer comps and records everything, so it arrives at a high quality (watch at 1:18). Telomic’s rule: make sure “the quality of the vocal at source is really good”.
A little processing from the singer’s side is fine. This vocal already had some compression on it. Telomic simply asks that there isn’t too much, so he still has room to shape it himself.
2.Add preamp distortion for grit
Put a gentle saturation or preamp-style distortion first in the chain. It adds grit and helps the vocal hold together once it is compressed, so it sounds less clean and sterile.
The first plugin is Soundtoys Effect Rack with Radiator, a 1567A mixer amp emulation, on the vocal (watch at 2:02). He drives it hard to show the effect, then keeps it subtle. It “gives it a bit of grit, especially when we’re compressing”. Telomic says he spent a while making everything in his productions very tight and clean, and is now stepping away from that a little.
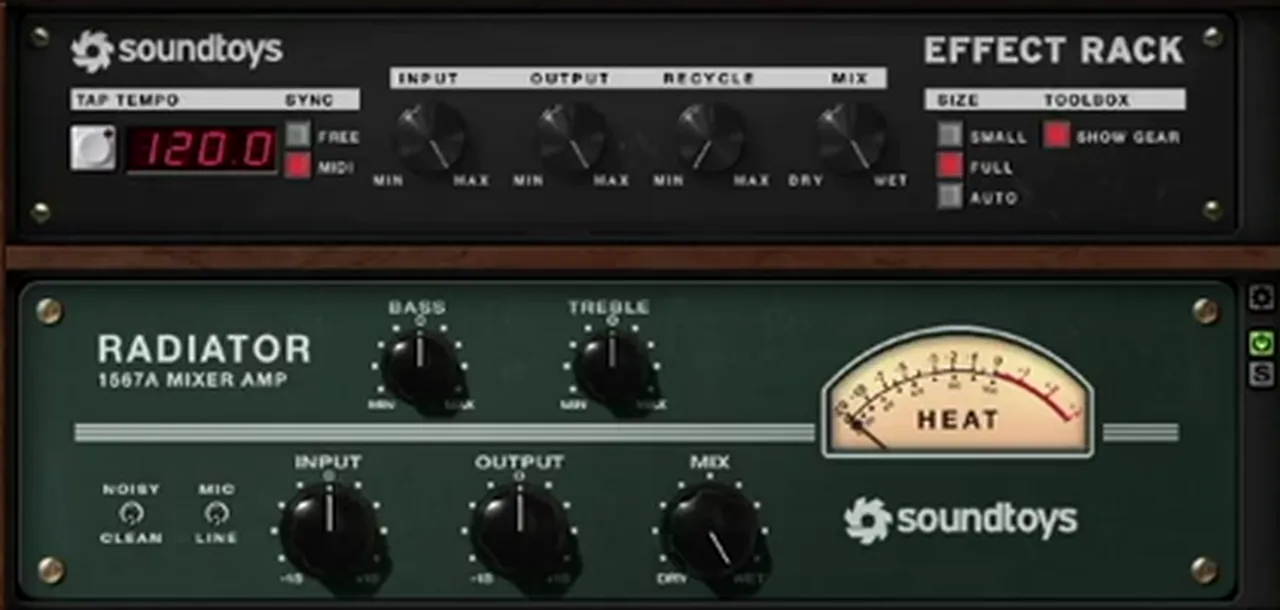
He also switches the project to 174 BPM at this point so the tempo-synced effects later on line up with the tune (watch at 2:42).
3.Cut the lows before compression
High-pass the vocal before the compressor, so low rumble and bumps don’t trigger it. Only the vocal tone itself should drive the compression.
Next comes Ableton’s EQ Eight with a high-pass filter. The Freq dial reads about 124 Hz with a Q of 0.72 (watch at 2:56). The order matters. If you cut the lows after the compressor, the low-end noise and bumps would already be pushing the compressor around, “which isn’t what we want”.
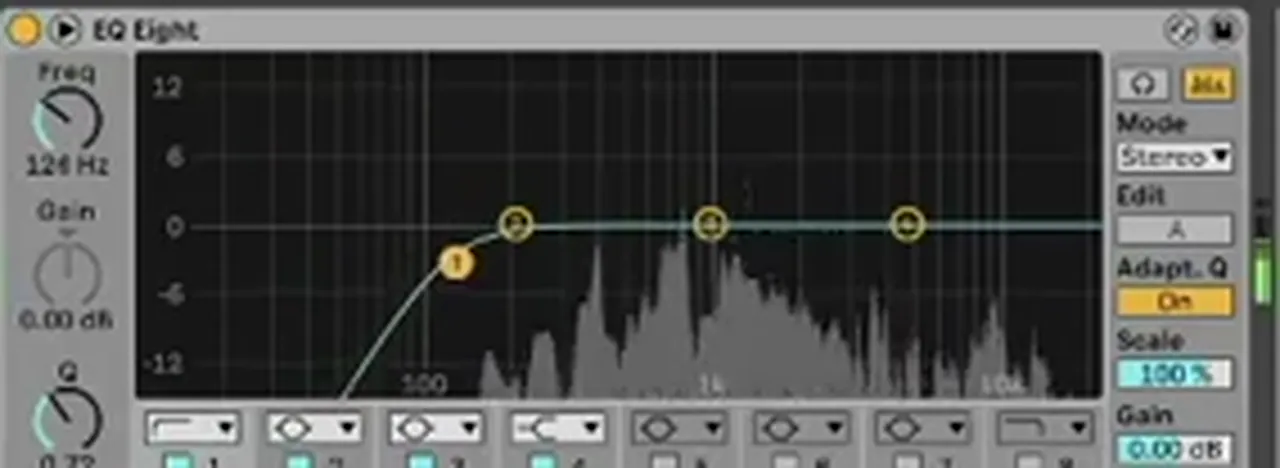
Why after the distortion, then? Telomic says it is partly taste. Any low end going into the distortion adds a bit of extra crunch and drive. His general rule is useful for any vocal chain: subtractive EQ goes before compression, and anything more creative goes after.
4.Compress for about 6 dB of gain reduction
Use a simple compressor and aim for around 6 dB of gain reduction. That evens out the level so every word sits at a steady height over the drums.
Telomic uses Waves RVox “because it’s really simple”: one main slider (watch at 3:50). He goes for about 6 dB of reduction. In our screenshot the Comp slider sits at -15.8, with the gate off. Don’t copy the slider number, because it depends on how loud your vocal is. Set it by the gain reduction instead.
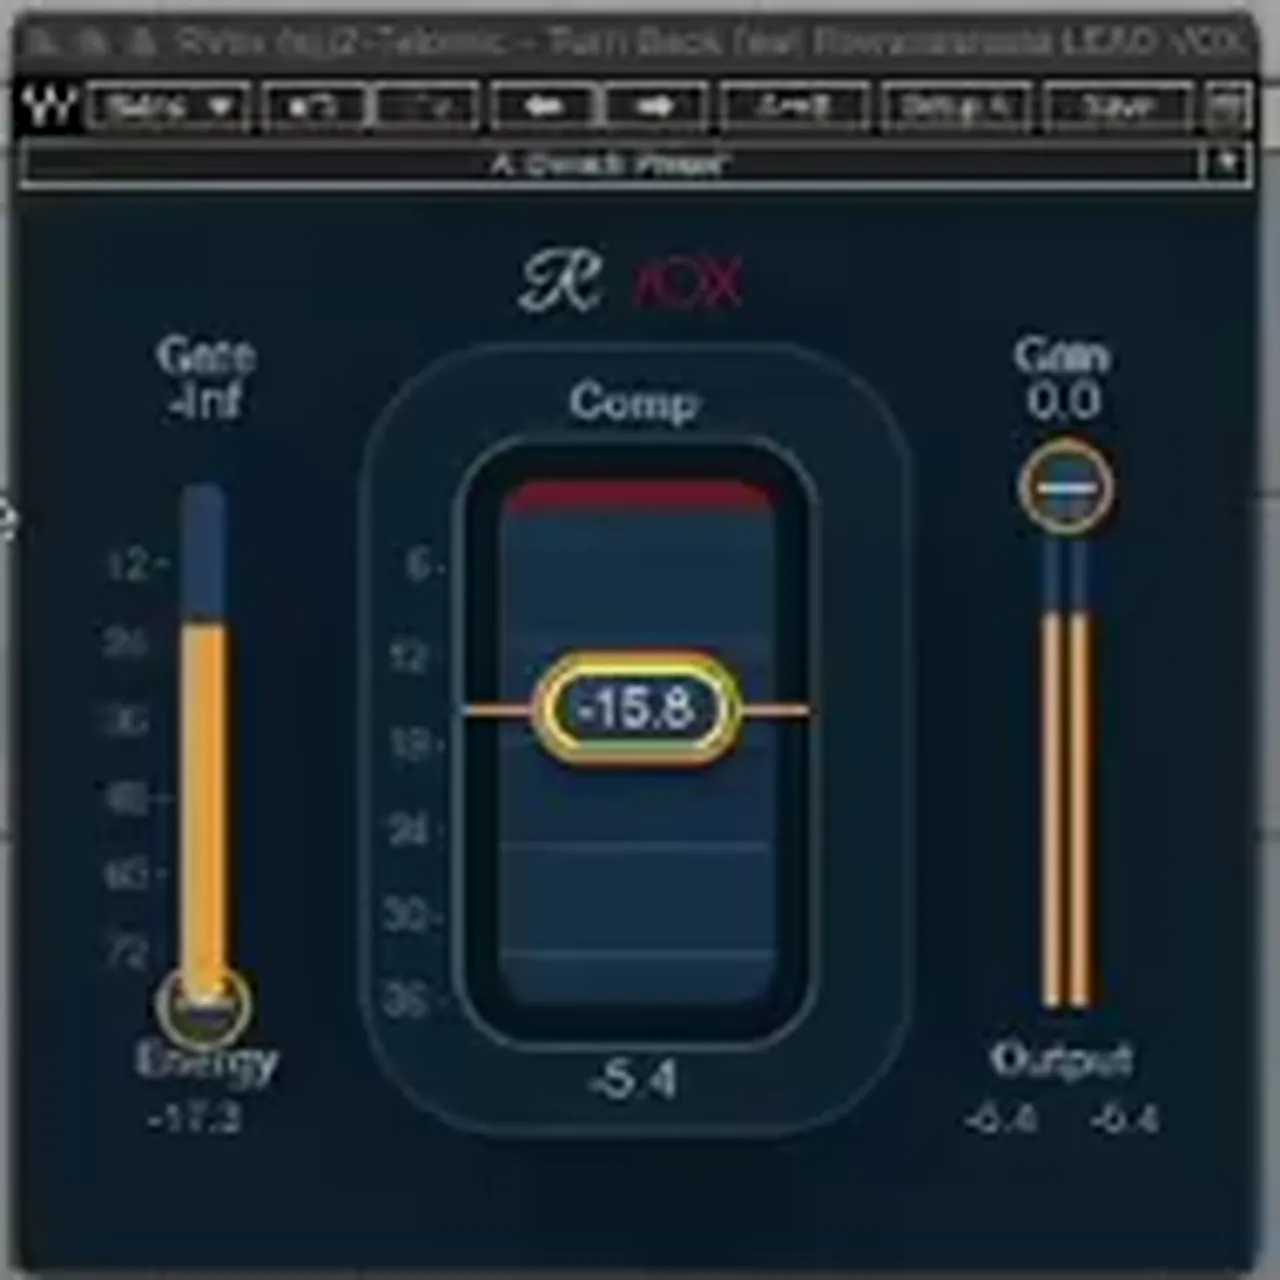
Any stock compressor does this job: watch its gain reduction meter rather than the threshold number. This is also where the grit from step 2 pays off, because the compression brings it forward.
5.Tame the highs with dynamic EQ, then lift the low mids
After compression, use a dynamic EQ band to pull down the harsh highs only when they get loud, and a small, wide boost in the low mids to give a top-heavy vocal more body.
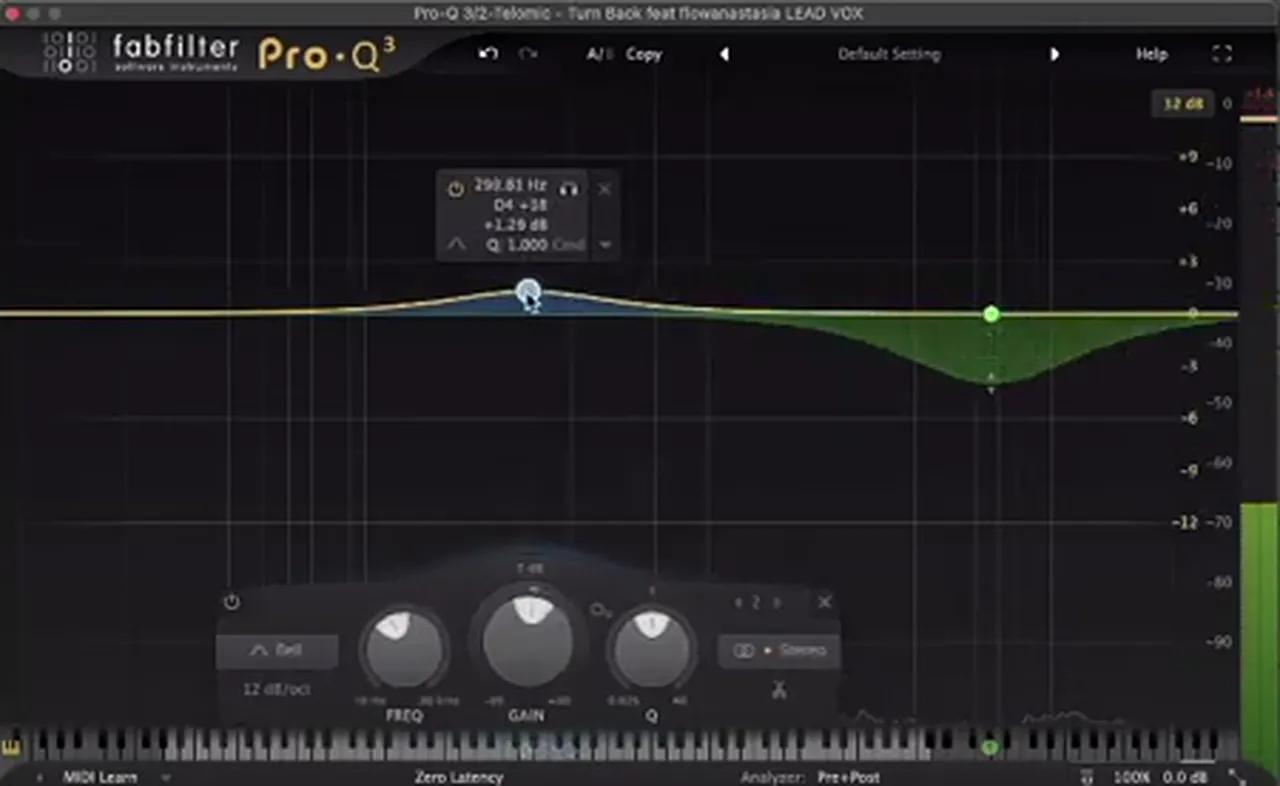
Telomic loads FabFilter Pro-Q 3 and tones down the highs (watch at 4:27). His tip: in Pro-Q 3, hold Alt while you scroll on a band to make it a dynamic EQ band. It then reacts to the level, so it only cuts when the highs push through. In the video the band sits around 7 kHz with a Q of about 0.93.
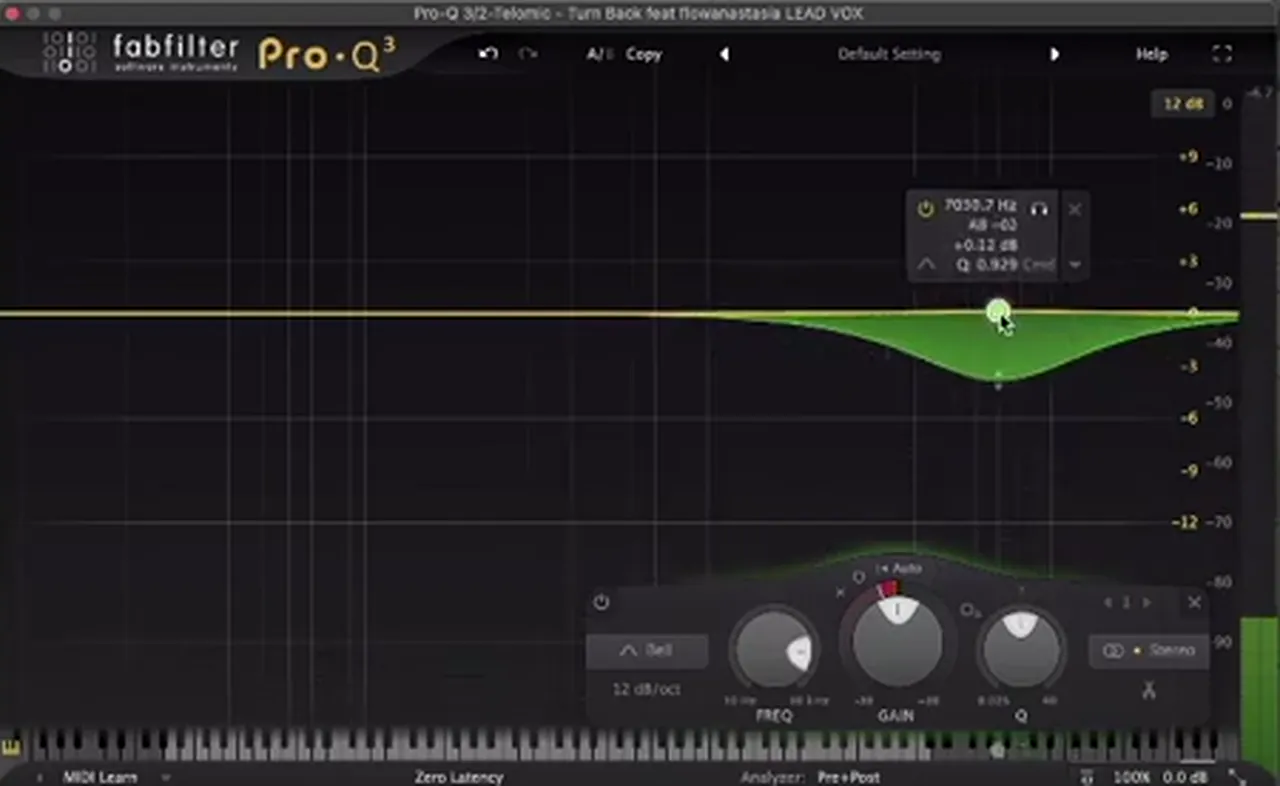
Then he adds “a slight bump” in the low mids (watch at 4:54), because the vocal sounds very top-heavy. The bell sits around 290 to 330 Hz, between about +1.3 and +1.9 dB, Q 1.0. It brings up the low fundamental of the singer’s voice on the lower notes. Keep it small: he tries a bigger boost, then pulls it back.
As Telomic puts it, people often panic that they don’t know how to process vocals, but “it’s actually really, really simple” (watch at 5:28). By this point most of the work is done.
6.Add a filtered delay on a dotted rhythm
Use a tempo-synced delay on a dotted rhythm for movement, and switch on its filter so the echoes are thinner than the dry vocal. Without the filter, two full-range vocals pile on top of each other.
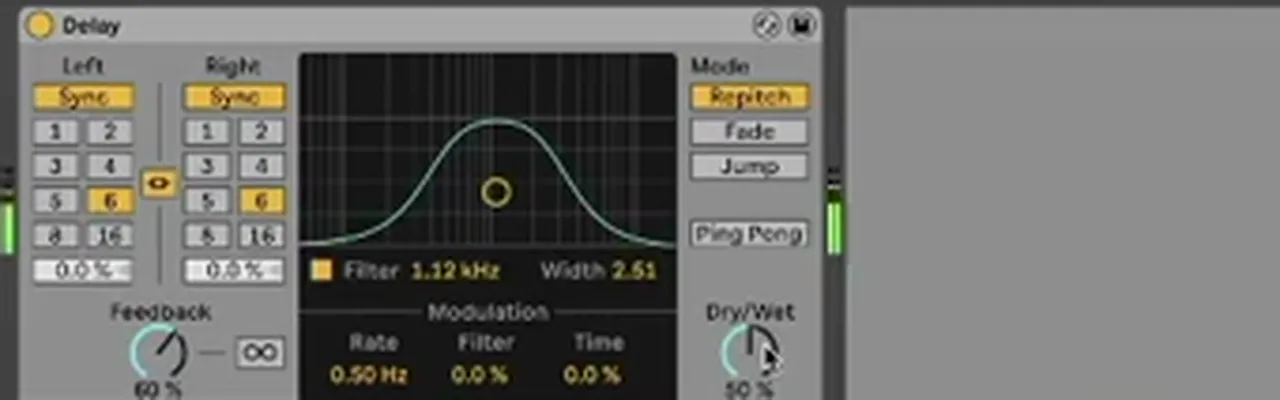
Telomic adds Ableton’s stock Delay (watch at 5:44). He tends to use dotted rhythms “so that it adds a bit more interest to the vocal”. On screen both sides are synced to 6 sixteenths (a dotted eighth), with feedback at about 60%, Repitch mode and the dry/wet starting from 50% before he blends it back.
Listen: the soloed vocal with the delay filter off, then on10 sec
The important part is the filter. With it switched on (1.12 kHz, width 2.51), all of the delayed signal is band-passed. Telomic plays it with the filter off first: because the delayed vocal and the original are “both full spectrum vocals”, they crowd each other. With the filter on it is “much better”. If your delay has no filter, put an EQ after it on a return channel and cut the lows and highs.
7.Finish with a little reverb
Put a modest reverb at the end of the chain. The right decay depends on the tune, so set it by ear against the instrumental, and keep the mix low so the vocal stays upfront.
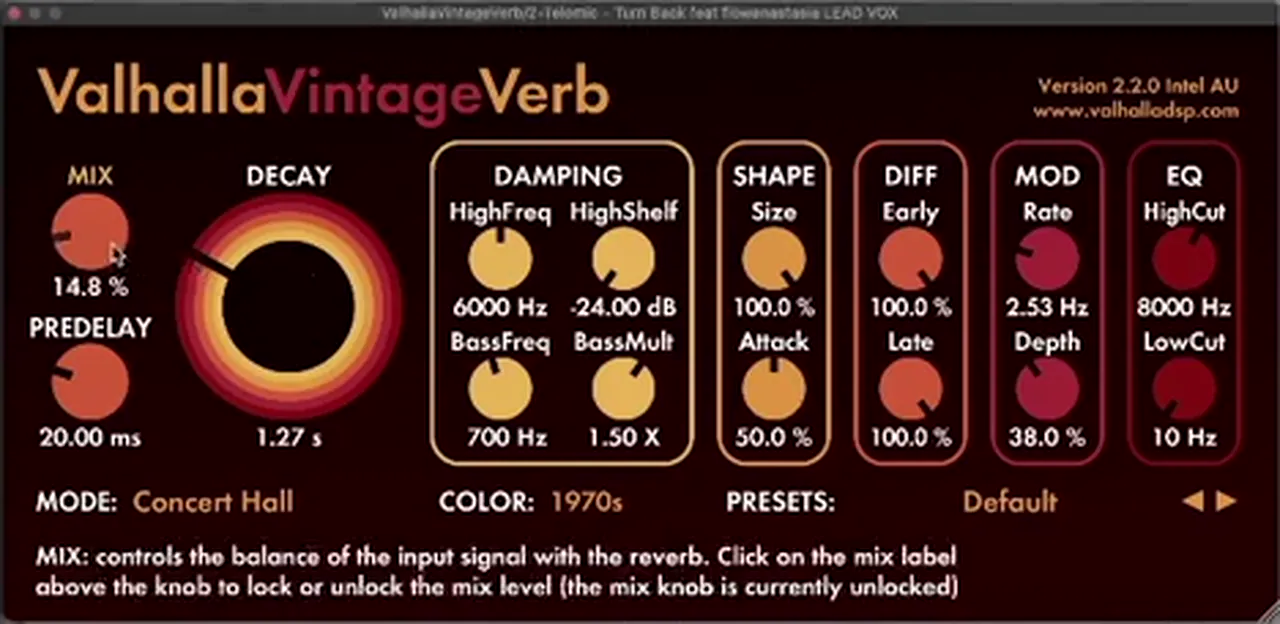
Last in the chain is Valhalla VintageVerb (watch at 6:37). “The decay on the reverb is always going to depend on the tune.” He loads it with a 4.11 s decay and 7.1% mix, and later shortens the decay to 1.27 s with the mix at around 11 to 15%. The mode is Concert Hall, the colour is 1970s and the pre-delay is 20 ms.
For more on how reverb and delay fit into the whole mix, see the space step in our drum and bass mixing guide.
8.Tame resonances on a top-heavy vocal
If a vocal still sounds harsh, use a resonance suppressor such as soothe2. It finds the ringing frequencies and turns them down. Use the delta button to hear what it removes, then turn the mix down.
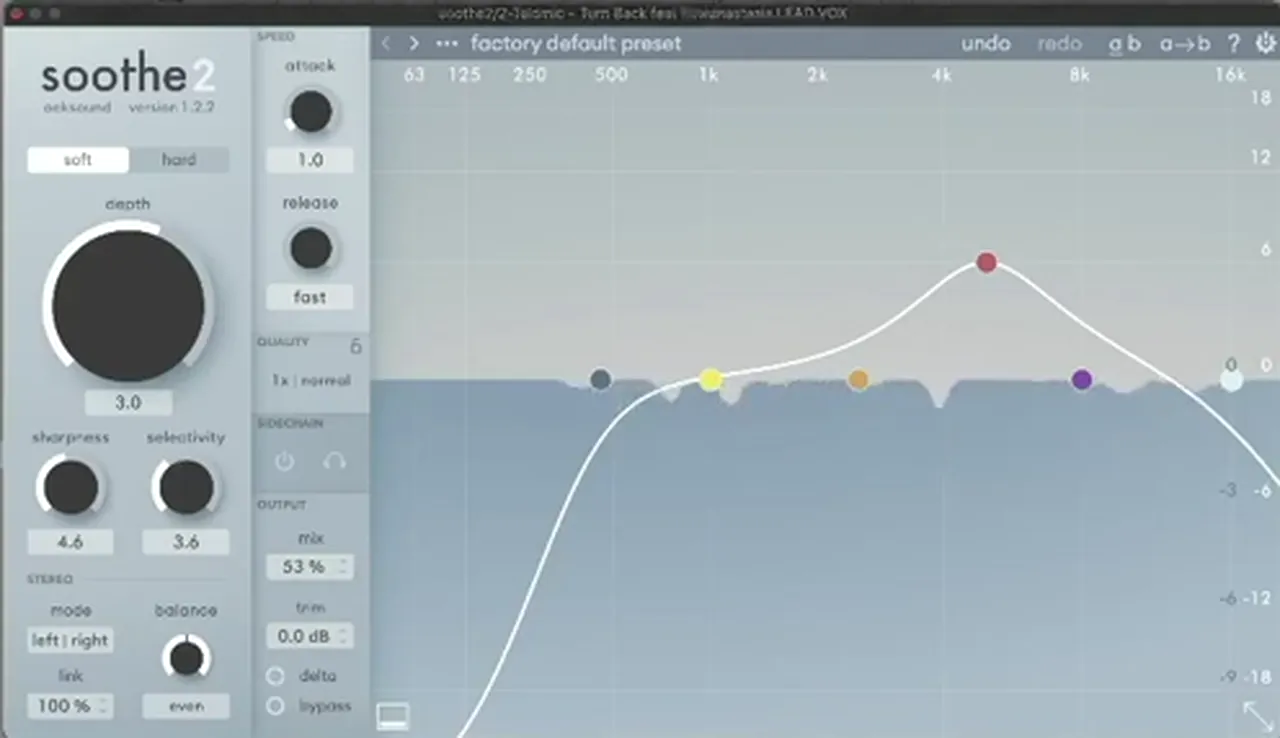
One more tip for a top-heavy vocal: Telomic adds oeksound soothe2 after the Pro-Q 3 and before the delay (watch at 6:46). It “will find all the resonances in the vocal and bring them down”. He solos it and hits delta to hear only what it is taking out. Then he dials the mix right down, to about 53% in our screenshot, on the factory default preset.
9.Delay throws, harmonies and ad-libs
Automate the delay’s dry/wet up on the last notes of a phrase to fill the gaps, or copy those words to a second track with a 100% wet delay. Ask your singer for more harmonies, ad-libs and takes than you think you’ll need.
The finished tune has lots of harmonies, extra vocals, layers and ad-libs, and they all add interest. Telomic’s advice when you get someone to record for you: “make sure that you almost get too much” (watch at 7:36). If you don’t use something, that’s fine. If you need something you don’t have, you have to go back to the studio.
For creative tricks, he automates the delay’s dry/wet up on the later notes of a phrase, so the echoes fill the gap before the next line (watch at 8:12).

Listen: the automated delay throw on the end of a phrase, in the mix12 sec
If you don’t want to automate, double up the vocal instead. Copy just the part you want delayed to a new track, cut out the rest, and set that track’s delay to 100% dry/wet (watch at 8:51).

Then do a quick A/B (watch at 9:48). The level is much steadier thanks to the compression, the top end is tamed and there is a bit of reverb. The vocal now sounds like part of the tune, “rather than it just being a weird recording that’s sitting over the top”. Listen below: first the vocal before processing, then the finished chain, both with the instrumental playing.
Listen: before (first 4 sec), then after the full vocal chain12 sec
Making a vocal tune? Our liquid DnB chords and pianos guide shows how to write the harmony under a topline, our liquid DnB in FL Studio tutorial builds the rest of the track, and our sub bass guide, also from Telomic, keeps the low end clean underneath it.
Common DnB vocal mixing mistakes
- Trying to fix a bad recording. Spend the effort on the source: good takes and a clean comp.
- EQ-ing the lows after the compressor. Rumble then drives the compression. High-pass first.
- Over-processing. Telomic’s whole chain is seven plugins, most of them used lightly. Stop when the vocal sits in the tune.
- Full-range delays. Unfiltered echoes clash with the dry vocal. Filter the delay or EQ the return.
- Too much reverb. Set the decay for the tune and keep the mix low so the words stay clear.
- Judging the vocal soloed. Do your final A/B with the instrumental playing.
- Too few takes. Ask for harmonies, ad-libs and extra takes while the singer is in the studio.

Free download
Free DnB vocal samples to process
No singer yet? The Soul DnB Vocal Starter Pack has 20 vocal samples from our Soul Vocal Pack Vol. 2, ready for your own vocal chain:
- 6 sung phrases and 5 adlibs in Eb minor
- 4 spoken vocal shots
- 2 vocal FX and 3 vocal percussion hits
- 24-bit WAV, royalty-free
It’s one of seven free sample and preset packs in DNB Academy Free Access, along with the mixing and mastering e-books and the 3‑day DnB challenge. Join 40,000+ producers in Free Access. Free account, no card needed.
Go deeper
A full Telomic track, and vocals to work with
Want to see how a whole liquid tune is built and mixed, or need more vocals to practise on?
 Production courseTelomic production courseA track from scratch in about 6 hours: music theory, bass synthesis and resampling, drums, atmospheres, arrangement, mixing and mastering, with the project file, stems, presets and samples.
 Sample packSoul Vocals Vol. 2285+ royalty-free soul vocal samples: phrases, ad-libs, spoken lines, vocal FX and 2 construction kits, in dry and wet versions.
 Sample packSoul Vocals Vol. 1285+ royalty-free soul vocal samples for liquid, dancefloor and halftime, in dry and wet versions, with MIDI for the construction kits.
Every artist course, preset bundle and sample pack is also in The Vault. Browse courses
Related tutorials
All tutorials → Guide · MixingHow to Mix Drum and Bass: A Mixdown Guide for DnB19 min read · Guide
 Liquid · ChordsHow to Write Liquid Drum and Bass Chords and Pianos18 min read · Video + guide
 Telomic · BassHow to Make Drum and Bass Sub Bass That Works on Any Speaker12 min read · Video + guide
 Guide · StylesDrum and Bass Subgenres: 12 Types of DnB13 min read · Guide
FAQ: DnB vocals
How do you process vocals for drum and bass?
Start with a clean, well-recorded vocal. Then add gentle preamp distortion, high-pass the lows before compression, compress for about 6 dB of gain reduction, tame the highs with a dynamic EQ, add a small low-mid boost, and finish with a filtered dotted delay and a little reverb. That is Telomic’s chain in our video.
What order should a DnB vocal chain be in?
In our video: saturation (Soundtoys Radiator), high-pass EQ (EQ Eight), compressor (RVox), tone EQ (Pro-Q 3), resonance suppressor (soothe2), delay and then reverb (VintageVerb). Subtractive EQ goes before compression and more creative processing after it.
Why cut the lows before compressing a vocal?
Low rumble and bumps in a vocal recording would otherwise trigger the compressor, so it reacts to noise instead of the voice. High-passing first means only the vocal tone drives the compression. In the video the high-pass sits at about 124 Hz.
How much should you compress a DnB vocal?
Telomic aims for about 6 dB of gain reduction with Waves RVox. Set it by the gain reduction meter rather than the threshold number, because the right threshold depends on how loud your vocal is.
What delay settings work on DnB vocals?
A tempo-synced dotted rhythm adds interest. In the video Ableton’s Delay is synced to 6 sixteenths, a dotted eighth, with feedback around 60% and its filter on at 1.12 kHz so the echoes don’t clash with the full-range dry vocal.
Where can I get DnB vocal samples?
DNB Academy Free Access includes the Soul DnB Vocal Starter Pack: 20 royalty-free vocal samples from our Soul Vocal Pack Vol. 2, with sung phrases and adlibs in Eb minor, spoken shots, vocal FX and vocal percussion, as 24-bit WAV files.
Next steps
Take a dry vocal and build the chain in order: grit, low cut, compression, tone, delay, reverb. Then A/B it against the dry stem with the instrumental playing. Then keep going:
Free Access
Seven free DnB sample and preset packs, including the Soul DnB Vocal Starter Pack, plus mixing and mastering e-books and a 3-day challenge.
Get free packsThe full guide
Tempo, drums, sub, mid bass, chords, arrangement and mixdown: every step of a DnB track.
Read the guideDNB Foundations
A structured drum and bass course with weekly live feedback calls on your tracks, mixdowns included.
See Foundations1:1 Mentorship
Personal guidance on your music from a mentor, built around your goals.
See the mentorship50,000+ producers have joined DNB Academy, and our producer Discord has 5,300+ members.