Arrangement · Drops & build-ups · Ableton Live
How to Turn a Loop into a Drum and Bass Drop (with Icicle & Molecular)
To turn a loop into a DnB drop, stop polishing the loop and lay it out as a structure: an intro, then a drop made of 16-bar sections that each change something, with fills at the end of every 16. Then build tension into the drop and a transition out of it using the sounds you already have. Icicle shows the first part in Ableton Live, and Molecular shows the build-up and the transition, in two of our own videos.
Part of our how to make drum and bass guide: this page goes deep on the arrangement step, from loop to drop.
Quick answer
How do you turn a DnB loop into a drop?
Zoom out until the whole track fits on one screen, move your loop to where the drop starts (after a 32-bar intro in Icicle’s sketch) and split the drop into 16-bar sections that each add or take away something. Mark the end of every 16 with a fill, open filters over time, then build tension into the drop and break the drums out for the transition.
- See the whole track.Shrink everything so the full arrangement fits on one screen.
- Map the sections.A 32-bar intro, then three 16s with different jobs.
- Fill the end of every 16.Variations from a long resampled sound, a pitch drop.
- Stagger and automate.Bring layers in later and let the filters open.
- Give each 16 its own layer.More distortion and growl where it gets rowdy.
- Refine by ear.Octave-up stabs, call and response.
- Build the tension in.Filtered drums, echo, a kick roll, resampled bass.
- Transition with a fake-out.Drums out, then into the next 16.
Icicle takes a 16-bar groove from his start-to-finish course project and lays it out as a full drop in Ableton Live. For the build-up and transition we use Molecular’s video further down.
What you’ll need
- A loop you like. An 8- or 16-bar idea with drums, bass and a few musical bits. Icicle’s is a 16 with drums, several bass layers, stabs and pads, at 172 BPM; Molecular’s drop idea runs at 174 BPM. Our DnB BPM and structure guide explains why both work.
- A DAW. Both videos use Ableton Live. Molecular sticks to Ableton’s own devices (EQ Eight, Echo, Phaser-Flanger, Auto Filter, Roar, Reverb, Shifter, OTT); Icicle also uses FabFilter plugins, but any filter, saturator and reverb does the job.
- A synth for the bass layers. Icicle’s basses are Vital and resampled FM8. Vital is free.
- Time away from the loop. This is a framework job, not a sound design job. Expect it to sound rough at first.
1.Fit the whole track on one screen
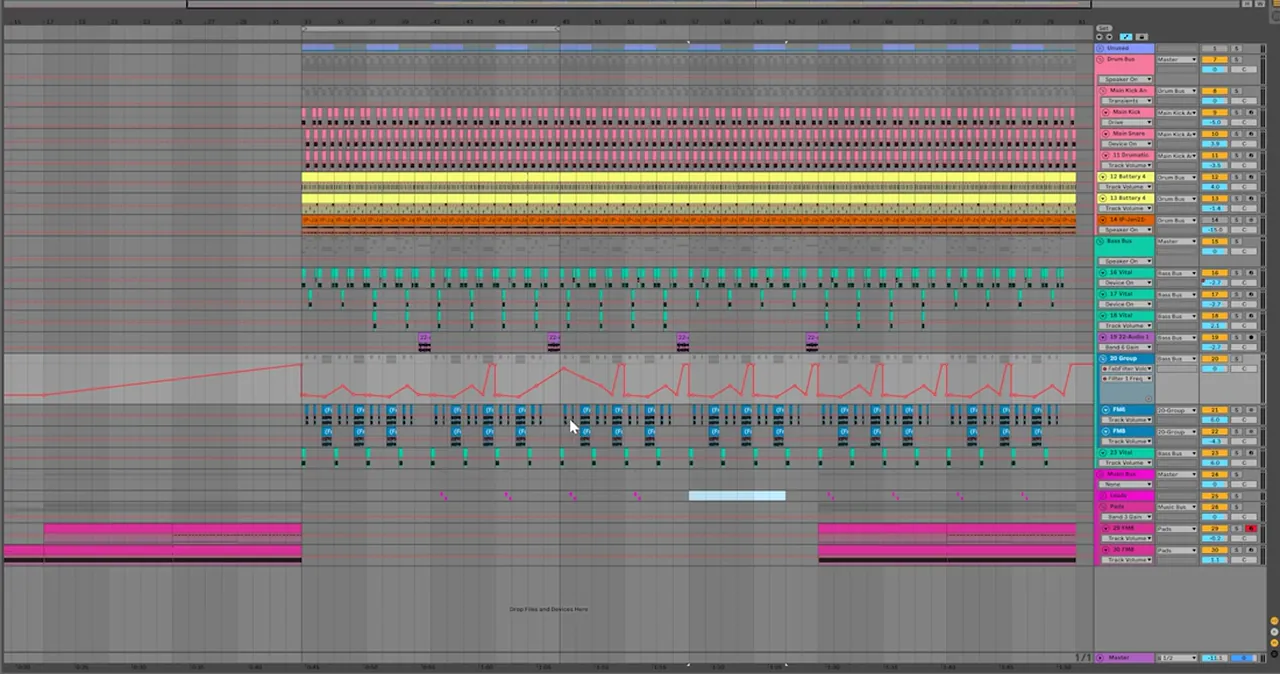
Before you arrange anything, zoom out and shrink every track until the whole song fits on one screen. You can’t judge a structure you can only see eight bars of at a time.
Icicle calls himself “very anal about having the whole track on one screen” and starts by resizing everything “to be as small as possible”, while still showing enough to work with (watch at 0:38). He also starts arranging early, before he has every element: “for me, it creates a big sort of framework to just start filling in”. That is the cure for being stuck on a loop: the gaps in the timeline tell you what to make next.
2.Map the intro and the 16-bar sections
Leave room for an intro, then plan the drop as 16-bar blocks, each with its own job. In Icicle’s sketch that is a 32-bar intro and a drop of three 16s: an open first 16, a second where it picks up, and a more subdued third with pads.
Icicle starts from “the 16” he already has, assumes a 32-bar intro, and moves the groove to where the drop will start (watch at 1:08). Then he gives each 16 a role (watch at 1:21):
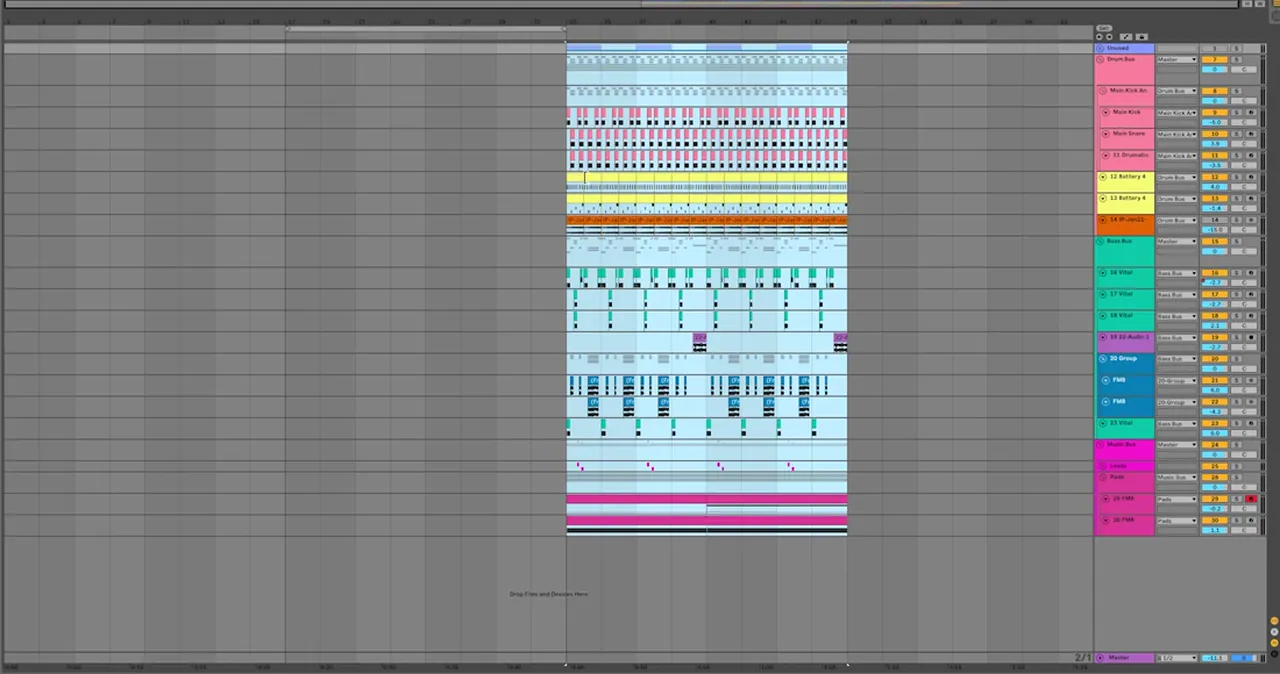
| Section | Bars | What changes |
|---|---|---|
| Intro | 32 | Room for the pads and a drone; the top layers come in during the first 16 |
| Drop, first 16 | 16 | “Fairly open”: the core groove, with the bassline opening up |
| Drop, second 16 | 16 | “Everything picks up speed”: more modulation, the mids speak more, perhaps more percussion |
| Drop, third 16 | 16 | More subdued, and the pads come back in |
He is clear that it is “all very crude”. The point is that once you can imagine the structure, you “just work through front to back, keep on adding stuff”. If you want to compare this with other common layouts and bar counts, see the structure section of our BPM guide.
3.Mark the end of every 16 with a fill
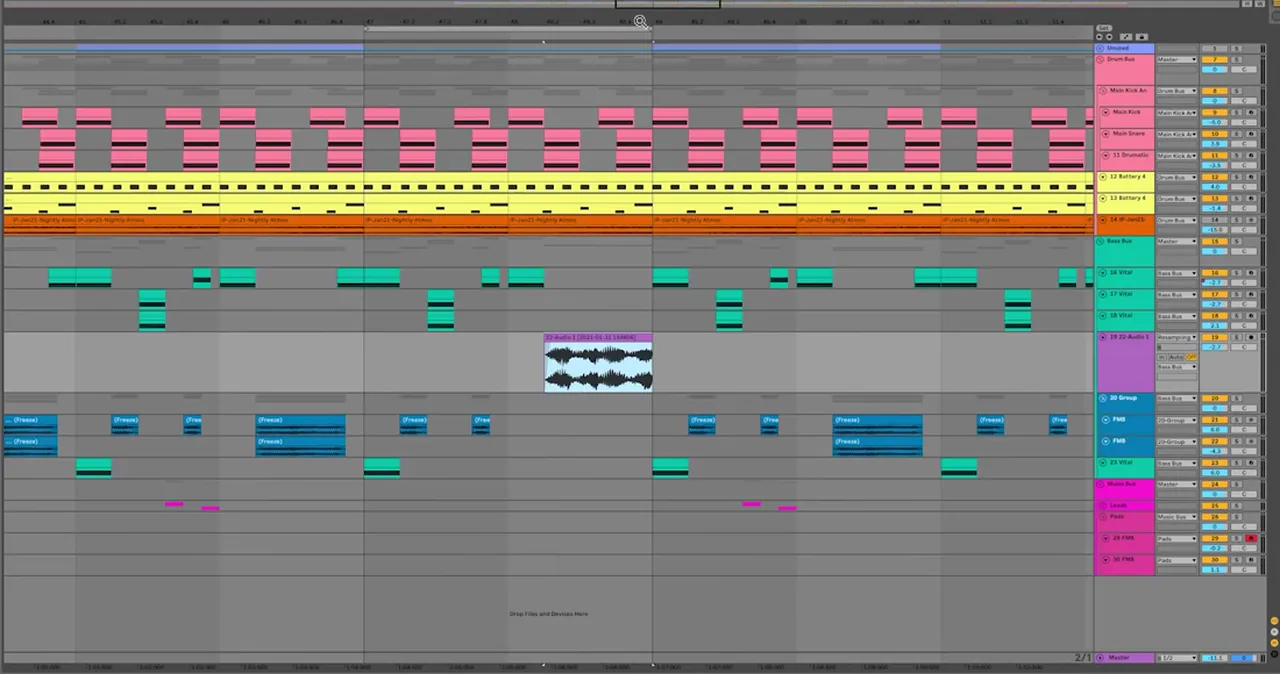
Put a small change at the end of each 16 bars so the listener hears a new section coming. A long resampled sound is ideal: scroll through it to get different variations, and use a short pitch drop as an ender.
At the end of the first 16, Icicle reuses a long sound he resampled earlier. Because it is long, he gets “variations very easily just through scrolling” through the audio, then quantises the clip so it lands on the grid (watch at 2:31). He also brings back a pitch drop he made, where the sound “just drops down a tiny bit”, and spreads these enders through the 16s so each one gets its own variation.
A fill doesn’t need to be a new sound. Drum edits, a reversed hit or a gap in the bass work too: our DnB drum patterns guide covers drum fills.
4.Stagger the layers and let the filters open
Don’t start every layer on bar one of the drop. Bring the top layers and stabs in after 8 or 16 bars, and automate a filter on the bass so it opens up as the section goes on. Movement over time is what turns a loop into a drop.
Icicle switches on automation mode and works through each part (watch at 3:10). The top layer he made could “come in a little bit later”, or be replaced with “something harsher” later on. The stabs come in “either after 8 or after 16”, because he wants the focus at the start to be on the bassline opening up.
That opening is a filter on the group of resampled FM8 sounds (watch at 4:26). On screen it is FabFilter Volcano 2 on the bass group, with its Filter 1 frequency automated in a rising, pumping curve across the drop. Then he listens and makes a call: the stabs “seem to detract from it getting a bit rougher there from the filter opening up”, so they come out of that part.
5.Give the rowdier 16 its own layers
For the section that should hit harder, duplicate a bass layer and process the copy more aggressively, then play it only in that section. Turn the other layers down a little to make room.
For the second 16, “where we wanna get a bit rowdier”, Icicle makes another layer just for that section (watch at 5:29). It is a resampled layer rather than an original synth, so there isn’t much control over it, but he can “just chuck a little bit more distortion on there”. Because it sits on top of the others, he selects those layers and takes them back by 3 dB: “a slight difference”.
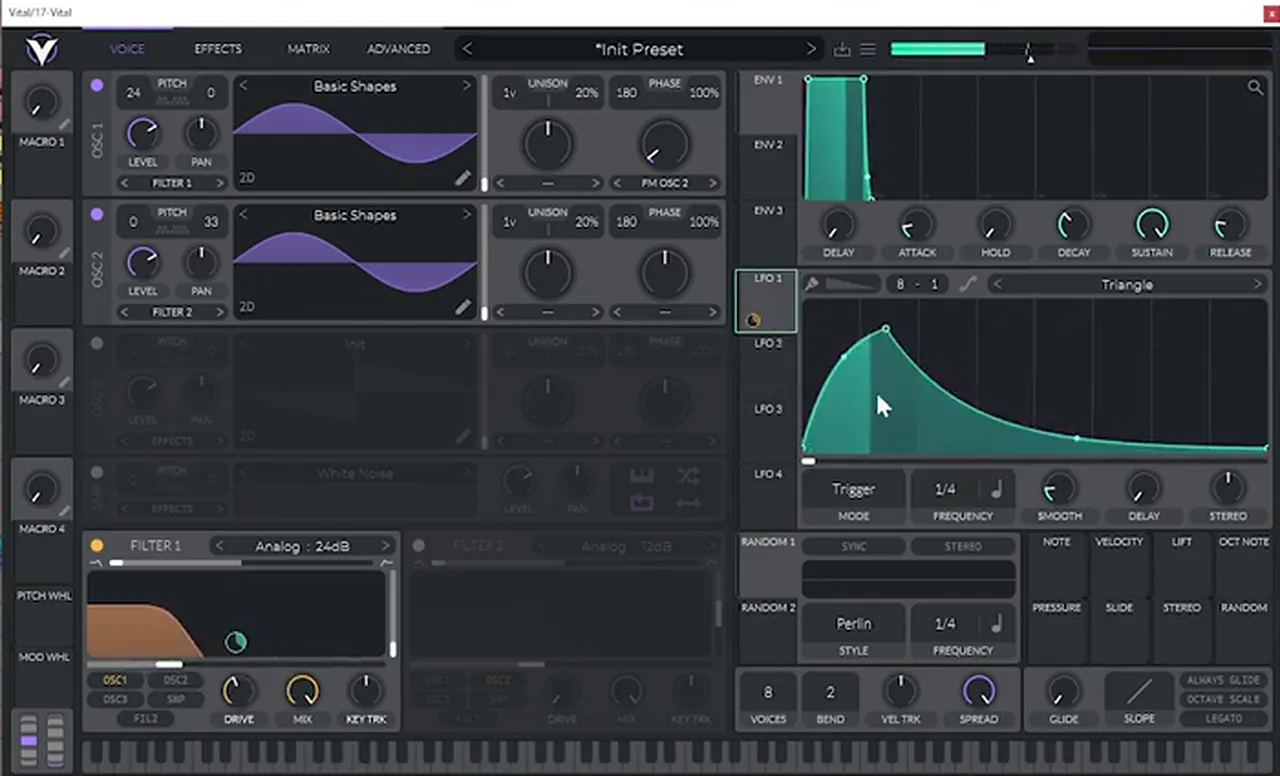
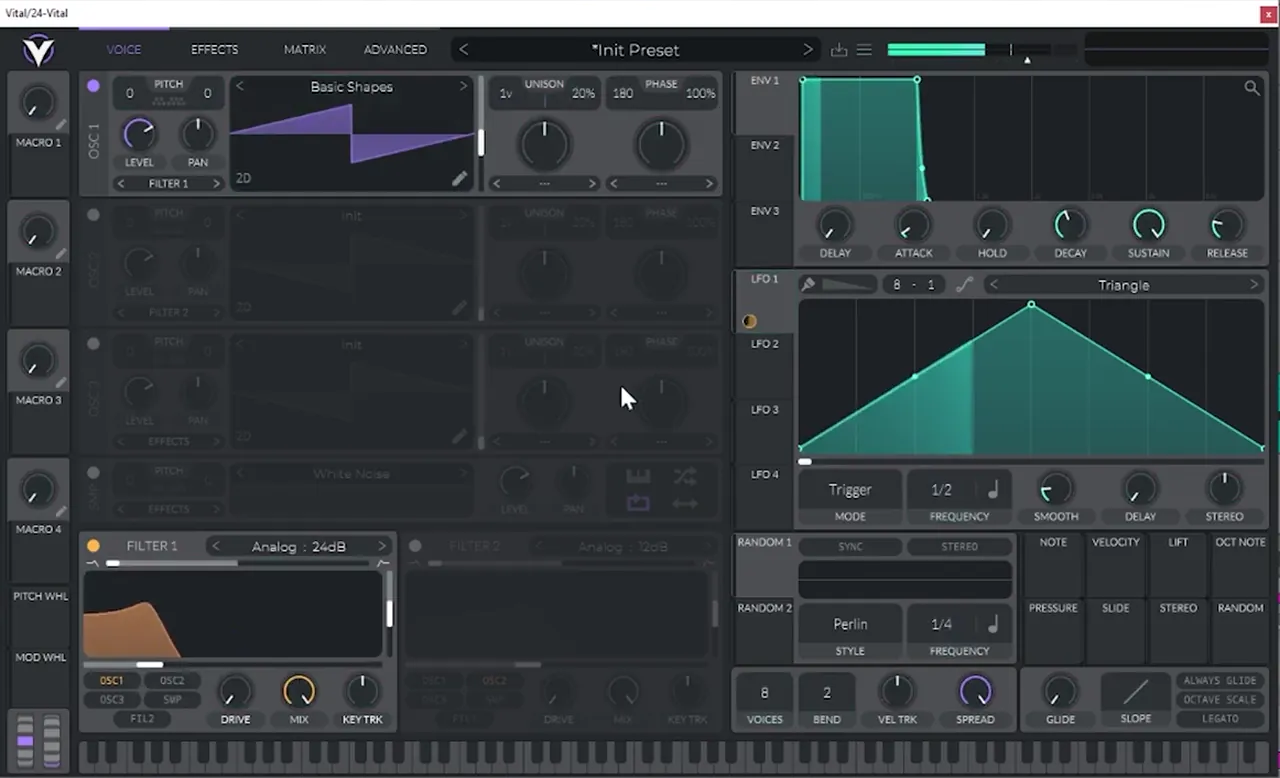
The main bass is clean, so he duplicates the tiniest layer, “the tiniest of sounds compared to the other things”, and lets it play only in “the somewhat rowdy section” (watch at 6:24). In the Vital patch on that layer, “all very basic”, he gets “a little bit of the FM growl”: on screen, oscillator 1 is a Basic Shapes wave at +24 with FM from oscillator 2, into an Analog 24 dB filter.
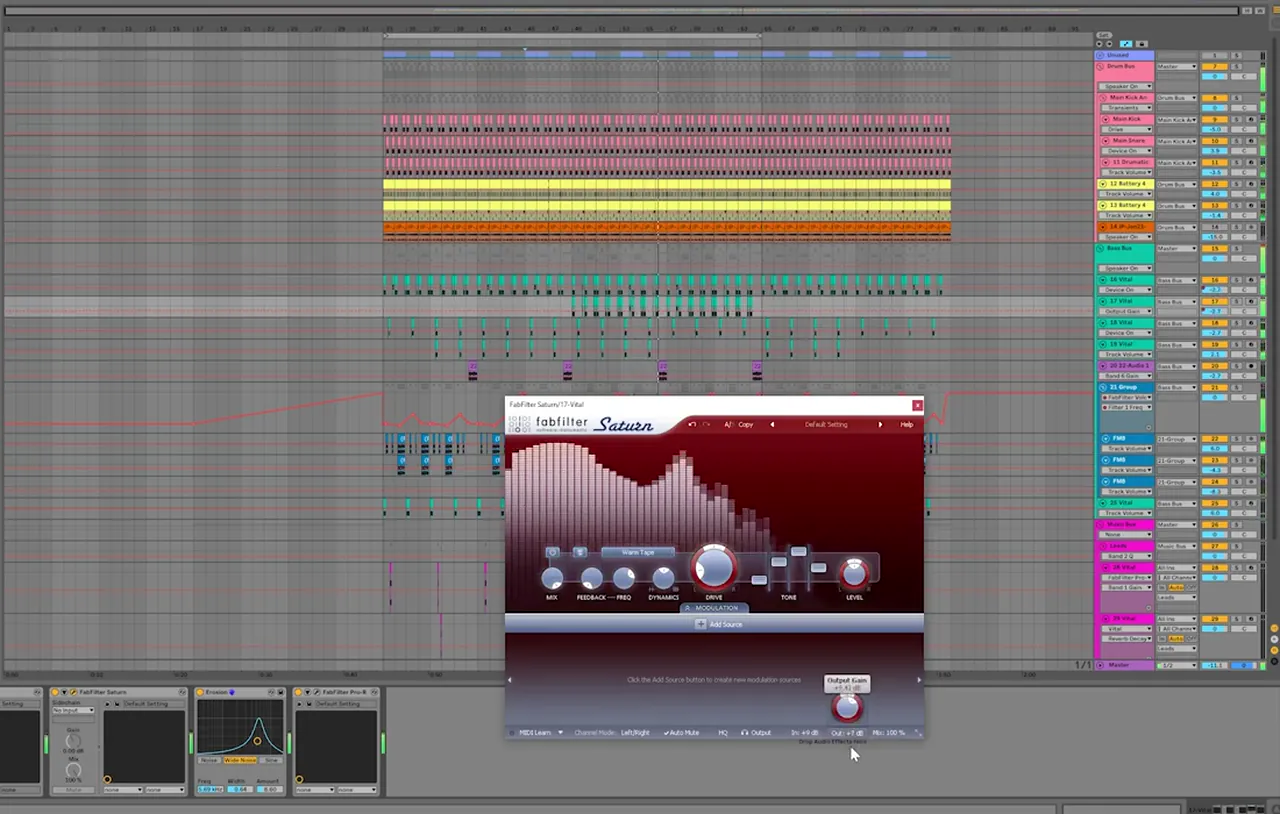
Later he adds “a little bit of erosion” to it for “a tiny bit more articulation”. The chain on that Vital track ends up as Pro-Q 3, Saturn (Warm Tape mode), Ableton’s Erosion and a Pro-R reverb, and he notes the whole tune “taking on a bit of a reverb character”, more than he usually uses, “but it’s working”.
Listen: Icicle’s drop sketch so far12 sec
Want the bass layers themselves? Our neuro stab bass in Vital with Icicle tutorial builds one from scratch, and the DnB bass guide links every bass type we cover.
6.Refine by ear: octaves and call and response
Once the layout is there, play it from the top and fix what doesn’t speak. Move stabs up an octave if they don’t cut through, and answer phrases with a reply so the drop has a conversation in it.
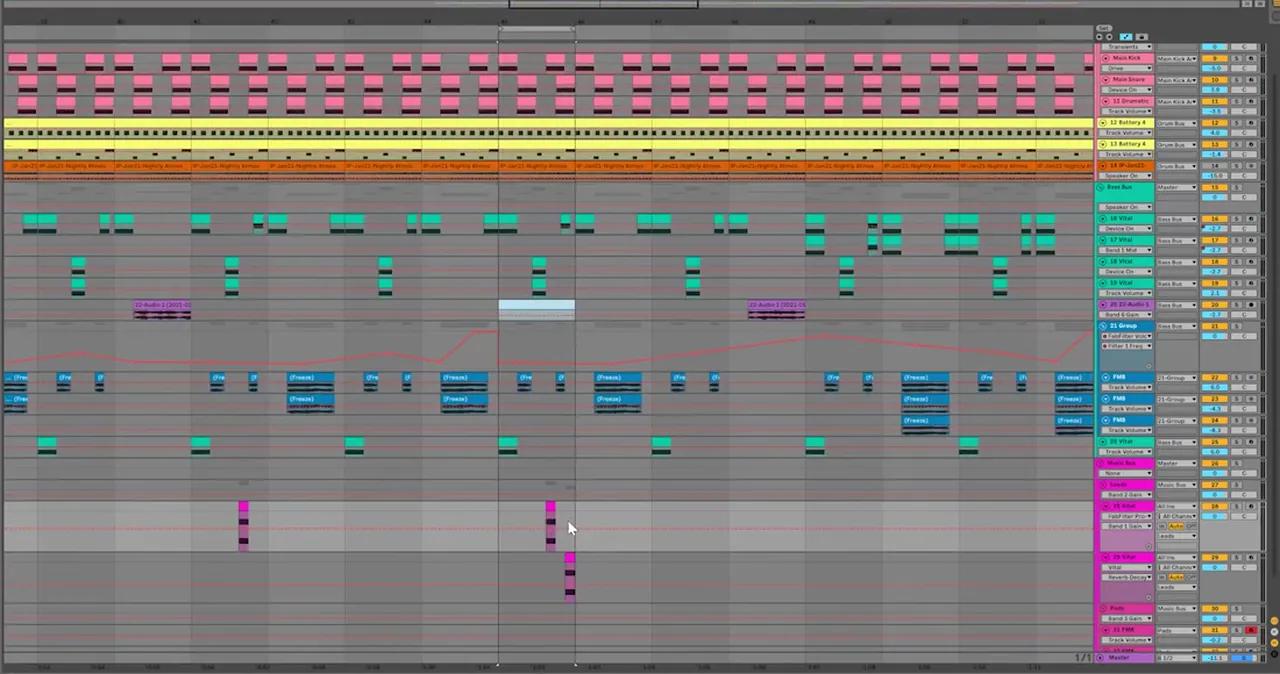
Icicle admits he is moving between tracks “pretty frantically”: the sounds were made systematically, “but now we have to make something creative with it” (watch at 9:18). Listening to the stabs, he decides they are not fully articulating, and that they should perhaps be “an octave up so that they cut through more” (watch at 9:41). He much prefers it.
Hearing that play, he imagines an extra part and adds it in a call and response pattern: “it seems the appropriate call and response structure”. Ctrl+D (Cmd+D on a Mac) duplicates the clips so he can copy the idea through the section (watch at 10:45). Our neuro bass patterns guide goes deeper into call and response.
Listen: octave-up stabs with the call and response11 sec
7.Build the tension into the drop
A build-up can come from your drums alone: a high-pass filter that sweeps down while the volume rises, a quarter-note echo, a flanger that speeds up and a kick roll that gets faster, all automated over the last bars before the drop.
The arrangement now has a drop, but nothing leads into it. In our build-up and transitions video, Molecular starts from a drop idea with “no intro whatsoever” and connects it to the structure using only the drums and bass already in the project.
Molecular adds a build-up and a transition to a DnB drop idea in Ableton Live, with no new samples.
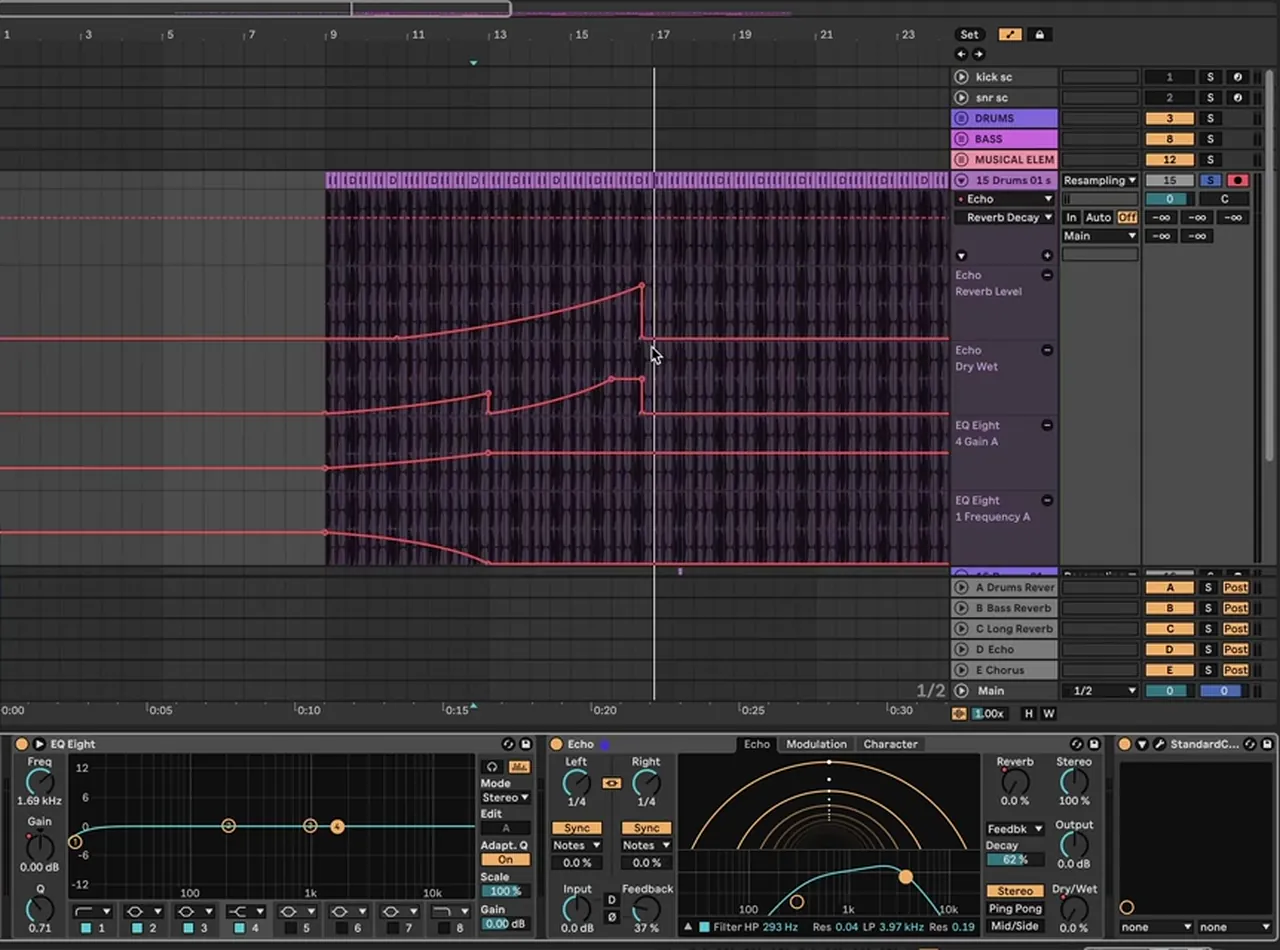
- Filter the drums in. He puts EQ Eight on the drum loop and automates a filter that starts “quite high” and eventually gets low, while the gain rises to 0 dB: “we’re basically easing into the drums” (watch at 1:11).
- Add a DJ-style echo. Ableton’s Echo in quarter notes, a delay “very commonly used by DJs when they’re mixing”, with its dry/wet and reverb level automated up into the drop (watch at 2:04). Feedback mode feeds it back into itself “to create even more tension”, and the Echo’s filter lets you accentuate specific frequencies.
- A flanger that speeds up. Phaser-Flanger moving “quite slow” at first, with dry/wet and feedback rising over time and the rate starting slower and getting faster; he removes it just for the snare (watch at 3:27).
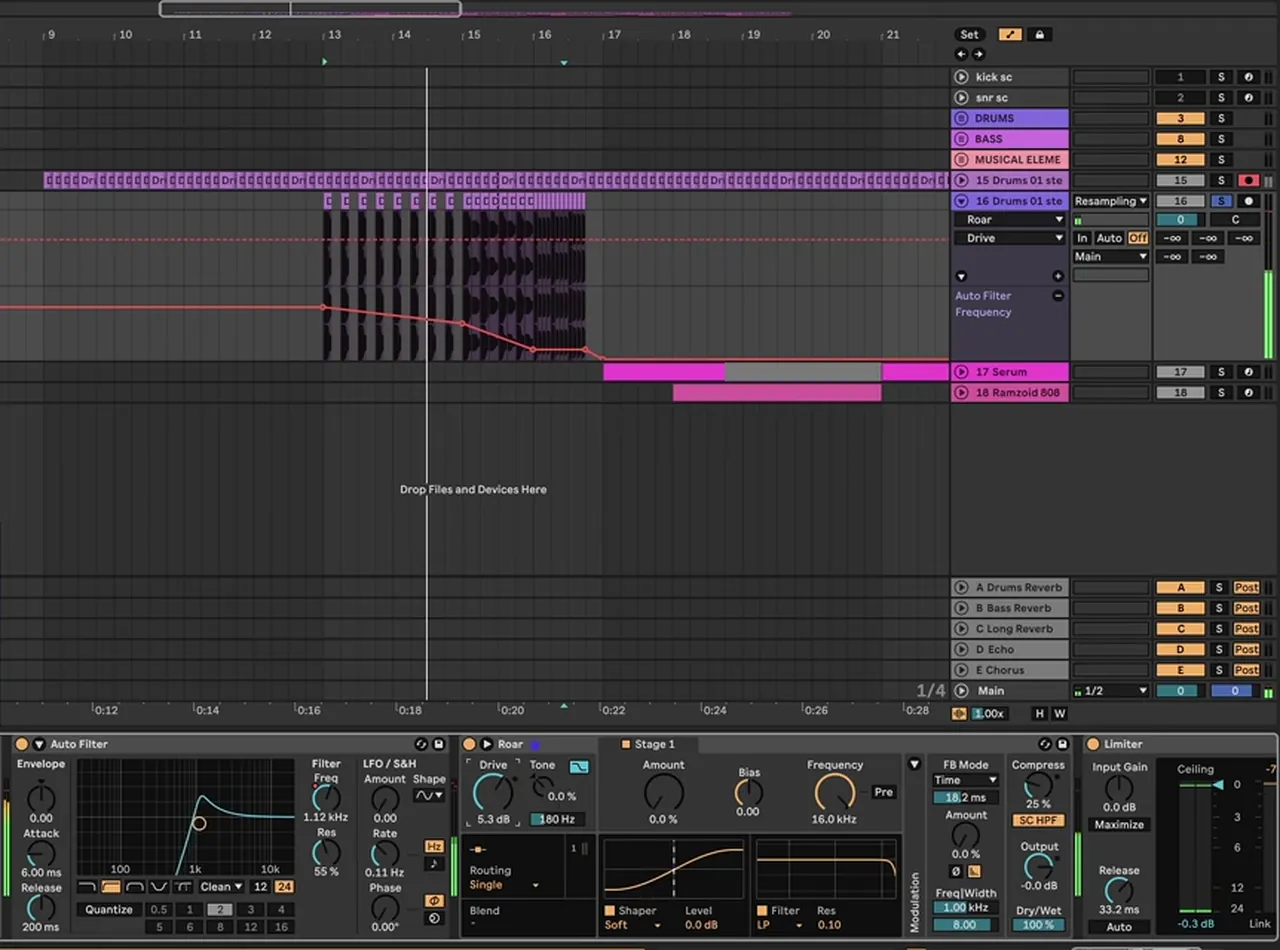
Then the kick roll (watch at 4:31). Molecular takes a kick that has no hat on top of it and chops it into a roll of eighth notes and then sixteenths, giving more emphasis to the notes on the beat, fading each slice so there are no clicks, and raising the later parts of the roll step by step. On it go an Auto Filter made “quite resonant” (55% resonance on screen) with its frequency automated, a Limiter “just to make sure”, and a little distortion from Roar, turned down a touch afterwards. He consolidates it all into one clip with Cmd+J (Ctrl+J on Windows) and fades it in.
8.Resample the bass for the build-up
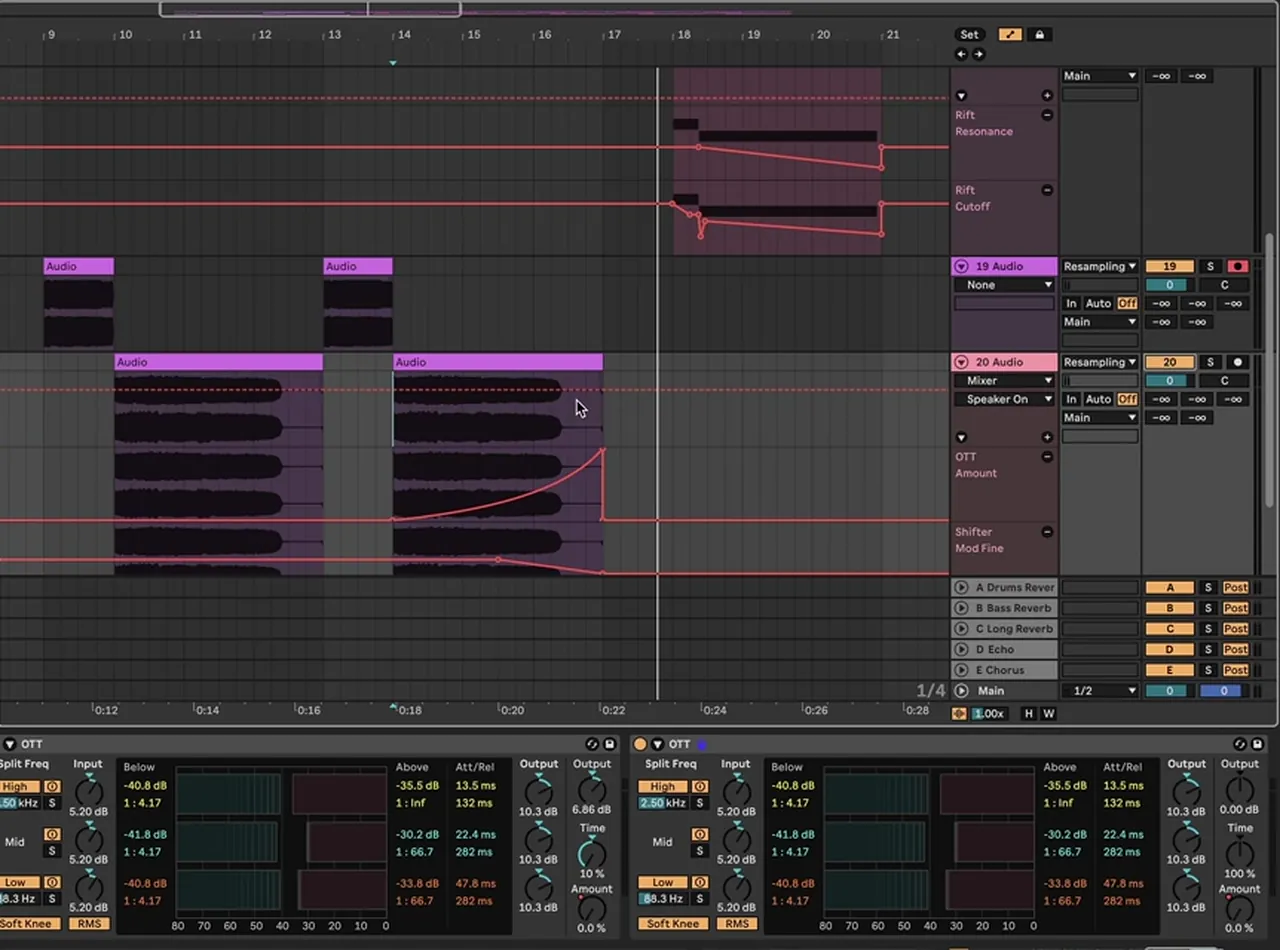
Record your drop’s bass onto a new audio track, pitch a copy up an octave and wash it in echo, reverb and a slight pitch-down, then automate OTT so it swells into the drop. Cut it the moment the drop lands.
Molecular opens a new track, sets it to Resampling and records the bass sounds playing (watch at 6:38). His reasoning for the pitch: “if we have something that’s low pitched and we pitch it higher, we kind of want it to resolve back down”, so he pitches one bass up “an octave or 12 semitones” and fills it with echo, then filters it (watch at 7:16). A second copy stays lower in pitch.
- Reverb, then Shifter. Reverb first, then Shifter after the reverb and delay “to kind of make it pitch down slightly” (watch at 8:25).
- OTT to finish. OTT “to give emphasis to all of this”, with the OTT amount automated so it rises through the build (watch at 9:05).
- Stop it at the drop. He deactivates the track “right when it drops”. The other bass gets a similar treatment: an EQ curve, distortion and reverb.
Listen: Molecular’s build-up into the drop12 sec
“This is a nice way of not using any samples or adding any other new sounds”, he says. Instead of the octave, you could also try other intervals, and he mentions the fifth (watch at 10:49). If you have never resampled before, our neuro DnB in Ableton guide shows the routing.
9.The transition: a fake-out into the next 16
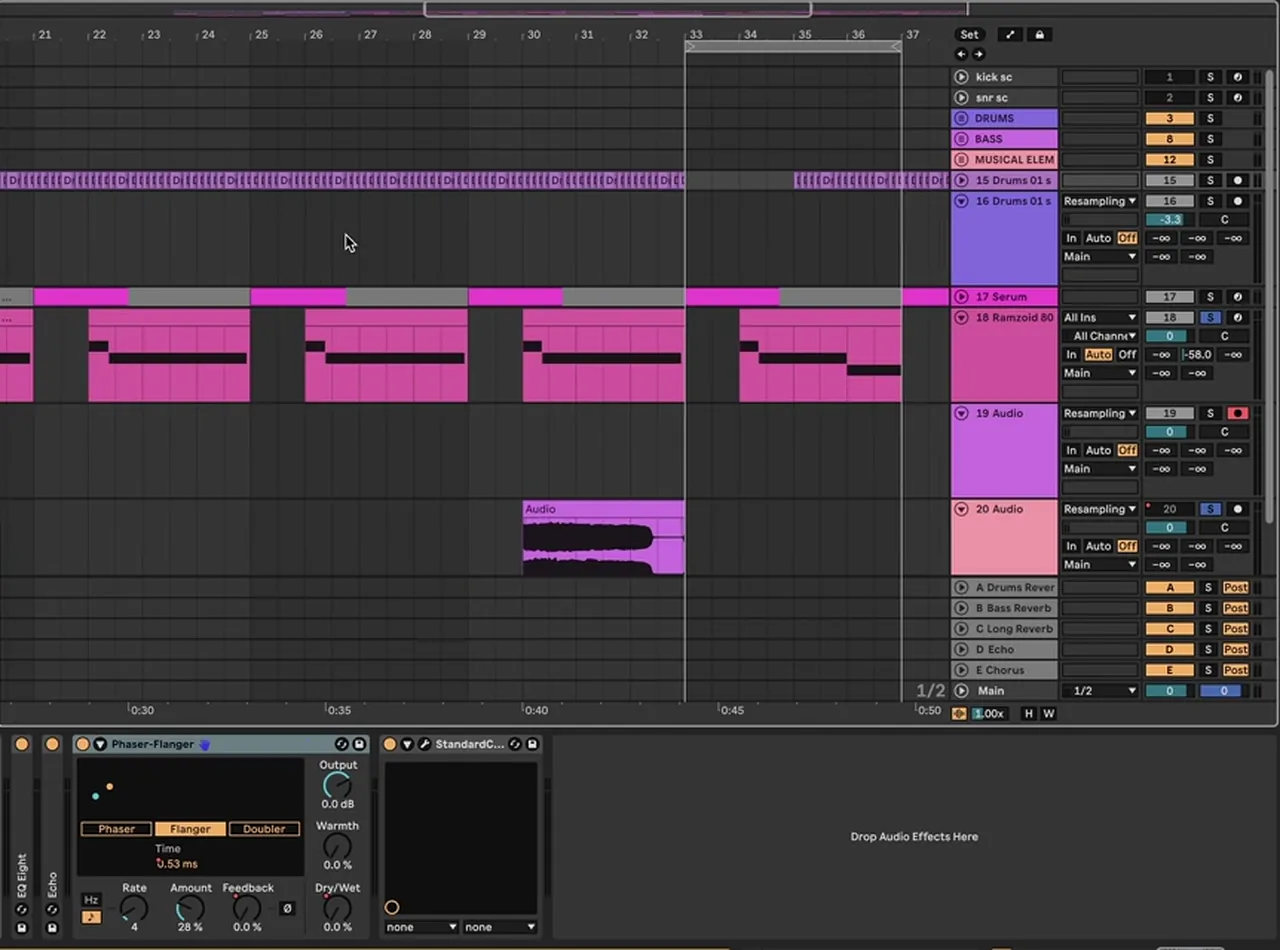
To move from one 16 to the next, reuse the build-up idea: duplicate the resampled riser an octave higher and filter it down to just the sub, take the drums out for a bar or two as a fake-out, and bring them back filtered.
For the transition “over to the next stage”, Molecular duplicates the riser, pulls it one octave higher with the automation copied, stretches it “all the way up to the end” and filters it so “we just have sub” (watch at 11:17). Then the key move: “have no drums here” (watch at 12:03).
“It’s like a sort of a fake out, and you can use this massively to improve your transitions.” He re-enables the EQ filter on the drums and rides its frequency up and down, and makes sure the phrase doesn’t end on the snare, so the fake-out lands. The flanger doesn’t suit this one, so he leaves it off.
Listen: the fake-out transition into the next 1612 sec
“Without adding any new sounds to our project, we’ve already built a basic structure for an intro build-up and the transition onto the next 16” (watch at 13:55). Risers, uplifters, samples and vocals all add more audio cues for the listener, but the drums and the bass from your project are enough to start.
Common mistakes when turning a loop into a drop
- Perfecting the loop forever. Icicle arranges before every sound is finished, because the framework shows what is missing.
- Working zoomed in. If you can only see eight bars, you can’t judge the shape of the track. Fit the whole song on one screen.
- Copy-pasting the same 16. Give each 16 a job: open, rowdier, more subdued.
- Starting every layer on bar one. Bring top layers and stabs in after 8 or 16 bars and let filters open over time.
- No fills. Mark the end of every 16 with a variation, a pitch drop or a drum edit.
- Stacking more and more. When you add a heavier layer, turn others down; Icicle pulled them back 3 dB.
- Dropping in from nowhere. Build tension with filtered drums, echo, a kick roll and resampled bass, and cut the build-up the moment the drop hits.
- Transitions that never surprise. A bar without drums, a fake-out, makes the next 16 hit harder.
Free download
Sounds to practise your first drop with
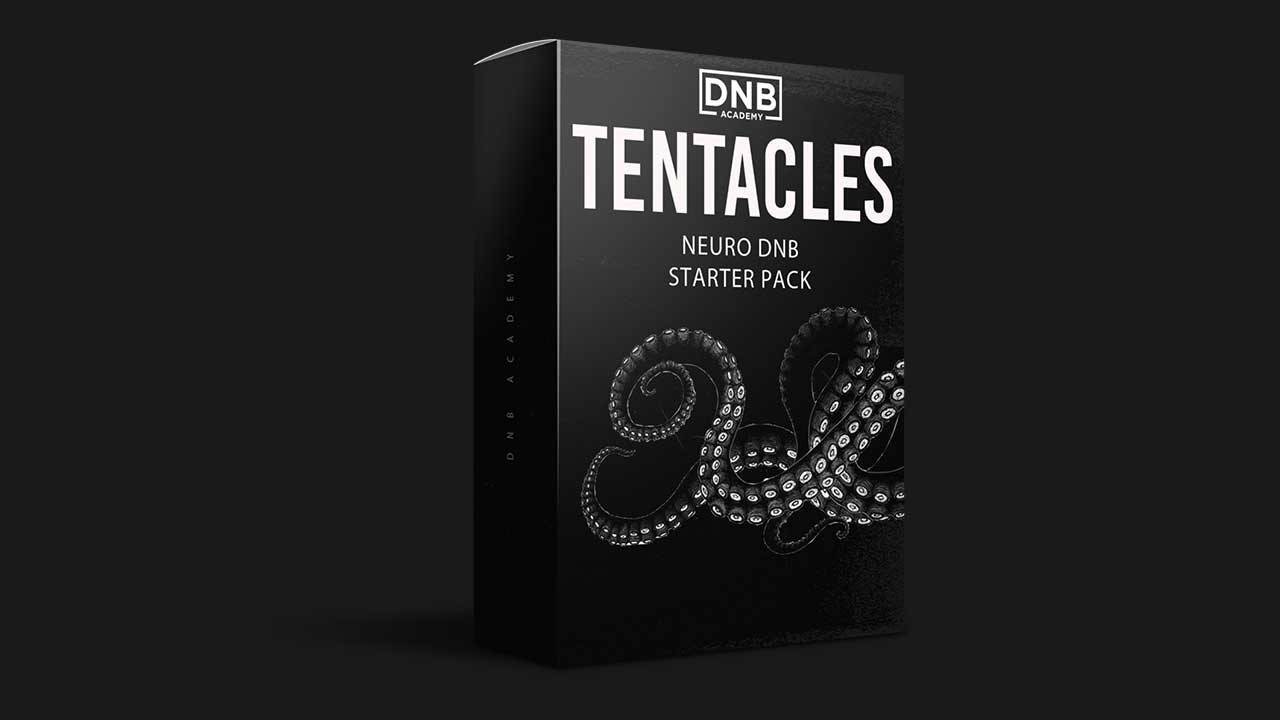
No loop to arrange yet? The Tentacles Neuro DnB Starter Pack gives you the raw material for one, ready to drop into Ableton Live or any DAW:
- 15 kicks, snares and top loops for heavy drums
- 25 neuro bass samples
- 10 FX samples
- 50 royalty-free samples in total, with Ableton project files
It’s one of seven free sample and preset packs in DNB Academy Free Access, along with the mixing and mastering e-books and the 3‑day DnB challenge. Join 40,000+ producers in Free Access. Free account, no card needed.
Go deeper
The full tracks, from first kick to master
Icicle’s video is a chapter from a full start-to-finish course. Want to see whole tracks arranged, or the sounds used?
 Production courseIcicle production courseA professional DnB track from the first kick transient to mastering, in 4+ hours of video, including rough arranging, with the project file, stems, samples and Vital and FM8 presets.
 Production courseMolecular production courseTwo techy DnB tracks built from scratch in 14+ hours, with lessons on filling out the drops and arrangement, plus project files, stems, samples, presets and Ableton racks.
 Preset bundleIcicle Vital preset bundleVital presets for deep, techy drum and bass, for the free synth used in the video.
Every artist course, preset bundle and sample pack is also in The Vault. Browse courses
Related tutorials
All tutorials →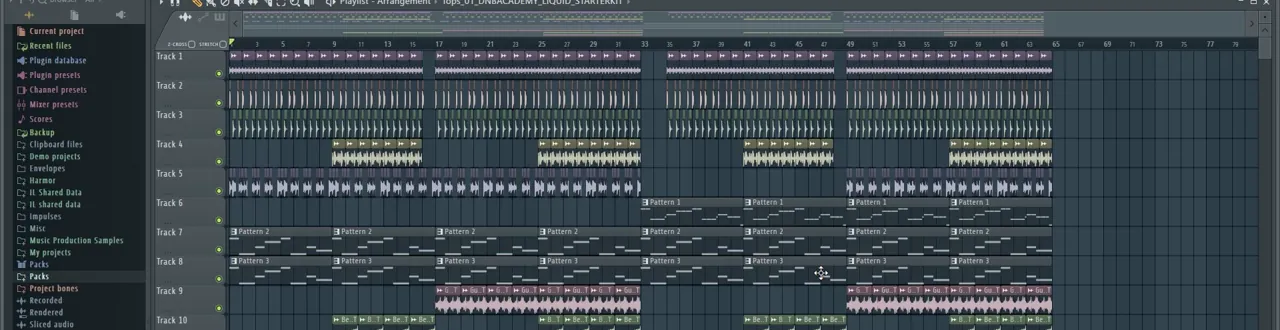 Guide · ArrangementDrum and Bass BPM & Song Structure Guide12 min read · Guide
 Vital · NeuroHow to Make a Neuro Stab Bass in Vital with Icicle8 min read · Video + guide
 Bass · PatternsNeuro Bass Patterns: Call and Response Basslines8 min read · Video + guide
 Guide · BeginnersHow to Make Drum and Bass: A Step-by-Step Guide19 min read · Guide
FAQ: drum and bass drops
How do you turn a loop into a drum and bass drop?
Zoom out so the whole track fits on one screen, move the loop to where the drop starts and split the drop into 16-bar sections that each change something. Add a fill at the end of every 16, bring layers in later, open filters over time, then build tension into the drop and use a fake-out for the transition.
How long is a drum and bass drop?
There is no fixed length, but DnB drops are built from 16-bar sections. In our video Icicle sketches a 32-bar intro followed by a drop of three 16s: an open first 16, a rowdier second 16 and a more subdued third 16 where the pads come back.
How do you make a build-up in DnB without samples?
Use the drums and bass you already have. In our video Molecular automates a filter that sweeps down while the drum volume rises, adds a quarter-note echo and a flanger that speeds up, programs a resonant kick roll, and resamples the bass an octave up with echo, reverb and OTT.
What is a fake-out in drum and bass?
A fake-out is a moment where the track sets up a hit and then holds it back, for example by taking the drums out for a bar or two before the next section. Molecular uses one between 16s and calls it something you can use massively to improve your transitions.
How do I stop getting stuck making 8-bar loops?
Start arranging early, before every sound is finished. Lay the loop out as an intro and three 16-bar sections, then fill the gaps one by one. Icicle says this gives him a big framework to fill in, so the timeline tells you what to make next.
What BPM should a DnB drop be?
Drum and bass usually sits around 170 to 176 BPM. Icicle’s project in our video runs at 172 BPM and Molecular’s at 174 BPM. The drop runs at the same tempo as the rest of the track.
Next steps
Take the loop you have been stuck on, move it to bar 33, give the drop three 16s with different jobs and add one build-up and one fake-out. If you keep ending up with 8-bar loops, that is the most common beginner problem we see, and the part where structured feedback helps most:
Free Access
Seven free DnB sample and preset packs, including the Tentacles Neuro DnB Starter Pack with Ableton project files, plus e-books and a 3-day challenge.
Get free packsThe full guide
Tempo, drums, sub, mid bass, chords, arrangement and mixdown: every step of a DnB track.
Read the guideDNB Foundations
A structured drum and bass course with weekly live feedback calls, to take your loops all the way to finished tracks.
See Foundations1:1 Mentorship
Personal guidance on your music from a mentor, built around your goals, including getting tracks finished.
See the mentorship50,000+ producers have joined DNB Academy, and our producer Discord has 5,300+ members.